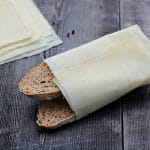
Beeswax Food Wraps
I’ve always wanted some kind of alternative to plastic wrap, and these can even be used in place of zip top bags as well. Read on and I will show you how to make beeswax food wraps!
Servings 4 12 sq. in. wraps
Cost $13.00
Equipment
- 1" Wide Paintbrush
- Clothes Drying Rack
Ingredients
- ¼ cup beeswax
- 2 tablespoons pine resin
- 1 tablespoon jojoba oil
- 4- 12" x 12" squares cotton muslin
Instructions
- Preheat the oven to 225°F and line a baking sheet with parchment paper.
- Melt the pine resin in a double boiler (I use a glass pyrex measuring cup in a pot of boiling water) over medium heat. It takes a while for the resin to fully melt, but once it does add the beeswax.
- Stir using a wooden or bamboo stick until the resin and wax are completely melted together.
- Slowly drizzle in the jojoba oil. Turn the heat to low to keep it all melted.
- Place one square of muslin on the parchment and use the paintbrush to brush it all over with the beeswax mixture.
- Place the baking sheet in the oven just long enough to fully melt the beeswax. It should only take a couple of minutes.
- Take it out of the oven and spread the beeswax around again with the paintbrush, so that the whole muslin cloth is coated evenly.
- Then take another square of muslin and lay it on top of the first square to blot up the extra wax. Flip the two squares over so that the blotting square is now on the bottom.
- Return the baking sheet to the oven briefly, just long enough to liquefy the wax.
- Remove from the oven, and hang the first piece of beeswax coated muslin on a clothes drying rack to dry.
- Use the paintbrush to spread the wax on the blotting square, which is now your working square, and repeat the whole process again. Once they are all dry, they are ready to use!
Notes
Store the wraps as you would other kitchen linens.