Hello my friends! I have a great post for you today, something a little bit different. I recently had the chance to go through a really cool book all about beeswax and what you can make and do with it called The Beeswax Workshop by Chris Dalziel. You might know Chris from the blog Joybilee Farm as she is always doing fun DIY and herbalism projects over there. She was kind enough to let me share a recipe from her new book, so I decided to make the beeswax food wraps. I’ve always wanted some kind of alternative to plastic wrap, and these can even be used in place of zip top bags as well. Read on and I will show you how to make beeswax food wraps!

Want to save this post for later?
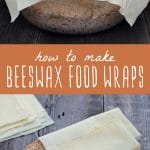
Beeswax Food Wraps Recipe
These beeswax food wraps are not hard to make, but they do take a little bit of time, so plan ahead for that. This recipe makes four wraps, but it’s easy to double the recipe if you want to make more.
Cut the muslin cloth to whatever size works best for you, or even different sizes if you wish. You can use pinking shears if you want to make the edges fancy (I didn’t, because I don’t own any pinking shears).
The pine resin is probably the hardest ingredient to come by, but I was able to find a good source on Amazon. Beeswax pastilles are probably the easiest form of beeswax to use here, or you can do what I did and grate some off a block of beeswax.
Ingredients
- ¼ cup beeswax
- 2 tablespoons pine resin
- 1 tablespoon jojoba oil
- 4 squares of 100% cotton muslin fabric (I used 12″ squares)
Equipment
- small saucepan
- glass pyrex measuring cup
- parchment paper
- baking sheet
- 1″ wide paintbrush
- clothes drying rack
Beeswax Food Wrap Directions
Melt the pine resin in a double boiler (I use a glass pyrex measuring cup in a pot of boiling water) over medium heat.
 It takes a while for the resin to fully melt, but once it does add the beeswax.
 Stir using a wooden or bamboo stick until the resin and wax are completely melted together. Then slowly drizzle in the jojoba oil. Turn the heat to low to keep it all melted.
Preheat the oven to 225°F, and line a baking sheet with parchment paper. Place one square of muslin on the parchment and use the paintbrush to brush it all over with the beeswax mixture.
 Place the baking sheet in the oven just long enough to fully melt the beeswax. It should only take a couple of minutes. Take it out of the oven and spread the beeswax around again with the paintbrush, so that the whole muslin cloth is coated evenly.
Then take another square of muslin and lay it on top of the first square to blot up the extra wax. Flip the two squares over so that the blotting square is now on the bottom. Return the baking sheet to the oven briefly, just long enough to liquefy the wax. Remove from the oven, and hang the first piece of beeswax coated muslin on a clothes drying rack to dry.
Use the paintbrush to spread the wax on the blotting square, which is now your working square, and repeat the whole process again.
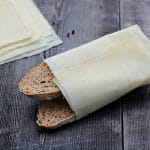
 Once they are all dry, they are ready to use! They work perfectly for covering bowls, just as you would use plastic wrap. The beeswax can be warmed in the hands and will conform to the bowl and stick to the rim. The pine resin gives it some stickiness as well. I used it to cover my no knead sourdough bread dough overnight and it worked really well!
 They also work great as sandwich or snack wraps, as they gently stick together keeping things in place.
 To clean, Chris says to wash in cool to warm water (not hot) with mild detergent, and hang to dry.
 I highly recommend The Beeswax Workshop book, there are so many great recipes! From candles to soapmaking, bath and beauty, and even recipes for beeswax crayons and garden tool handle preservatives. There are so many that I want to try!
I love these beeswax food wraps and I know they will become a mainstay in my kitchen! What have you made using beeswax?
Beeswax Food Wraps
Equipment
- 1" Wide Paintbrush
- Clothes Drying Rack
Ingredients
- ¼ cup beeswax
- 2 tablespoons pine resin
- 1 tablespoon jojoba oil
- 4- 12" x 12" squares cotton muslin
Instructions
- Preheat the oven to 225°F and line a baking sheet with parchment paper.
- Melt the pine resin in a double boiler (I use a glass pyrex measuring cup in a pot of boiling water) over medium heat. It takes a while for the resin to fully melt, but once it does add the beeswax.
- Stir using a wooden or bamboo stick until the resin and wax are completely melted together.
- Slowly drizzle in the jojoba oil. Turn the heat to low to keep it all melted.
- Place one square of muslin on the parchment and use the paintbrush to brush it all over with the beeswax mixture.
- Place the baking sheet in the oven just long enough to fully melt the beeswax. It should only take a couple of minutes.
- Take it out of the oven and spread the beeswax around again with the paintbrush, so that the whole muslin cloth is coated evenly.
- Then take another square of muslin and lay it on top of the first square to blot up the extra wax. Flip the two squares over so that the blotting square is now on the bottom.
- Return the baking sheet to the oven briefly, just long enough to liquefy the wax.
- Remove from the oven, and hang the first piece of beeswax coated muslin on a clothes drying rack to dry.
- Use the paintbrush to spread the wax on the blotting square, which is now your working square, and repeat the whole process again. Once they are all dry, they are ready to use!

Can I use almond or apricot seed oil in place of jojoba, I don’t have it
Yes, that should work fine!
Is it only muslin cloth that you can use for this?
How many grams of the beewax is in ¼ cup
I have a block of beewax to use, and I will have to cut it in small pieces
Thanks
There is a button in the recipe to convert it to metric. 1/4 cup of beeswax is 60g.