Hello my gardening friends! As I alluded to in my recent updates post, I have a really cool project to share with you today. If you’ve been reading my blog for a little while then you know that I’m big into permaculture, and my husband Joel is even more so than me. He has taken the PDC (Permaculture Design Course) along with other courses, and has also done a lot of work in the field. If you don’t know what permaculture is, you can start by reading my Permaculture 101 series: The Basics, Zones, and Forest Gardens. I’m sure more will be added to this series over time as well, as permaculture is a huge topic! But for now Joel and I are going to go in depth on how to build a permaculture swale planting bed.
 I’m sure the word “swale” might have perked your interest as it’s maybe something you haven’t heard before, so I’ll start there. In designing a permaculture based landscape, swales can be in integral part of the bigger picture. Swales are ditches dug following the contour lines of the land. The purpose of a swale is to prevent erosion and to keep water on your land as long as possible. The material is dug out and placed on the downhill side, and the base of the swale ditch is dead level for it’s entire length. Water will collect in the swale, permeating into the ground and providing deep watering for the planting mound that’s created.
This planting mound, or bed, can be created in many ways. The easiest way is to use the topsoil excavated from the swale itself, but often other materials are already on hand and can be incorporated into the mound design. I call this a debris mound, and it’s not so different than building a compost pile.
When choosing the placement of your swale there may be grass, weeds, brambles, leaves, bushes or even small trees that are in the way of the excavation (make sure none of these plants are valuable and consider transplanting if that’s the case). These materials can all be, and in my opinion should be, built into the mound.
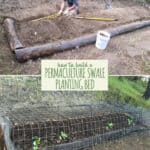
Now to start. This may seem backwards, but you actually build the mound before digging the swale. Gather the largest pieces of debris, roots, tree trunks, limbs and branches and place them on the contour where the mound will be. Then add a layer of green material like weeds, grass or brambles. Then go with a layer of brown material like leaves, cardboard, or old straw.
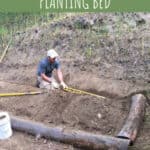
 Then dig out the swale, placing the topsoil on top of the debris. You can use downed logs or big rocks if you wish to “frame” the bed in.
 Make sure the base of the swale is level so that you don’t get water run off.
 If you’ve got compost or potting soil, top the mound with this. If not, just plant into it as is.
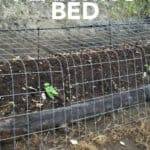
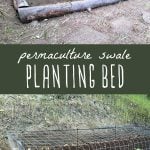
 Depending on where you have your swale bed you may want to add some protection from deer and other wildlife. Joel build a simple deer cage around this bed made from two cattle panels (4′ x 16′ welded wire) cut in half with bolt cutters. They are then bent or folded to form roughly a 90° angle. Next they are placed onto a rebar frame that is zip tied together.
 The panels are then zip tied to the rebar frame.
 This allows the panels to be lifted in place for easy access to your garden bed.
 The ends are covered with hardware cloth or chicken wire.
 In our swale planting bed, the rear section is up against a slope so steep that it doesn’t need protection. If yours is on a flat area you will want to enclose all sides with something if you are worried about wildlife getting to your bed.
 Now all you have to to is plant seeds and starts! We planted pretty intensively, with a large variety of seeds, trying to get the most out of a small area. The bigger plants you see are squash starts, but we also planted seeds of summer and winter squash, cucumbers, sunflowers, amaranth, turnips, beets, chard, carrots, collard greens, chives, nasturtium, hyssop, bee balm, and calendula as well as some seed potatoes. There’s probably others that I’m forgetting as well!

Potato, collard greens and butternut squash seedlings
As you can see we planted things really close, but it doesn’t concern me too much. Plants mature at different rates and we’ll thin as needed. It will become a mini food forest, I hope!

Amaranth and collard greens seedlings
Making this bed took a good day or two of work, but in reality it wasn’t that difficult to build. It’s a great way to use rainwater to your advantage by allowing it to soak right into your bed. You can even take it a step further and make it into a hugelkultur bed, which is similar, but bigger and with downed or rotting logs buried under the mound. The idea here is that once the buried wood has soaked up water from the ground and permeating rainfall it will slowly release this moisture to the planing bed built atop it. Also, as the wood decays and breaks down it releases nitrogen into the soil to help with plant growth.
As you can see there are so many different permaculture ideas to help you with growing more plants. The really cool thing is that once you have these systems in place it means less work for you in the future. I am so excited about our new planting bed and I can’t wait to reap the bounty at the end of the summer. It will be a fun experiment and I’ll keep you updated on it’s progress!
If you’re ready to jump into creating a permaculture landscape around your home, start with our Permaculture Gift Guide, 12 Best Permaculture Books for Garden Planning or one of these great Backyard Permaculture Projects!

Thank you for this! I know you can use the permaculture swale method on a small scale for veggies and don’t HAVE to grow trees, but I’ve been having a really hard time finding people’s examples. I really appreciate this. Question – do you plant at the highest point on the berm or on the down slope of the back side of the berm? In one pic it looked like the back side.
Just how tall is the grid? Once the amaranth, chard, collards, squash and other plants grow up through the grid, how do you keep the deer from eating the top growth? There aren’t that many plants that stay short. Also, once the plants have grown through the grid, it seems like it would be hard, if not impossible to lift it off for weeding and even harvesting some plants like squash. How do you reach the area against the slope to weed it? Seems like an awkward reach from the front. If you haven’t gone through at least one growing season, how do you know this will work?
I have a similar idea that i call “open book planting beds” but i use a recycled pallet to “divide” a paired bed that directs water into the bed were the plant roots are. http://www.allotment-ideas.co.uk/open-book.
But essentially both our ideas are along the same lines.
I read a book on native American techniques. They never mention watering… but they always grew on bends in rivers
I like this idea enough that I built one in my backyard a couple years ago. It’s close enough to the house that I was able to divert my roof runoff into it. I like the deer-proof cage idea. If I ever get out of the city, I’ll definitely keep that one in mind.
Did you plan a place for runoff on one end in the case that the swale overflows? I would hate to see the growing bed washed away during a downpour.
Yes, there is a place for water runoff on one end, although here in southern Oregon we have extremely dry summers so it’s really no threat to our plants until fall/winter.
The photos and step-by-step instructions are extremely helpful. Thanks for such a timely article.
I was just thinking of how to do this last night – you read my permaculture mind! Thanks so much!
This look very interesting. I’m going to have to remember this for when I finally save up enough to buy my land.
Thanks for sharing.
awesome stuff here, If I was in the PNW I also would enjoy having a place
1) where there is actual water (rain) 2) having a place to do this -no woods in central valley, CA :(
3) guess I’ll just have to be a city girl and used my raised beds.
When we first started we did our own mulch. So easy to take any food scraps (no meat!) and put
them into a hole, also newspapers & cardboard and cover with dirt every time. We would water them
sometimes. The mulch makes such great worms!
SO nice to see worms in a garden! after all, they are our workers under the soil!!!