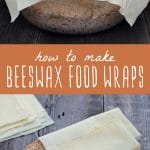
Hello my friends! I have a great post for you today, something a little bit different. I recently had the chance to go through a really cool book all about beeswax and what you can make and do with it called The Beeswax Workshop by Chris Dalziel. You might know Chris from the blog Joybilee Farm as she is always doing fun DIY and herbalism projects over there. She was kind enough to let me share a recipe from her new book, so I decided to make the beeswax food wraps. I’ve always wanted some kind of alternative to plastic wrap, and these can even be used in place of zip top bags as well. Read on and I will show you how to make beeswax food wraps!

Want to save this post for later?
Beeswax Food Wraps Recipe
These beeswax food wraps are not hard to make, but they do take a little bit of time, so plan ahead for that. This recipe makes four wraps, but it’s easy to double the recipe if you want to make more.
Cut the muslin cloth to whatever size works best for you, or even different sizes if you wish. You can use pinking shears if you want to make the edges fancy (I didn’t, because I don’t own any pinking shears).
The pine resin is probably the hardest ingredient to come by, but I was able to find a good source on Amazon. Beeswax pastilles are probably the easiest form of beeswax to use here, or you can do what I did and grate some off a block of beeswax.
Ingredients
- ¼ cup beeswax
- 2 tablespoons pine resin
- 1 tablespoon jojoba oil
- 4 squares of 100% cotton muslin fabric (I used 12″ squares)
Equipment
- small saucepan
- glass pyrex measuring cup
- parchment paper
- baking sheet
- 1″ wide paintbrush
- clothes drying rack
Beeswax Food Wrap Directions
Melt the pine resin in a double boiler (I use a glass pyrex measuring cup in a pot of boiling water) over medium heat.
 It takes a while for the resin to fully melt, but once it does add the beeswax.
 Stir using a wooden or bamboo stick until the resin and wax are completely melted together. Then slowly drizzle in the jojoba oil. Turn the heat to low to keep it all melted.
Preheat the oven to 225°F, and line a baking sheet with parchment paper. Place one square of muslin on the parchment and use the paintbrush to brush it all over with the beeswax mixture.
 Place the baking sheet in the oven just long enough to fully melt the beeswax. It should only take a couple of minutes. Take it out of the oven and spread the beeswax around again with the paintbrush, so that the whole muslin cloth is coated evenly.
Then take another square of muslin and lay it on top of the first square to blot up the extra wax. Flip the two squares over so that the blotting square is now on the bottom. Return the baking sheet to the oven briefly, just long enough to liquefy the wax. Remove from the oven, and hang the first piece of beeswax coated muslin on a clothes drying rack to dry.
Use the paintbrush to spread the wax on the blotting square, which is now your working square, and repeat the whole process again.
 Once they are all dry, they are ready to use! They work perfectly for covering bowls, just as you would use plastic wrap. The beeswax can be warmed in the hands and will conform to the bowl and stick to the rim. The pine resin gives it some stickiness as well. I used it to cover my no knead sourdough bread dough overnight and it worked really well!
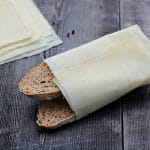
 They also work great as sandwich or snack wraps, as they gently stick together keeping things in place.
 To clean, Chris says to wash in cool to warm water (not hot) with mild detergent, and hang to dry.
 I highly recommend The Beeswax Workshop book, there are so many great recipes! From candles to soapmaking, bath and beauty, and even recipes for beeswax crayons and garden tool handle preservatives. There are so many that I want to try!
I love these beeswax food wraps and I know they will become a mainstay in my kitchen! What have you made using beeswax?
Beeswax Food Wraps
Equipment
- 1" Wide Paintbrush
- Clothes Drying Rack
Ingredients
- ¼ cup beeswax
- 2 tablespoons pine resin
- 1 tablespoon jojoba oil
- 4- 12" x 12" squares cotton muslin
Instructions
- Preheat the oven to 225°F and line a baking sheet with parchment paper.
- Melt the pine resin in a double boiler (I use a glass pyrex measuring cup in a pot of boiling water) over medium heat. It takes a while for the resin to fully melt, but once it does add the beeswax.
- Stir using a wooden or bamboo stick until the resin and wax are completely melted together.
- Slowly drizzle in the jojoba oil. Turn the heat to low to keep it all melted.
- Place one square of muslin on the parchment and use the paintbrush to brush it all over with the beeswax mixture.
- Place the baking sheet in the oven just long enough to fully melt the beeswax. It should only take a couple of minutes.
- Take it out of the oven and spread the beeswax around again with the paintbrush, so that the whole muslin cloth is coated evenly.
- Then take another square of muslin and lay it on top of the first square to blot up the extra wax. Flip the two squares over so that the blotting square is now on the bottom.
- Return the baking sheet to the oven briefly, just long enough to liquefy the wax.
- Remove from the oven, and hang the first piece of beeswax coated muslin on a clothes drying rack to dry.
- Use the paintbrush to spread the wax on the blotting square, which is now your working square, and repeat the whole process again. Once they are all dry, they are ready to use!

Your way of presenting the article is wonderful. The way you have presented this article is amazing. Thank you for sharing this great article.
Thank you.
Thank you for sharing this information about how to make beeswax food wraps. I really liked your way of presenting this article.
The information that you have provided through this article was really very helpful. Thank you for sharing.
You’re welcome.
Followed tutorial to the letter but my cloths are not sticky and do not adhere to bowl or themselves. How do I make them more functional? thanks
Which side of the fabric (printed or unprinted) needs to face up in the oven? Or does it not matter because the wax seeps through?
i have been making wraps and they have lost their stickiness and feel really dry. we were given a block of beeswax (which was not yellow like the stuff i got online) – can the quality of the beeswax affect the result or have you any ideas?
Mine are super sticky and leave a residue on my hands. Any suggestions about what to do?
I have bees & was wondering if you could use propolis in place of pine resin. The bees make the propolis out of tree resin & it is very sticky.
You could try! I’ve never tried it so I’m not sure how it would work.
I am an encaustics artist and I use beeswax with Damar resin. Do you think that would work?
Just finished making a bunch of these. This is the perfect recipe and method. There wasn’t enough resin to be super sticky and the jojoba oil smoothes everything out. The first two cloths went well, then it seemed a bit too heavy. The beauty of this method is that you blot off the excess with more cloth.
Tips I learned: Let the resin totally melt. It takes a while, even with powdered resin, which I recommend.
Don’t worry about overdoing it. Just lay another cloth over the saturated one and put it back in the oven to soak up the extra. I even took some that were drying and put them back in the oven to make one last cloth.
I found, since it is a bit colder here in Michigan right now, that 4 to 6 minutes worked well as time to melt in the oven.
Go get the $1 bandanas from WalMart (or other bandanas, since I am aware Wal-Mart is evil;) )for your big cloths. I had some already, and they said 100% cotton, so I went for it. I also used muslin for the smaller dimensions.
Wipe out your melting vessel and tools with your last cloth to minimize clean up. Use any overly-saturated cloths for melting onto your last cloth, if you are running short.
These were an easy project, and I had fun. I am testing them for Christmas presents. There is no way anyone should pay $13 for a 3-pack of these. I barely used any of the ingredients, so now I get to learn about things to make with pine resin and beeswax!
Thank you for all of your tips!
Hi
I made my wraps following the recipe and they do feel sticky and leave a residue on bowls. Any suggestions on how to resolve that issue? Thanks!
How do I clean the resin and beeswax out of my bowl that I used to make the wraps? Suggestions?
Several rinses of boiling water might work – I try to use a container that is specifically just for that purpose.
Try heating it up again and sopping it up with paper towels, then washing. Honestly, from my experience it might not work. If it does and you do this again, pull a can out of your recycling and wash and dedicate it. A wooden chop stick works as a sacraficeable stirrer.
I’m wondering if there’s any way to make little bags?
Hello, first of all thank you! This was a great tutorial and I love your blog. I have a question though, since I made these according to your recipe and I had a problem because the rosin wouldn’t melt! It turned into a gummy blob that is like taffy, but never was liquified. I decided to add the beeswax to see if it would help it to become liquid, but it just didn’t work. So I stirred it as much as I could, added the jojoba, and made the wraps, hoping that at least a tiny bit of rosin was added. Previously, I tried this using a different method (grate the wax and add the rosin on top of the cloth without melting it, then using the oven as in your method) and I have weird sticky blobs of rosin on the cloth and too much wax. I still use those, but I have to keep them in the fridge, and they leave a sticky residue on the containers I use them with. I made these for a birthday party (with an “eco theme”!) and overall I like this method better, and the cloths came out more pliable than the previous ones but I just am so curious about the rosin! What did I do wrong? I saved it in the container so I can still use it if possible! I haven’t used the cloths to see if they stick as well without the rosin. Thanks!
I made these using very thin ladies’ hankies I found on .Amazon. I followed the recipe and directions to the letter. I didn’t like the “feel” of the finished product. The residue left on my hands felt horrible! I had only used 6 of the 12 hankies I had bought. I kept thinking about how to change the recipe to make them more to my liking. I hit upon the idea of placing them back in my oven on a fresh sheet of parchment paper, interspersing the already made wraps with the 6 remaining. I put them in a 200 degree oven until they were warmed through, then placed another sheet of fresh parchment paper over the stack and smoothed the stack, pressing as hard as I could, hoping any excess beeswax mixture would soak through to the “fresh” hankies. It worked like a charm!
Hi, thank you post this tutorial, amazing!!
My beeswax keeps leaving a residue, is this normal?
What I am doing wrong? Thanks!!!
How long will these be reusable? Can the same cloths be refreshed by doing the treatment again, or should they be disposed of? How should they be cleaned between uses?
Thanks for the recipe. I would love to eliminate plastic wrap waste.
Does the pine resin need to be powdered?
Hi Josie, I used pine resin and it was powdered and it didn’t work well, so I’m now wondering the same thing!
Love the idea and another way of zerowaste. Thx for sharing!
I’m wondering about the resin you are using, I’ve read that some powdered resins have additives in them. Where do you get your resin..also wondering how long it takes to melt on the heat settings you talk about. Great post!
What is the purpose of joboba oil, please?
Jojoba oil will help to keep the wax and resin soft and pliable so that it won’t crack and peel off as easily. Jojoba oil also has natural antibacterial properties. It is actually more like a liquid wax rather than an oil and will not go rancid like most oils will.
How do you store the wraps between use?
I simply fold them up and keep them in a drawer in my kitchen.
I had a very difficult time trying to melt the resin…..finally gave up and just used the beeswax and jojoba. Seems to have worked that way.
The resin takes a LONG time to melt. It becomes a goopy solid mass first. Then add the bees wax. Let the bees wax melt then take two chopsticks and break the resin into smaller pieces. It takes a long time, but eventually will melt into a homogenous liquid. Then add the jojoba oil.
Same! I tried this twice, with measuring cup in water, and again with double boiler. Resin would only turn to taffy, and never melted with bee’s wax. Enormous mess, and much disappointment.
Hi
I tried to make it. But is feels very soft and not as firmer as I like. Is there anything else I can do for next time?
Use less resin. The resin is what softens the wax and makes it less brittle.
The pine resin you used is not food grade, would food grade frankincense resin work instead?
I’m not sure, I’ve never tried it. I don’t think there is any problem with using the pine resin that I linked to though, as there is nothing toxic about it :)
If you are looking for a food grade resin then try this on Amazon or http://www.jennyjoyssoap.com
Organic Pinon (Pinyon) Pine Refined Resin Incense & Aromatherapy from Arizona 2 oz. http://amzn.to/2sfQDiK
I know several people who have used this product for making reusable food wraps as well as medicinal salves, beard balms, incense and soaps. If the Pinon fragrance is too strong try blending lemon essential oils at the end while its cooling down. I’ve made these myself and once the Pinon cools on the fabric it’s not that noticeable. Also when it’s in the fridge I haven’t noticed any difference in aroma.
Pinon pine resin is naturally antibacterial, antiseptic, antimicrobial so it works very well in the things mentioned above.
There are also tutorials on the website with “how to remove the resin from the container” using a double boiler. It comes in a 2 oz size. Use the extra for making salve or incense if it’s too much for your food wraps. You can also see the posts on Amazon about the directions a customer used from the same book identified in this blog. If you have additional questions, please feel free to email us at jeniferwassell@gmail.com
Hope this is helpful!
Wow, I had no idea! Great post. Thanks for sharing!
This looks like a great idea. I have seen several recipes for making beeswax wraps, but yours is the only one, so far, that adds a resin. What does that ingredient add to the wrap?
It makes it a little more sticky so that it will stick to the top of bowls better.
Wow, way cool! Will defiantly have to try. I also hate using plastic wrap to cover stuff. Now just to get my hands on some of the ingredients.
I have been wondering how to make these! I have seen them in the health
food store but they are sooo expensive. Now I know how to make my own. Very happy. Thank you! (Love your blog).
Wow ! Neat idea. What else have you made from beeswax?
Does the pine resin taste/smell migrate into the foods the wraps are covering?
Did you ever get a reply to your question? I’d like to know, too, whether the taste/odor transfers to the food.
Not that I have noticed.
Coleen: I just ordered the book. Thank you so much for this post. Something happened to the unbleached brown waxed paper I used to use ((for years)) and my natural grocery store stopped selling it, replacing the old one, which I purchased for something like $2.00+ w/a new brand that sells for $5.45! Yikes… and I use tons of it for wrapping the raw meat that I feed my dogs. I do a lot of cutting/wrapping/freezing and then throw away the paper via recycling.
Do you think this stuff w/work for wrapping meat? Do you think I can recycle/reuse several times before throwing it away? I’m thinking of the cost and of course the Planet Earth.
Thanks for your thoughts!
Vicki and dogs (Katie and Walter)
It may work for wrapping meat if that is all that you used it for. I do think you could probably use them a few times before discarding, or you might even be able to wash them (in cold water) a few times, too.
Using for raw meat is normally not recommended because you need to wash with cold water and can’t really sanitize while keeping the wax in the cloth. It’s too great a risk for bacteria to grow, especially since these are reusable. Depending on how often you use them they can last between a few months to a year.
As a nurse, I would advise Do not use to wrap raw meat. I love these wrappers made with beeswax but never on raw meat. I too hate to use and throw away anything but on this note with raw meat.
: Always err on the side of safety.
Can’t you just pop them back in the oven to re-melt the wax rather than throwing them away once they become a bit cracked? The oven temperature would surely help to sterilise them a bit as well after general use?
will I be able to clean my pyrex? will I need to do anything special to do so.
Have made wax cloths with only using beeswax (from my garden hives) but saw on a commercial package that resin is used. As I have some resin that my husband used to make retsina, Im looking forward to trying this : D
I use an oven bag in my slow cooker far anything I need to use melted bees wax. Works a treat. No mess or hard to clean pots or bowls
No, it doesn’t. I’ve made lots.