Did you know that all you need to make yogurt is yogurt? And milk, of course. That’s why fermenting is so cool! You’re basically transporting a bit of the beneficial bacteria to a new medium so that it will continue to multiply and turn into something even more awesome. It’s actually almost like pre-digestion in a way. Dairy can be hard for a lot of people to digest, but yogurt can help with that, and is one way for people to get good, healthy bacteria into their gut. But, buying organic yogurt can get pretty expensive. If you already have a dehydrator, as many of us homesteaders and food preservers do, you can easily make your own yogurt. Here I will show you how to make yogurt in a dehydrator.
 All you need to make yogurt is a couple of spoonfuls of yogurt and some milk. I prefer to buy organic for both of these items, although if you can get local and/or raw milk that would be even better. Someday I hope I’ll have my own cow so that I don’t have to buy pasteurized and homogenized milk, but for right now that’s what I do.
When you’re making yogurt it needs to be kept at 105°-110° for 8-12 hours. I do this in my Excalibur Dehydrator, a kitchen appliance that I feel every homestead kitchen should have. I really don’t think that it’s worth it to buy a special “yogurt maker” because it only serves one purpose, whereas the dehydrator will be a workhorse for many different applications.
 You can, of course, can make yogurt without any machine at all. If you live in a warm climate you can just wrap your jars in a blanket and it should be plenty warm enough. You could also heat your oven to “warm” and put them in there, just make sure you have an oven thermometer to make sure that it doesn’t get too hot. Another method is to put your jars into a water bath in which you add warm water every so often to keep up the temperature.
How to Make Homemade Yogurt in a Dehydrator
To make 2 quarts of yogurt, heat ½ gallon of organic milk in a pot over medium heat until it gets to 180°F, or right when it starts to bubble up a little (not boil).
 I’m not even sure if this step is even necessary when you’re using milk that is already pasteurized, but it’s what Sandor Katz says to do in his book Wild Fermetation, so that’s what I do. Then take it off the heat to cool. In the meantime, preheat 2 quart size jars with their lids in the dehydrator at 110°.
 Now you’re just waiting for the milk to get down to 110°F. Stirring it with a clean wooden spoon helps to cool it a little faster.
 Continue to check it’s temperature, as you don’t want it to go below 105°F.
 Once it gets down to 110°, add 1 Tbsp of organic plain, whole milk yogurt per quart of milk.
 Whisk it in well to distribute all of the beneficial bacteria throughout the milk.
 Take your preheated jars out and fill them up with the yogurt infused milk. A canning funnel helps.
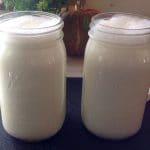
 Fill up both quart jars and put the lids on.
 Put them in the preheated dehydrator. You could probably fit 6 or even 8 quarts at a time if you wanted. I often have infused herbal oils going at the same time. Yogurt lasts for quite a while, so if you have a big family that might be a good time saver.
 Keep at 105°-110°F for 8-12 hours. I find that right around 10 hours is perfect. Don’t agitate it while it’s in the process, just check it after 8 or so hours to see if it’s “yoged”. In my experience, it always is and I’m always excited and totally thrilled about it, like an amazing feat has been accomplished. “Guess what?” I’ll yell at Joel at 10pm on a random night. “The yogurt has yoged, can you believe it?!”
 He’s always amazed (at least he acts like he is!), even though it’s worked every single time we’ve done it. It just seems like a crazy awesome thing for the little bacteria to turn milk into yogurt in 10 hours! My mind is always blown when I take the lid off and actually see yogurt instead of milk, and always go to bed happy knowing that we’ll have a fresh yogurt bowl for breakfast the next morning.
 With blueberries, walnuts and cinnamon, of course! That’s all you need! Maybe a drizzle of honey if you’re so inclined. It’s also delicious swirled into Pumpkin Coconut Almond Granola. Let me tell you, this yogurt will be the best you’ve ever had, rich and creamy. Just make sure to save a couple of tablespoons for your next batch!
Have you ever made homemade yogurt? What method do you use?
Ready to take your home dairy to the next level? Try making a few simple homemade cheeses like Rennet Cheese or Milk Kefir Cheese!
Homemade Yogurt
Instructions
- Heat 1/2 gallon of organic milk in a pot over medium heat until it gets to 180°F. (Right when it starts to bubble up a little, not boil.)
- Then take it off the heat to cool down to 110°F. (Do not let it go below 105.)
- In the meantime, preheat 2 quart size jars with their lids in the dehydrator at 110°.
- When the milk reaches temperature, add 1 Tbsp of organic plain, whole milk yogurt per quart of milk.
- Whisk it in well to distribute all of the beneficial bacteria throughout the milk.
- Take your preheated jars out and fill them up with the yogurt infused milk. (A canning funnel helps.)
- Fill up both quart jars and put the lids on.
- Put them in the preheated dehydrator. (You could probably fit 6 or even 8 quarts at a time if you wanted.)
- Keep at 105°-110°F for 8-12 hours. Do not disturb while the milk is culturing.
Notes
- You can help cool the milk to 110°F more quickly by stirring it with a clean wooden spoon or placing the pot in a sink filled with cold water so that the water goes halfway up the outside of the pot.

How long will this yogurt keep in the refrigerator? And if I freeze the yogurt, will that kill the probiotics?
Homemade yogurt will typically keep in the refrigerator for about 1 to 2 weeks. As for freezing, it won’t kill all the probiotics, but it can reduce their potency
I’ve had this same dehydrator for 20 years and now I’m kind of mad that I never noticed it says YOGURT right on the temperature label.
… I am interested in using my Cosori dehydrator to make Dr. William Davis’s yoghurt recipe for fermented yoghurt … using probiotics from tablets or capsules as the starter in order to culture a very specific bacteria … it cannot get over 100 degrees and it is incubated for 36 hours … my concern is whether or not the milk will stay a consistent temperature throughout the mix … if this doesn’t work I may try my food warmer drawer …
Hi Texas Terri… did you try this with your Cosori dehydrator? I am contemplating the same process and same dehydrator since it has temperature controls. I would be interested to see if it worked for you (for l. Reuter, etc.)
Thank You for your clear concise directions.
One question if I reduce the size of the jars should I also reduce the time ?
No. It takes the same time for the yogurt to develop regardless the batch size.
Just made my first batch and it totally worked! How can I get the results to be a thicker yogurt? Does it need longer in the dehydrator, or should I heat it to 180 for a bit longer to evaporate more of the water out? Or is there something else I can do to make it more like a Thick Greek yogurt?
I go 24hrs for a good thick yogurt. I use my instant pot. You can strain the whey off by using a mesh bag, yogurt mesh container. Be sure and let it rest in fridge for at least 12hrs before you strain it
Add dried milk, about two tablespoons (80ml) to the mix. That helps.
I like thick Greek yogurt so I strain mine with a clean cotton towel or a nut bag overnight in the fridge set in a strainer over a bowl. I just cover it loosely. It works wonderfully.
just check it after 8 or so hours to see if it’s “yoged”.
Yoked??
I’ve try searching, not finding a definition for this … Help?
“yoged” is a term her husband made up on the spot, not a technical term, but makes sense once you’ve seen it happen. ‘Yoged” in this sense is when the milk has essentially congealed or set. Much like Gelatin “Gels”
Hey there,
Do you think it’d be possible to steep some tea in the milk before placing in the dehydrator to flavor the yogurt?
Thanks!
I haven’t tried it, but I don’t see why not! Sounds interesting!
Hi Colleen,
I went to the source book wild fermentation and the author states that you heat the milk to 185 so that the yogurt finishes thick. You don’t have to heat it but if you don’t I assume it will be thin. I don’t think it’s a true pasteurization.
Thank you for a great website.
Thank you!
I tried your recipe with reduced fat milk and yogurt, and it worked ok – it was a lot like kefir, a very thin consistency. (I’ll try tweaking the temperature around and whatnot next time.) More importantly, when I checked on the yogurt after it’s done, at the bottom of the jar I found brown spots around the rim – it looked like mold or burnt milk, but I’m not sure. I threw out the batch just in case. Do you know what this might be?
I have made yogurt with 2% milk and gotten a great set. I found this article and it was a great help. Hope it works for everyone. The Science of Great Yogurt
I’ve tried this three times and every time it comes out separated or curdled. I use organic, non-pasteurized whole milk and live culture yogurt (goat milk). At first I thought I was processing it too hot for too long, but I’ve tweaked it to lower for shorter, and it still separates! Any suggestions??
I would try using regular cows milk yogurt as your starter, that could be part of the problem. Different starter yogurts, even cows milk, produce different results, so that’s where I would start. Also, are you using an Excalibur dehydrator, or a different brand?
About to make my second batch! I love the lack of single use containers, and the fact that I am using far superior ingredients at a fraction of the cost..
I make some of mine in 8 oz mason jars (same time process as quarts) and don’t fill them all the way. That way there is room for fruit, jam, or granola depending on what i feel like that day. That way it is pre-portioned and ready to go.
When checking to see if the milk has lowered to 110 degrees (after it has reached 180 degrees), do you put your thermometer in the middle of the milk to gauge an average temperature? When I measure towards the top, the temperature is, for e.g., 105 degrees, but the milk towards the bottom of the pot is near140 degrees.
Late comment, but might help someone else, when this happens, stir the milk and then take the temperature, the top would cool faster than the bottom. So before you take the temp, give it a quick stir !
Do I have to use plastic caps?
No, but if you use metal lids you will want to put a square of parchment paper in between the jar and the lid, as you don’t want the yogurt to come in contact with metal.
I make my yogurt in half-pint jars (8 oz.) so we can eat a whole jar at a time. I started out putting the jars in the pan part of my electric roaster with warm water in the bottom, and then putting the whole thing in the oven with the light on. I had yogurt in 6 hours using this method, but then the light fixture failed :( So lately I’ve been putting the jars in a pre-warmed ice chest. This works, but …. I really like the look of this dehydrator. It’s probably cheaper than buying a whole new stove just because the light fixture is broken! :D
Way late on an answer to this but, I use my electric roaster as a yogurt incubator. I used a thermometer to find just the right heat setting on the unit and marked the dial setting as 110 degrees. I place a towel on the bottom of the pan, place my soon to be yogurt in the roaster and place towels around the jars if they seem unstable. Turn the dial to my premarked yogurt setting and let it run for 12 hours. Makes amazing yogurt and there was no need for me to buy a yogurt maker or come up with other ways to process my yogurt. I make 1/2 gallon of yogurt a week with this method using a bit of my yogurt to start each batch.
I am new to dehydrating. I am enjoying bit immensely. I have a question about the yogurt. Can you add blueberries or strawberries or any fruit while in the dehydrator to give a different flavor. I am looking forward to reading more recipes. Thank you so much. PS ..how long does it stay good for and do you have to refrigerate it?
Yes you can add some fruit or berries to the bottom of the jar before putting in the milk. It does need to be refrigerated just like normal yogurt and will last for several weeks!
I have used powdered milk for a whole batch before. It works but I thought it gave an unpleasant taste. I prefer the taste of yogurt made from milk especially organic milk.
Wondering if you have done this using probiotics instead of yogurt as the starter?
I have not tried that!
I have tried making it with pro-biotic capsules. I put in 2 capsules of one pro-biotic mix and 1 capsule of another kind, i used inulin and organic cream. I ended up with the freshest tasting sour cream i’ve ever had!
Anyone ever made yogurt with almond milk or another nondairy option?
No, I haven’t, but I know that it can be done!
Yes, Mallorie — I’ve done it with soy-cashew milk following the recipe in Miyoko Schinner’s Artisan Vegan Cheese book. Here’s the recipe that is posted online (with permission): http://www.savvyvegetarian.com/vegetarian-recipes/cashew-yogurt.php. It comes out great, In my experience (using Westsoy soy milk and ample cashews) it turns out as thick as regular cow’s milk yogurt — no need to add any extraneous thickeners. The key is to start off with a non-dairy milk that has enough protein and fat, mimicking the constitution of the mammal’s milk from which traditional yogurt is made. To make it Greek style, just drain a little in a handkerchief (cotton lawn) set in a colander. Drain more and it makes a really nice vegan cream cheese. You can use the drained whey to make oatmeal or in baking..
BTW, thanks, Colleen, for your very good tutorial and pictures for using the Excalibur dehydrator to make yogurt. It’s good to know what temp setting you use and that you get the same consistent results every time!
Can I use your recipe using raw cow milk?
Got it. Sorry I missed the raw milk mention in your post. ☺️
I love your idea of using the dehydrator! But let me ask, have you ever flavored your yogurt? At what stage do you add fruit or whatever other flavoring you might like?
I don’t ever flavor my yogurt as I prefer it plain, or served with fresh berries on top. But I think that if you wanted to flavor it you would add it to the jars at the beginning before pouring in the warm milk. Yogurt doesn’t like to be disturbed during the culturing process.
What I was told and also read many years ago is that it is best to flavor the plain yogurt after you have completed the process. Just make sure to keep some plain yogurt for starter.
Would it be possible to use a toaster oven or a slow cooker with water in the bottom for this recipe? (As long as the temperature stays between 105-110°) I would love to try this, however my dehydrator is individual racks rather than a large unit. Thanks
I just got an Excalibur Dehydrator. I am excited to start diving into making many wonderous goodies with it. I see you have plastic lids for your mason jars. I have only metal. Does it matter with making the yogurt?
I have been making yogurt for about 35 years once upon a time I had an electric yogurt maker with 5 or six little jars then, I made yogurt in a slow cooker but was not crazy about that and for the last 12 years have been using my Excaliber Dehydrator for making yogurt and find it the most convenient way for me . I usually add a couple of tablespoons of non instant dry milk as well as the yogurt I like the thicker consistency I get with the dry milk powder added.I also have added 1 tsp of honey to the milk while I heat it but that is just my personal preference.
I know this I rarely buy yogurt except when for whatever reason I have run out of or let the yogurt starter sit too long . Once you start making your own yogurt you really do not want to start buying yogurt from the store except like you are on the road or something exceptional happens. It is so much less expensive and you get the added benefit of the natural bacteria that you do not always get in the cheaper commercial yogurts, of course I always buy the plain yogurt with all three of the active bacteria so my homemade is very healthy and I think so delicious!
An ice water bath may be used to cool the milk more quickly :) We love to strain off the whey using a small colander lined with a coffee filter and use the yogurt cheese as a substitute for sour cream&cream chz. Makes great cheesecake&the whey can be used to make ricotta or in baking, or add to juice for a probiotic boost. I love that starter can be frozen.
another reason I NEED an Excalibur Dehydrator!!! 2017!!!
Can you use powdered milk, like Thrive or Kirkland’s???
I’m not totally sure, as I’ve never done it with powdered milk myself, but I think that you probably could.
I add 1/4 cup of pd. milk to the mix. It comes out super thick. Not sure about doing a whole batch with pd. milk.
Hey Colleen! I am finally ‘settled’ at the moment in Texas, and I am excited to finally ferment some stuff again!!!! I was wanting to make my own yogurt with coconut yogurt as a starter and milk (or perhaps almond). Do you think I could follow your recipe with my substitutions? I can’t quite find the answer by quickly scanning my google search.
Thanks! :)
Hi Hayley! I have never done it with coconut yogurt/milk (or any other non-dairy substitute) but it’s worth a try! One thing I’ve noticed in recipes for non-dairy yogurt is that some sort of thickener is usually added, such as agar. If you’re going to use coconut milk, you may want to use the thicker canned variety rather than the thinner stuff in the box. Good luck and let me know how it turns out!
So cool! I am not a huge fan of yogurt… but I love making everything myself. I’ll have to attempt this for my family to try. I only wish we had dairy goats or cows to have my own raw milk. :D
Hi Colleen,
What a wonderful blog you run here. I always find myself enjoying your posts. I love me some yogurt and can go through a quart a week quite easily if you let me (I usually let me). I just got through the milk chapter in The Art of Fermentation and I think Katz’s warm cooler method is going to work best in my situation. There are just too many things to try in that book though. I’ve got Smreka going, and am starting a sourdough starter and ginger bug for sodas in the next couple of days. After that, yogurt is next on my list.
awesome”