
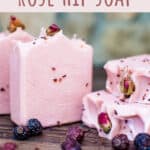
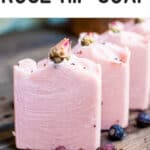
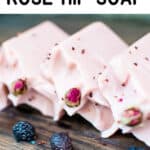
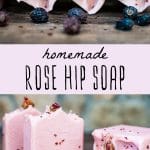
Do you have delicate skin or skin that is beginning to show the marks of passing time? Rose hip soap may be the perfect bar of all-natural herbal soap to care for your skin! As a facial bar, it will leave you with a brighter, healthier complexion while combating the signs of aging!

Want to save this post for later?
Rose Hip Skin Benefits
Rose hips have 50% more vitamin C than oranges! Crazy right? You’d think we’d hear about them more. It’s certainly why I love finding more rose hip recipes and ways to use them.
But what does that mean for you skin? Well, the antioxidants from Vitamin C are shown to encourage the synthesis of collagen, reduce and prevent fine lines, scars, and wrinkles. The high vitamin A content in rose hips may work to regenerate new skin cells.
Rose hips have anti-inflammatory and free-radical scavenging properties. Phytochemicals in rose hips work to fight cell damage.
This makes rose hips an excellent choice for your skin care!

Where to get Rose Hips
Roses are abundant, both in the wild and as a cultivated plant. Rose hips from all varieties of rose can be used. The hips form in the fall and will persist into winter.
While you’re out foraging for rose hips for food and medicine, be sure to grab an extra handful or two to incorporate into your DIY natural beauty routine!
Learn more about what to forage in fall and winter here.
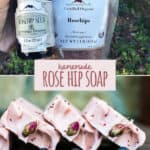
{This post is sponsored by Mountain Rose Herbs}
You can also purchase dried rose hips from Mountain Rose Herbs, my favorite place for high quality, organic dried herbs.

Rose Hip Soap Recipe
Rose Hip Soap Ingredients
- 2 Tablespoons dried rose hips
- 2 cups water
- 15 ounces purified tallow
- 8 ounces coconut oil
- 5 ounces sweet almond oil
- 2 ounces rose hip seed oil
- 2 ounces castor oil
- 12.16 ounces rose hip herbal infusion tea
- 4.58 ounces sodium hydroxide (lye)
- 1 Tablespoon French rose clay
- .15ml rose essential oil
- 10 drops geranium essential oil

This rose hip soap recipe is a cold-processed soap using only all-natural ingredients including rose hip herbal infusion and rose hip seed oil.
I prefer soaps using base fats that I know to be sustainable, such as tallow and lard. Both are excellent choices to nourish your skin and you can feel good knowing that you’re finding a purpose for a product that was destined for a landfill.
If you can’t source tallow, or are uncomfortable using it, see the recipe notes below for an alternative combination of oils.
I chose tallow as the base oil for this recipe. I love using tallow because it creates a moisturizing bar that won’t turn to mush like many homemade soaps have a tendency to do.
Coconut oil gives the bar cleansing properties without being too harsh while the sweet almond oil and rose hip seed oil increase the moisturizing and skin softening effects of this soap.
You can substitute rose hip seed oil for all of the sweet almond oil if the cost isn’t too prohibitive, for a total of 7 ounces rose hip seed oil. Or you can make an herbal oil infusion with rose hips in the sweet almond oil. A little castor oil increases the lather because isn’t that half the fun and what really makes feel clean?
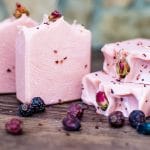
French rose clay is used to clean and detoxify the skin, sloughing off dead skin cells. You can also substitute Rose Kaolin Clay or Australian Red Clay and get a similar beautiful mauve color to your soap.
You could also add powdered rose hips. They will create a natural look with dark brown speckles in the soap. Since dried rose hips are so crunchy and hard, I’d be concerned about the exfoliation causing micro-dermabrasions.
Finding a natural fragrance for rose hip soap was tricky because rose essential oil is expensive. I was able to find rose essential oil absolute and use a little geranium essential oil, both very old-fashioned scents, to anchor the rose.
Of course, you can always use your favorite essential oil blend or use no scent at all if you’re just interested in all of the herbal goodness from the rose hips.

How to Make Rose Hip Soap
I won’t be going into all the basics of how to make soap for beginners. The process is pretty much the same for most simple cold processed soaps.
I very highly recommend Jan Berry’s Natural Soap Making eBook and Soap Making Success course if you are new to making soap!
This recipe will make about 10 bars depending on the size of your mold.
Make the Rose Hip Tea
Begin making rose hip soap by brewing up a rose hip herbal infusion tea. I just pour 2 cups of boiling water over the dried rose hips, cover it , and allow it to cool down to room temperature. Then strain out the rose hips with a fine mesh sieve lined with a coffee filter to remove all of the irritating hairs.
Tip: Freeze the Liquids
I actually prefer to freeze all of my liquids when making soap. I pour the tea into ice cube trays and pop them in the freezer. I do this for four reasons: safety, time, no fumes, and it’s more likely that the beneficial properties from the herbs and oils will stay intact when your ingredients aren’t repeatedly heated to high temperatures.
When you make homemade soap, you’re going to spend some time waiting for things to cool down. Normally, after you mix the lye into the liquid it gets really hot and you have a container of lye water just sitting around while it cools.
You can’t plan on exactly how long it will take to cool either so it takes a chunk out of the day. I’d rather freeze the liquid so I can go about my business in the meanwhile.
If you use a frozen liquid in the lye mix, the lye water is usually at the perfect temperature to stir into the melted fats when the ice cubes have dissolved. I’ve also noticed that when you use ice cubes there isn’t the issue of fumes with the lye which is awesome.
Measure and Weigh the Ingredients
Once your tea is ready, you will need to measure out solid fats, tallow, and coconut oil. Create a makeshift double boiler with a small saucepan full of water. Set the bowl with the solid fats in it over the saucepan and melt them down.
Meanwhile, weigh the rose hip tea into the container you’ll be mixing the soap in.
Wearing eye protection, weigh the sodium hydroxide (lye) into a separate container.
Slowly sprinkle the lye into the tea with a slow constant stirring using a silicone spatula. Continue stirring until the lye has fully dissolved and set it aside.
Next you’ll need another bowl to weigh out the liquid oils, sweet almond oil, castor oil, and rose hip oil. I measure them all into the same bowl, but many recommend weighing each oil into their own container before combining them so you don’t accidentally pour in too much. (It’s good advice.)
Finally, you’ll need to get your add-in’s ready. Measure out the essential oils into a container and get that tablespoon of powdered clay ready to go.

Make the Soap
Once the oils in the double boiler are melted, remove them from the heat. Stir in the combination of liquid oils and check the base temperature. Check the temperature of the lye mixture and figure out the average of both numbers so you have an idea of what temperature you’ll be soaping. You’re shooting for about 95-105 degrees.
When everything has cooled to a good temperature, add the oil mixture to the lye mixture and, using an immersion blender, begin pulsing and stirring to thoroughly incorporate all of the ingredients together.
When the temperature begins to rise, you know you’re heading to a true trace. I usually stop after it has risen 2 degrees from my starting temperature and has thickened to a thin, pudding-like consistency. (Sometimes it’s still thin even after the temperature goes up. I just keep blending until I get it to a consistency I like in that case.)
Once you’ve reached trace, add in the french rose clay and essential oils and blend it for another minute or so until they are fully incorporated.
Pour the soap into the mold and decorate as your creativity inspires you. Crushed or whole rose hips, rose buds, or rose petals are all beautiful!

Cover with waxed paper and set aside to harden for about 48 hours.
Remove the soap from the mold and cut it into bars if you used a loaf mold. (If the soap seems soft or tacky, it may need to sit another day or so before removing from the mold.)
Allow the soap to cure in a dark place for at least 4 weeks, but preferably for 8 weeks. This will ensure your bars are fully-cured and will be hard enough to last a while.

More rose hip recipes to try:
- Rose Hip Tea with Fresh or Dried Rose Hips
- Homemade Vitamin C Gummies with Rosehips
- Rose Hip Facial Oil: Homemade Face Serum
- Rose Hip Syrup: Foraged and Made with Honey
- Reishi Mushroom Infused Red Wine with Rose Hips
- Rose Hip Lip Balm for Soothing Dry Lips
- Rose Hip Whiskey Smash: Foraged Fall Cocktail
More Natural Soap Recipes
Here are some more soap recipes for you to make now that you know the basics:

Rose Hip Soap Recipe
Equipment
- Double Boiler
- Small measuring cups or ramekins to weigh out colorants, herbs, and essential oils
Ingredients
Rose Hip Herbal Infusion
- 2 Tablespoons dried rose hips
- 2 cups water
Rose Hip Soap
- 15 ounces purified tallow
- 8 ounces coconut oil
- 5 ounces sweet almond oil
- 2 ounces rose hip seed oil
- 2 ounces castor oil
- 12.16 ounces rose hip herbal infusion
- 4.58 ounces sodium hydroxide (lye)
- 1 Tablespoon french rose clay
- .15 ml rose essential oil absolute
- 10 drops geranium essential oil
Instructions
Rose Hip Herbal Infusion
- Pour 2 cups of boiling water over the dried rose hips, cover it , and allow it to cool down to room temperature before straining out the rose hips with a fine mesh sieve lined with a coffee filter.
- Freeze the Rose Hip Tea.
Rose Hip Soap
- Measure out solid fats, tallow and coconut oil.
- Create a makeshift double boiler with a small saucepan full of water. Set the bowl with the solid fats in it over the saucepan and melt the tallow and coconut oil.
- Weigh the rose hip tea into the container you’ll be mixing the soap in.
- Wearing eye protection, weigh the sodium hydroxide (lye) into a separate container.
- Slowly sprinkle the lye into the tea with a slow constant stirring using a silicone spatula. Continue stirring until the lye has fully dissolved and set it aside.
- Weigh out the liquid oils, sweet almond oil, castor oil, and rose hip oil into another bowl.
- Measure out the essential oils into a container. Set aside.
- Measure out 1 tablespoon french rose clay. Set aside.
- Once the oils in the double boiler are melted, remove them from the heat. Stir in the combination of liquid oils and check the base temperature of the oils mixture and the lye mixture. The goal should be that they will average 95-105 degrees when combined.
- Add the oil mixture to the lye mixture and, using an immersion blender, begin pulsing and stirring to thoroughly incorporate all of the ingredients together. When the temperature has risen 2 degrees from the starting temperature and it has thickened to a thin pudding-like consistency.
- Once you’ve reached trace, add in the french rose clay and essential oils and blend it for another minutes or so to fully incorporate them.
- Pour the soap into the mold and decorate if desired.
- Cover with plastic wrap or waxed paper and set aside to harden for about 48 hours.
- Remove the soap from the mold and cut into bars if you used a loaf mold. (If the soap seems soft or tacky, it may need to sit another day or so before removing from the mold.)
- Allow the soap to cure in a dark place for at least 4 weeks, but preferably for 8 weeks.
Notes
- 14 ounces coconut oil
- 8 ounces sweet almond oil
- 4 ounces shea butter
- 4 ounces rose hip seed oil
- 2 ounces castor oil
- 12.16 ounces rose hip tea
- 4.73 ounces sodium hydroxide (lye)
Quinn Veon handcrafts all-natural herbal & botanical soap and skin care products inspired by the farm and garden. You can follow her on Instagram @quillhavenfarm.

Hello!!
I have been looking to this kind of shade of pink!! I see you used French Rose clay and you steeped Rose Hip tea. Is that a contributing factor to the color? What would happen if I didn’t use the tea, could I get close to the same color? Would titanium Dioxide help lighten the clay up?
Hi Shannon. I appreciate your patience. The rose hip tea doesn’t influence the color, so it’s all the French rose clay!
If it were me, I would not use the tea as this will give you a brown soap
Hi there! Have a question about the amount of rose essential oil to use for this recipe. It states 0.15ml of rose essential oil and 10 drops of geranium. Should that be 15ml, or half an ounce? Thank you in advance!
I followed the recipe exactly as my soap turned brown as well. So disappointed
Same here. I have tried twice (one with tallow and one with tallow-free version) and I got both brown. It’s doesn’t make any sense! Also 2nd tried have spitting badly which I assumed overheating? What went wrong?
My soap has turned out beautiful! Love the pink color—will be a great Christmas gift for friends
(I took Jan Berrys’ Soap making course and it has been the best investment ever–highly recommend- as any questions are always answered promptly . ) Will be making your Wild Rose and Yarrow Soap next!
Thank you for this recipe
Yvonne
So glad you loved this recipe and Jan Berry’s course!
Hi Colleen
I’d thought of doing a lot of things with rose hip but never thought of soap, thanks for this recipe
Enjoy!
Followed the recipe pretty close, didn’t have the French clay, tho. My soap turned brown, like chocolate. I’m pretty sure it was the rose hip tea, it was dark red until I added the lye, then it looked like coffee. It’s sitting for the 24-48 hour rest, so we’ll see how it turns out. Not sure I’ll make it again
I’ve made this lovely recipe twice. The first time I steeped the rose hips too long and used the full suggested amount of rose clay . The soap did turn brown . Wasn’t too appealing. This time I incorporated 1 tsp titanium dioxide into the oils at trace and used 1/4 tbs of the rose clay instead of the full amount. The color this time is gorgeous. Light , pretty pink . Just a suggestion. Happy soaping everyone. Thank you for sharing these recipes.
I have a question about the amount of rose absolute. The recipe states 0.15ml. Is that correct?
I made this and followed the directions to a tee…except I did the tallow free version, using Shea butter. They smell great but mine do not look at all like your photos. Mine are much darker. I did let the rose hip tea steep for a long time. I did freeze it. Just wondering why mine came out so much darker.
Thanks!
Hi Laura. It’s really hard to say why your soap came out darker than mine. It could be the species of rose, how long you steeped them, any number of variables.
Hello, I notice you say to add the oil mixture to the lye mixture. I have always been warned to add the lye to the oils. Why do you do it this way?
I followed the recipe, but my lye mixture turned brown. I’m not sure what went wrong.
Can lard be substituted for tallow?
Yes, you can do that!
I am concerned that both in the main blog and in the recipe text there is the instruction “add the oil to the lye mixture” I have always read, and been instructed that the lye mix goes into the oils.
Just wanted to make sure this got corrected, if needed.
Hi Holly! Thanks for bringing this up. I asked Quinn, the author of this article about it and here is what she says, “I’ve seen tutorials done both ways. The only reason it’s often advised to add the lye mixture to the oil is because there is a higher likelihood the liquid you are pouring into will be the one that splashes. So when oil pours into the lye, it would be the lye that has a higher splash risk. That said, I personally feel safer with my lye bowl never leaving the stable surface of the counter. I have never had the lye splash out while pouring the oil into lye. I have, however, had my oil miss the lye container while pouring and spill all over the counter, floor, and me. I figure if I don’t pick up the lye container I can’t spill it, especially working awkwardly with gloved hands.”
I do want to add that it is very important to add the lye crystals to the liquid, and not the other way around, to avoid the chance of a “lye volcano.”
Hope that helps!
I made a batch yesterday. Mine is tan in color, not the lovely soft pink shown in your soap. I make the tea of dried rosehips (from Mt. Rose Herbs) and water. I let it cool completely, strained and when the lye was added, it turned dark brown. I added the rose clay, but that didn’t change it. Now I have tan soap!! What did I do wrong?
I didn’t add the clay to the lye mixture, just at trace.
Oh, and it’s also worth noting that floral essential oils are among the most prone to acceleration, which means that when you add them, your batter might come to trace very quickly, of even seize completely. If that happens you’ll need to take proper safely precautions when attempting to solve the problem because the soap will be lye-heavy for up to a couple days until the saponification process has progressed enough to make it safe to handle without chemically burning your bare skin if you touch it.
If your soap does seize, you’ll need to rebatch it in a crock pot with additional distilled water to make sure the lye is completely cooked out (another name for the saponification process, when referring to Hot Process soapmaking, as opposed to combining the oils and lye and pouring directly into a mold, which is known as Cold Process.) Hot Process gives soap a somewhat rustic appearance and texture, though it shouldn’t affect the usability. It *IS* possible to overcook and burn soap, though, so be sure to read up on HP thoroughly before undertaking a rebatch.
It is super important to put any soap recipe through a soap calculator personally, yourself, before you make it. Different kinds of tallow (from different animals) vary in terms of their saponification values, or, to use laymens terms, the amount of lye requires to saponify each gram of fat. The concentration of the dissolved lye will vary from one recipe to the next, but must be diluted at least 1:1 or you will potentially have dangerous undissolved crystals in your finished soap. Anything more than a 2.5:1-3:1 ratio and you risk your soap forming glycerin rivers, a largely cosmetic issue but nevertheless risky, since it can mimic the appearance of improperly mixed batter that is leaking oils or lye.
Putting the recipe through a soap calculator also allows you to verify that superfat percentage; that is, the percentage of oils that are in excess of what is saponifiable by the precisely weighed quantity of lye in the recipe. Unless you are a very experienced soapmaker and are making a batch for a very specific non-body purpose (like to use as a stain-removing treatment), you should always superfat your soap. Firstly because it is a buffer against slightly inaccurate measuring tools (even electric scales aren’t malfunction-proof), and secondly to improve the skin-feel of your homemade soap. Having a small percentage of unsaponified oils allows those to redeposit slightly during use of the soap, which, depending on the amount of superfat in your recipe, can be the difference between your skin feeling stripped or feeling soft after use.
Soapmaking is a wonderful craft and hobby to delve into, but please don’t risk yours or your family/friends’ skin by using a recipe you have not personally verified. No one would purposefully share a recipe with an error in it, but it only takes a minute to plug in your oils and lye concentration and superfat percentage and make sure you’re not about to waste valuable time and energy making something you’ll have to shred and rebatch because of an errant typo.
Gigi what super fat should we be aiming for a body bar?Face bar?
Hi there, thanks for the lovely recipe 😊 I would love to put the recipe through SoapCalc for my own mould. Could you please share the percentage of your oils please, the amount of superfat and the percentage of lye to water concentration. Thanks a million!
Sorry, I don’t have any of that information for you, only the volume measurements listed in the recipe.
Que pena que no esta en Español…Amo esta pagina . todo lo que haces y lo generosa en pasar conocimientos. Gracias!