
This traditional hummus recipe gives you that authentic texture and flavor of restaurant style hummus. It really is the best hummus ever!

Want to save this post for later?
Homemade Traditional Hummus
I know a thing or two about hummus. I got turned onto the store bought version long before it was popular, and shortly thereafter starting making my own.
At first I would use canned chickpeas, then I got fancy and started cooking beans from scratch.
My homemade hummus was really good, but never quite as good as what I was served in restaurants. There was some kind of magic in that stuff, or so I thought!
Then, several years ago, I was introduced to real hummus by a good friend of mine who had spent some years in Lebanon. She made it herself and she had that magic!
I had to know how to do it, as this was the best hummus I had ever tasted. Now I’m going to share this wonderful traditional hummus recipe with you! You can thank me later.
Tricks to Making Authentic Hummus
As it turns out, I was using all of the right ingredients in my own homemade hummus recipe, just the wrong amounts and the wrong method.
There are a few simple processing tricks that give traditional hummus that smooth texture and really bring out the flavor.
The first trick is to heat the chickpeas in a pot before making the hummus, even if they are canned. This helps with the consistency of the hummus and gives them a creamier texture.
The second trick is to run the heated chickpeas through a food mill to remove the skins. This is what gives it that super creamy and rich texture that you will find in restaurants.
The third trick is to use a mortar and pestle to smash the garlic and salt together before mixing them with the other ingredients, which seems to really give it an amazing flavor.

Steps to Making Traditional Hummus
This hummus isn’t quite as simple as just throwing a bunch of ingredients in your food processor and calling it good.
There is a bit more work that goes into it, but it is so worth it, and not hard at all.
Heat the Chickpeas (Garbonzo Beans)
You can use either canned chickpeas (also known as garbonzo beans) or you can cook them from dried beans. Cooking them yourself is probably the best option taste wise, but I’ve done it with canned and it works just fine.
The first step is to make sure that you are working with fully cooked and hot chickpeas.
If you are cooking the chickpeas yourself, be sure that they are totally soft. If they have already cooled, heat the 3 cups called for in this recipe in a small pot with some of the cooking liquid.
If you’re using canned chickpeas, heat them up in a pot with their liquid as well.
Once the chickpeas are hot, strain them and reserve some of the liquid.
Run the Chickpeas Through a Food Mill
Put about half of the heated chickpeas into a food mill and start processing them over a bowl.
It might seem to take a bit until anything is happening, but eventually a chickpea mash will start to come out, while the skins stay behind.
It’s helpful to add a very small amount of chickpea liquid as needed to get the beans going through the food mill.

Soon there will be nothing left in the mill except the chickpea skins. Remove them and repeat the process with the other half of the chickpeas.

The bowl underneath the food mill will be filled with your little bits of chickpea mash.

Make the Garlic/Oil/Tahini Mixture
Set the bowl of chickpea mash aside, bring out the mortar and pestle, and put the garlic cloves and salt into the bowl (mortar). Mash them together with the pestle until you have a uniform garlic/salt paste.
If you don’t have a mortar and pestle, this can also be achieved by first mincing the garlic and then using the flat side of a large chef’s knife to grind the salt into it.
Then stir the lemon juice, tahini, and olive oil into the garlic/salt paste until it is all completely mixed together.
A little more than ¼ cup of olive oil is usually necessary, so add a tablespoon or two more and mix it in.

Then add the garlic/oil/tahini mixture to the chickpea mash and stir it all together very well.

Taste and Adjust Flavors
Now, this is where a little bit of personal taste and intuition come in.
Taste the hummus and determine how the flavors are balanced. Does it need more salt? Is it acidic enough or need more lemon juice? How is the tahini level?
Adding a little more olive oil is usually warranted, but use your taste buds to decide if it may need a bit more of any other ingredient.

Garnish and Serve the Hummus
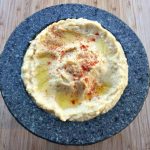
Once it’s to your liking, put the finished hummus into a serving bowl or container of some sort. I like to serve it in the mortar because it looks cool.
Garnish with a drizzle of olive oil and a sprinkle of paprika. Adding some pine nuts to the top is nice as well.
If you can handle it, cover the hummus and let it sit for a while for the flavors to meld before digging in. If it will be longer than an hour or so, put it in the fridge.
I always have to have some right away, but then I can usually hold off!

This is seriously the best hummus ever!
I feel so lucky to be given the knowledge of this traditional hummus recipe. This is how I will always make my hummus from now on. I can’t even look at the store bought stuff anymore! It doesn’t even compare.
I’m really looking forward to enjoying it with some sourdough naan! It would also be a nice accompaniment to roasted olives with rosemary and garlic. The perfect appetizer plate!
Now that we’ve gotten this far, you should probably watch this hilarious video about hummus called All About That Paste. Enjoy!
Traditional Hummus Recipe
Ingredients
- 3 cups cooked chickpeas canned or cooked from dried
- 4 cloves garlic
- 1 tsp salt
- 1/4 cup fresh squeezed lemon juice
- 1/4 cup tahini
- 1/4 cup extra virgin olive oil plus extra for drizzling
- paprika for garnish
Instructions
- Heat the chickpeas in their liquid in a small saucepan. Strain the chickpeas, reserving some of the liquid.
- Place half the chickpeas into a food mill and start processing them into a bowl. Add a very small amount of chickpea liquid to get the mash going.
- Process until all of the chickpeas are mashed and only the skins remain. Remove the skins from the food mill and repeat with the remaining chickpeas. Set the mashed chickpeas aside.
- Place the garlic and salt into a mortar then grind with a pestle until you have a garlic/salt paste.
- Stir the lemon juice, tahini, and olive oil into the garlic paste until smooth.
- Add the garlic/oil/tahini mixture to the mashed chickpeas and stir until mixed well. Taste the hummus for seasoning and adjust to personal preference with more salt, olive oil, or lemon juice. (I usually stir in a little more olive oil).
- Transfer to a serving bowl and drizzle with additional extra virgin olive oil and paprika.
Notes
- You can use either canned chickpeas or you can cook them from dried beans.
- The hummus gets better after sitting in the fridge for at least an hour.
- Serve with sliced vegetables or chips.

Just wanted to say thank you. I’d never tried making hummus without a food processor because Alton Brown said there’s no reason to bother on Good Eats. Meanwhile, I found a restaurant that makes the best hummus. I tried to find their secret on my own and they wouldn’t tell me. Years later, after the restaurant closed, it finally dawned on me, hand made! I googled and I couldn’t find a traditional recipe until I found this one. I just made the hummus and it was perfect, just like the restaurant. I’m so happy! Too bad the food mill is so much work because I want to make it all the time!
I’m so glad you’re happy with this recipe, Alison. Enjoy!
How long will this keep in the refrigerator?
Homemade hummus will last no more than a week in the fridge or you could try freezing it.
Good ingredient portions
I like to soak my chickpeas over night to remove the lectin. I also soak the chopped garlic in the lemon juice for a few hours to smooth it out. I keep the skins for the fiber and nutrients.
Thank you for sharing- reminds me to make some humus!
I finished making hummus and I would say the amount of mashed garbanzo beans I ended up with was the right amount, because when I combined it with everything else the taste was great. There was too much salt for me, so I’ll adjust that the next time. I’m not sure if I’m going to use the mortar and pestle the next time, because I ended up sending the hummus through my VitaMix for a luxurious smooth texture. Which makes me still wonder if I should be using the fine disk, rather than the medium. although what I did worked great! I may just run it through the food mill and combine in the VitaMix.
I agree with other comment. Next time us fine disc.
I am in the middle of making this recipe. I’ve used the food mill. So far, so good. You did not mention whether to use the fine, medium, or coarse blade. I used the medium blade. Is that the best one to use?
How many cups of mashed chickpeas should I have when I’m done? I have approximately 1.75 cup/ Is that what I should expect? It matters, in terms of the measurement of other things added to this recipe flavor-wise.
Hi Peggy, my food mill only has one blade, so I’m not sure about that! I’m sure the medium one will work just fine. And yes, close to 2 cups mashed chickpeas is perfect!
Thanks for your response!! The medium blade did work great. As I said in my other message, I finished it off in my Vitamix and the texture is amazing!
Awesome. I’m so glad that worked out!
Thank you so very much for the hummus recipe!! Hubby says best hummus he’s ever had!! We’re definitely keeping this recipe! Thank you! Thank you! Thank you!!
You’re welcome, Amy! I’m so glad you liked it!
Thank you so much! This looks delicious. I have tinnitus and was searching for a recipe that didn’t require a noisy appliance. I love this authentic recipe, and can’t wait to try it! :)
This is an amazing recipe! Thanks for sharing.
That video is hysterical! I love it! I love hummus too and have rarely been able to make anyhting I have really liked. I am looking forward to trying this recipe out, thank you!
Good hummus is the only food that has ever made me spontaneously exclaim “f**k yeah!” at a table full of relatives. Needless to say this makes me excited. Thanks for sharing!
Yes.I make hummus a lot! I soak the peas overnight then boil hard for 10-15 min. Cool slightly then rub them in a linen towel to get the skins loose. Then put back in water and heat while I skim the top for the skins. I never thot of using the food mill.. will have to try that! Thanks!