
When it’s apple season fresh pressed cider is easy to find. Learn how to make your own homemade hard cider with wild yeast using fresh apple juice!

Want to save this post for later?
Wild Yeast on Apples
We recently had a whole lot of fresh pressed apple cider on our hands after building a simple DIY apple press and pressing a bunch of apples from our tree.
While the juice is incredibly tasty as is, we couldn’t drink it fast enough, and some of it even started to ferment in the fridge!
I have always wanted to try making hard cider with wild yeast, and with gallons of juice to experiment with, this seemed like the perfect opportunity.
Although wild yeasts can produce inconsistent results and sometimes off flavors, I was really happy with the way this cider turned out!
I consulted my well used copy of Wild Fermentation by Sandor Katz, and he makes it sound so simple, so I decided to give it a try.
Wild yeasts are present on most fruits and vegetables, which is why we can ferment them to begin with.
I could tell that these apples from our tree had a lot of natural yeast on them by the white bloom on their skin.

Hard Cider with Wild Yeast Recipe
The best part about this hard cider with wild yeast is that the only ingredient you need is fresh pressed apple cider.
This recipe will not work the same way with pasteurized store bought cider.
If that’s all you have access to, you can follow my instructions for how to make hard cider with yeast, or you can try making a wild yeast starter to add to it.
It is helpful to have a wide mouth gallon jar, and a gallon jug with an airlock.
Ferment the Cider
First you will fill the wide mouth jar with fresh pressed cider, leaving two or three inches of headspace.
Cover the jar with cheesecloth or a kitchen towel and secure with a rubberband.

Put the jar in a dark and quiet corner, and give it a vigorous stir with a clean spoon every day.
You may want to set the jar on a pan or something to catch any overflow. Mine did not overflow, but came pretty close!
After a couple of days, this is what it looked like. Very bubbly and frothy!

Transfer to a Jug with Airlock
Once it gets to this point that means the fermentation is going good and it’s time to transfer it into a jug with an airlock. This will keep any unwanted yeasts out.

Then put it back in the dark corner and let it ferment away!
Soon you will see lots of bubbles in the jug, if you didn’t already, and the airlock should be bubbling away as well.

Bottle the Wild Hard Cider
Once the bubbles subside, which took about a week or so, then it is time to bottle the cider. I usually use flip top grolsh style bottles. You can follow my instructions for bottling here.
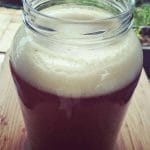
This glass of hard apple cider was poured right before bottling. We always like to taste some right away when it’s finished!
It will get more clear after it is bottled and sits for a couple of weeks.

We have made three one gallon batches of this hard cider with wild yeast, with a bit of experimenting along the way. The first batch we made just as I explained here, using only fresh pressed cider.
For the second one we added a half cup of sugar, and the third we added a half cup of honey (which is technically then called a cizer, or cider mead).
We liked all three, and the differences were subtle, but the one made with honey was our favorite.
Try making Mulled Hard Cider, Apple Ginger Kombucha, or Apple Cider Jelly with your hard cider! They’re all really tasty!
Check out my post on preserving apples for more ideas on how to use apples!
Have you ever made homemade hard cider? What method did you use?
Hard Cider with Wild Yeast
Equipment
Ingredients
- 1 gallon fresh pressed cider unpasteurized
- ½ cup sugar or honey optional
Instructions
- Fill a wide mouth gallon jar with cider and sweetener, if using. Leave two or three inches of headspace. Cover the jar with cheesecloth or a kitchen towel and secure with a rubber band.
- Put the jar in a dark and quiet corner, and give it a vigorous stir with a clean wooden spoon every day. You may want to set the jar on a pan or something to catch any overflow.
- Once it gets to this point that means the fermentation is going good and it’s time to transfer it into a jug with an airlock. This will keep any unwanted yeasts out.
- Then put it back in the dark corner and let it ferment away! Soon you will see lots of bubbles in the jug, if you didn’t already, and the airlock should be bubbling away as well.
- Once the bubbles subside, which took about a week or so, then it is time to bottle the cider. I usually use flip top grolsh style bottles.
Nutrition

My hard cider made with wild fermentation is done. It’s very dry and tart. I don’t want carbonation but I would like it to be a little sweet. What do you suggest?
Hi Leisa, hard cider made in this way is usually pretty dry. You could try adding a little bit of sweetener to the bottles and see what happens, but I haven’t done it so I can’t say what the results would be!
So excited to tell you that the hard cider turned out GREAT! It was tart and very dry. The batch was 1 quart and 1 pint. Added 3 Tbsp of honey to the quart, it took the edge off the tart. Very delicious. Starting a second batch. Can I use a gallon apple juice jug, plastic?
I’m so glad you liked this recipe, Leisa! Yes, you can definitely use a gallon apple juice jug!
Hi Colleen,
Thanks for these simple and beautifully published recipes. Did you ever get an abv read on your wild ciders? I’m curious to know how alcoholic they get with the wild yeast.
Thanks!
Brandon
Hi, Brandon. I’m sorry, I don’t measure the ABV of any of my fermented drink recipes.
I get that you don’t measure abv, but how about measure how much sugar you start with and how much is left after fermentation? A by-product would be info like sugar content and abv? Sorry the scientist in me wants to know…lol
After you finish the brewing how long can you keep the finished product .. how do you package it and where do you store it
Hi,
Just a comment on keeping pressed apple juice if you have too much: freeze it. The freezing seems to kill the yeast and our 100 liters last the whole year!
Thanks for the tip, Dan!
Hello,
I’ve never made anything fermented before. I think I understand why but I should not worry about the the normal sanitization process with this recipe because it is benefitting from the “wildness”?
Thank you.
You’ll still need to sanitize your fermentation vessel and all equipment prior to starting your ferment to eliminate any cross-contamination that may occur.
Hi, this is my first summer with a lovely apple tree out back, so I am going to try my hand at cider making :) Your instructions are fantastic, I can’t wait to start, just wondering: when I ferment my kombucha, I leave it on the counter for a few days after bottling so that it gets carbonated. Can you do the same for cider? Or is it best to refrigerate right away? How long should I wait before drinking it, if at all?
Hi Kylie, yes you can definitely leave the bottles out at room temperature to help build up carbonation. I like to let it age for a week or two before drinking as that will improve the flavor a bit!
What the the purpose of covering the jar with a cheese cloth only to later put it in a carboy to prevent any unwanted yeast? If the yeast is on the outside of the apples when being pressed, the cider should already have the yeast present in it. So it could go right to the carboy step. My concern is that the cheese cloth would allow any unwanted yeast or bacteria in my closet to fall into the cider.
Is there any way around not having the air vent stopper when fermenting ??
I would really recommend you buy a stopper, which can be as cheap as 2dollars and can be reused for future brews. The “balloon” alternative is a joke, don’t do it.
A balloon (I literally just discovered that one and am planning to use it, myself).
Hi
Can I add more apple juice to my last week juice in wide mouth jar ?
Did this turn out much different than the gingerbug cider?
The more cider I make, the easier it gets.
.
.
From my limited experience, all one really needs to make a decent apple cider, is juice, yeast, a clean container, and a balloon. The only ringer, is temperature.
.
Ferment it cold, and slow, at around 50 degrees.
If you ferment it warn, and fast, you get skunky un drinkable flavors.
.
Additions to the cider can be an un fermentable sugar ( if you want a sweet cider) , and for yeast nutrient, add raisons or a little dry pounded meat, ( beef steak ) .
.
From my reading, any yeast, even bread yeast will do fine.
.
.
The real key to good cider ( to my mind at least ) is low temperature, and long slow fermentation.
If I wanted to make apple cider vinegar, would I just leave the cider in a wide mouth jar with a towel over it for a while? Past the alcoholic state? Thanks!
Yes I believe that is the process, but I’ve never actually done it myself! (One of these days!)
Perhaps I can help…after your Cider finishes fermentation then inoculate your now hard cider with a vinegar “mother.” This mother can be obtained from a beer/wine fermentation shop, a fellow fermentor’s vinegar batch or a store bought unpasteurized and unfiltered vinegar like Braggs Apple Cider Vinegar. A cup or less will do the job. Store, covered with a towel or cheese clothe in a dark, room temperature spot for 2 to 4 months. Be sure to taste along the way, once the acidity is to your liking you can bottle in sterile containers (I like to up-cycle old wine, beer, kombucha and liquor bottles) and continue to age to mellow the acidity for another 6 months or indefinitely. Vinegar never goes bad!
Bon Chance mes Amis!
PS. Take your now “mother” and use it to create other batches of vinegar with un-drank wine etc..
Jup, that’s basically it. I like to just chop up my apples (about 8small ones per gallon, leaving some headspace) core and all (organic, use everything). Top it off with water, muddle it every couple of days, store on a counter in the shade. Take the apples out 2weeks later. Sive the juice into a smaller container +- 1-1,5 liter) and let it sit for +-3-4 more weeks (covered and in the shade). Tadaah tadaah apple cider vinegar
Hi
What’s the difference between apple cider and hard cider please? Thanks
Mostly geography. In many places in Europe and elsewhere, “cider” means the fermented and alcoholic version. In the U.S. “cider” usually means unfermented, non-alcoholic, and “hard cider” means alcoholic.
Hi,
Is it necessary to let the cider sit with cheesecloth, or can I put the cork/airlock assembly on immediately?
Thanks!
The cheesecloth serves two purposes; first, is to allow enough oxygen for the yeast to produce a high enough cell count to get a healthy fermentation started, and second, to keep any insects, birds or vermin from contaminating your batch.
With my experience in spontaneously fermented ales, 12-16 hours is the desired time for cooling (which doesn’t apply to fresh-pressed, unpasteurized cider) and open air innoculation. After that, it is transfered to a fermentation vessel and air locked.
Hello! I pressed apples from our tree on Thursday and now on Saturday, ferment is starting. However, with our two jugs, one is more active and the others as spots. It does smell a tad moldy. The other one smells fine, has bubbles, and I can see a few spots. They are already in carboys with coffee filters over the top to let oxygen in for the first phase. Should I intervene and try to rescue? Or do I leave it and hope for the best? Thanks!
I’d leave it alone, but be wary of the one that smells moldy. If you don’t see bubbles within a few days I’d compost it.
thanks
question When should i bottle it. It has quit bubbling for a day know. I took the airlock off and sealed the jug up till my bottles get here. Its sure smells strong is that normal.
I would leave the airlock on until you get the bottles. Even though you don’t see bubbles doesn’t mean they aren’t still there a tiny bit, so I would give it a few days at least before bottling. It will smell pretty strong at first, but after bottling and sitting for a while it will mellow out.
This is a great recipe! I write blogs for a webseries called Spoiled to Perfection (dedicated to every thing fermented, cured and cultured) and I would love to share your recipe at some point with our followers. And I would love to try it myself! Thanks for sharing!
Hard cider is pretty forgiving. My favorite is a jug forgotten in the fridge. Even at close to freezing fresh raw cider will ferment spontaneously. I have allowed a gallons and even 5 gallon batches to ferment out for several months with super results. It stays sweet for a long time, but will eventually dry out and fall clear if you care to wait that long! The orchard where we buy ours uses plastic “milk jug” type containers with the snap on lid, I burp the lid when the jug bulges a bit and get really good carbonation. Be careful fermenting in any sealed container, fermentation will make enough pressure to burst glass and plastic containers if the pressure isn’t released!
That’s a simple way to do it! I always use glass jugs with airlocks so I don’t have to worry about explosions :)
So if I wanted dry cider, should I leave it longer?