
You’ve seen me brew several things here, mainly mead and cider, but as of yet I haven’t forayed into beer on this blog. To be honest, it’s because brewing beer is a more difficult process than making simple country wines, ciders and meads. But, there is a way to brew beer that is a bit easier and great for beginners, and that’s using beer extract kits. It’s a great way to get your feet wet and learn the basics of brewing beer. Here’s how to brew beer from a kit, the easy way!

Want to save this post for later?
Beer Brewing Kit Supplies
We got the “Fat Tire Clone” kit from Adventures in Homebrewing, which is a great place to buy all sorts of brewing equipment. Here is what came in the kit.

Clockwise from left:
- Specialty Grains in mesh bags
- Liquid Malt Extract (2 containers)
- Yeast
- Priming sugar
- Aroma Hops
- Bittering Hops
- AIH All Clean Kit (in center)
You will also need some equipment, most of which is in this Beginning Homebrewing Kit. Beyond that you will need a 3 gallon pot, a big metal spoon, a thermometer, and a bunch of ice cubes and/or blocks.
How to Brew Beer from a Kit
Now let’s get brewing! First, though, you need to sanitize everything that will come in contact with your brew. This is an extremely important step, so don’t skip it! Then, bring 2-3 gallons of water to 150°F and put your specialty grains (in their mesh bags) in to steep for 20 minutes. Try to keep the temp. at 150°-160°F as best as you can.
 Remove the grains and do not squeeze them! Just let them drain out a bit. What you have now is a wort. How exciting! Bring that wort to a boil, then remove it from the heat and add the liquid malt extract, stirring as you go.
 Then, return your pot to the heat source and bring it back to a boil. Once it’s boiling again, add your bittering/boiling hops.
 Then boil it for 55 minutes. Set a timer! When your timer goes off, add the aroma hops and boil for 5 more minutes. Then take it off the heat and cool it down as quickly as possible. Ice water in a sink works well.
 Once it’s cooled siphon it (with an auto siphon) into your fermenting vessel, leaving as much of the debris behind as possible. Add unchlorinated water to make 5 gallons. Make sure it is at room temperature or cooler, then pitch your yeast by sprinkling it on the surface of the wort.
 Then cover it with the lid and put an airlock in it.
 Put the fermenting bucket in a cool and dark spot. You should see the airlock start to bubble within the next 24 hours. Now it’s time for patience, because you need to wait about *2 weeks*! Then it’s time to bottle. First and foremost, you need to sanitize your bottles and all of your bottling equipment (bottling bucket, auto siphon, tubing and bottling tool). At this point in our brewing career we use flip top bottles, but you can totally reuse regular glass beer bottles as long as they’re sanitized. You’ll just need to also buy new bottle caps and a hand held bottle capping machine.
 After you’ve sanitized everything, mix the priming sugar with 2 cups boiling water and let sit to cool. Transfer the wort from the fermenting bucket to the bottling bucket (which has a spigot) using the auto siphon. Then add the cooled priming sugar liquid to the wort in the bottling bucket.
 Then connect the tubing to the spigot and a bottling wand to the end of the tubing. Use the bottling wand to fill up each bottle, leaving about an inch of head space.
 Cap the bottles and let them sit in a cool and dark place for another *2 weeks* for carbonation. Just like Tom Petty said, the waiting is the hardest part! Once they’re ready I recommend drinking one super chilled on a hot day
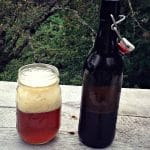
 This beer was quite lovely and really was similar to Fat Tire! I should have bought some to do a side by side comparison, but in all honesty who cares? It was light and refreshing and tasty… and that’s all that really matters, right? Plus, it was relatively easy and cheap to make.
 Be sure to check out Adventures in Homebrewing to see all the other awesome beer kits that they have! They have a lot of different clone kits as well as their own, both extract (which is what I have shown here) and all grain. They also have all the brewing equipment you would ever need. Brewing beer doesn’t have to be difficult, get a kit and do it the easy way!
More Homebrewing Recipes
Ready for your next brewing adventure? Try one of these tasty recipes!
How to Brew Beer from a Kit
Ingredients
- 5 gallons water, divided
- specialty grains in mesh bag
- liquid malt extract
- rapid rise bread yeast
- aroma hops
- bittering hops
- 2 cups boiling water
- priming sugar
Instructions
- Sanitize anything that will come into contact with the brew.
- Then, bring 2-3 gallons of water to 150°F and put your specialty grains (in their mesh bags) in to steep for 20 minutes. Try to keep the temperature at 150°-160°F as best as you can.
- Remove the grains and do not squeeze them! Just let them drain out a bit. (What you have now is a wort.)
- Bring that wort to a boil, then remove it from the heat and add the liquid malt extract, stirring as you go.
- Return your pot to the heat source and bring it back to a boil. Once it’s boiling again, add your bittering/boiling hops.
- Then boil it for 55 minutes.
- When your timer goes off, add the aroma hops and boil for 5 more minutes.
- Take it off the heat and cool it down as quickly as possible. (Ice water in a sink works well.)
- Once it’s cooled siphon it (with an auto siphon) into your fermenting vessel, leaving as much of the debris behind as possible.
- Add unchlorinated water to make 5 gallons. Make sure it is at room temperature or cooler, then pitch your yeast by sprinkling it on the surface of the wort.
- Then cover it with the lid and put an airlock in it.
- Put the fermenting bucket in a cool and dark spot. You should see the airlock start to bubble within the next 24 hours.
- Ferment for 2 weeks.
Bottling
- Sanitize your bottles and all of your bottling equipment (bottling bucket, auto siphon, tubing and bottling tool).
- Mix the priming sugar with 2 cups boiling water and let sit to cool.
- Transfer the wort from the fermenting bucket to the bottling bucket (which has a spigot) using the auto siphon.
- Add the cooled priming sugar liquid to the wort in the bottling bucket.
- Connect the tubing to the spigot and a bottling wand to the end of the tubing.
- Use the bottling wand to fill up each bottle, leaving about an inch of head space.
- Cap the bottles and let them sit in a cool and dark place for another 2 weeks for carbonation.
Notes
- Serve chilled.

Ready to brew? This guide makes it easy and fun! Craft your perfect beer at home with just a kit!
I like IPAs as a rule. Haven’t tried home brewing yet but would like the opprotunity this kit would afford me! Thanks for sharing, if I win I’ll definitely post results!
I don’t have a favorite beer because I’ve never had the opportunity to try a home brew. I like beer but not chemicals. This recipe may change that. Looking forward to giving it a try. Thanks for sharing the opprotunity to try this!
I have not brewed my own beer as yet……would love to though! My favorite beer is Bud Light …I really need to broaden my horizons…lol