{This post is sponsored by Mountain Rose Herbs}
I wasn’t allowed to drink much soda pop growing up (thanks Mom!), but I did have the occasional root beer when we went out to eat. It was always my favorite with its distinctive flavor that was so different than the regular boring colas. Little did I know back then that the root in root beer meant just that—roots! Traditional root beer is actually made with real roots and herbs. Fast forward a bunch of years, and here I am putting the root back in root beer with this fermented root beer recipe that’s made with a ginger bug!

The Roots and Herbs in Traditional Root Beer
Many different roots and herbs have traditionally been used to make root beer over the years, but the primary one is sassafras root and bark.
In recent years, because of a debatable controversy over the safety of sassafras root due to its safrole content, wintergreen has become the primary flavoring agent.
Beyond sassafras and wintergreen, many other roots, herbs, berries, and spices can be added for more flavor, depending on your preference.
Some common ones are birch bark, sarsaparilla, licorice root, wild cherry bark, ginger, cinnamon, cloves, dandelion root, burdock root, juniper berries, and anise.
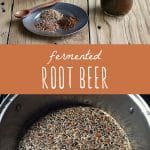
Fermented Root Beer Recipe
I decided to stay pretty traditional and use sassafras, sarsaparilla, and birch bark, all from Mountain Rose Herbs (my favorite place to purchase high quality, organic herbs and spices).
Feel free to add in any other herbs, spices, and roots that you’d like.
Related: 12 Fermented Soda Recipes

Want to save this post for later?
Make the Ginger Bug
The first step in making this fermented root beer is to make a ginger bug. Since ginger root is also a common ingredient in root beer, this seemed like the perfect choice.
You can follow my recipe for making a ginger bug here.
Boil the Roots & Herbs
Combine the water and herbs in a pot and bring to a boil. Reduce the heat and simmer for 20 minutes. Remove the pot from the heat and let the root and bark tea come to room temperature.
Just smelling these herbs brewing brings back childhood memories of drinking root beer!

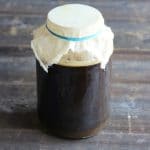
Ferment the Root Beer
Strain out the herbs and put the tea into a wide mouth gallon jar.
Stir in the sugar, molasses, ginger bug, and ginger slices, then cover the jug with a piece of cheesecloth secured with a rubber band.
Put the jar in a quiet corner in your kitchen and let the root beer ferment. Give it a vigorous stir with a wooden spoon once per day. It should start to bubble up within 3-4 days, then it’s ready to bottle.

Bottle the Root Beer
Strain out the the ginger pieces and transfer the root beer to flip top bottles using a funnel, making sure to leave an inch or two of head space.
Let the bottles sit at room temperature to build up carbonation for at least a week before drinking your root beer. Serve cold and enjoy!

This homemade root beer is so delicious, exactly what real root beer is meant to taste like. I think it’s my new favorite fermented soda!
It even foams up like it’s supposed to, no artificial foaming agents needed (yes, that’s a thing).
Now go get yourself some roots and bark and make some refreshing fermented root beer!
More Fermented Soda Recipes
If you’re interested in making more homemade fermented sodas and beers, I have a few recipes for you:
- Apple Ginger Beer
- Elderberry Soda
- Sweet Potato Kvass
- Turmeric Soda
- Strawberry Rhubarb Soda
- Pine Needle Soda
- Homemade Soda with Yarrow
- Winter Herb Kvass
- Strawberry Water Kefir Soda
Fermented Root Beer
Equipment
Ingredients
- 1 gallon water
- 1/2 cup dried sassafras bark
- 1/2 cup dried sarsaparilla root
- 1/2 cup dried birch bark
- 1 cinnamon stick
- 1 cup sugar
- 1/2 cup molasses
- 1/2-1 cup ginger bug
- 3 slices fresh ginger root
Instructions
- Combine the water and herbs in a pot and bring to a boil. Reduce the heat and simmer for 20 minutes. Remove the pot from the heat and let the root and bark tea come to room temperature.
- Strain out the herbs and put the tea into a wide mouth gallon jar.
- Stir in the sugar, molasses, ginger bug, and ginger slices, then cover the jug with a piece of cheesecloth secured with a rubber band.
- Put the jar in a quiet corner in your kitchen and let the root beer ferment. Give it a vigorous stir with a wooden spoon once per day. It should start to bubble up within 3-4 days, then it's ready to bottle.
- Strain out the the ginger pieces and transfer the root beer to flip top bottles using a funnel, making sure to leave an inch or two of head space.
- Let the bottles sit at room temperature to build up carbonation for at least a week before drinking your root beer. Serve cold and enjoy!
Notes
- Many other herbs can be used to make homemade root beer, including wintergreen, licorice root, wild cherry bark, cloves, dandelion root, burdock root, juniper berries, and anise.
- Mountain Rose Herbs is the best place to get organic dried herbs and spices.

Could you address the toxicity in Sassafras root please. I had the ginger bug ready and the pot of sassafras root, sarsaparilla root, and birch bark simmering on the stove for the 20 minutes. I came across a YT video that talked about sassafras root being a known carcinogen (I’m a cancer survivor) as well as causing liver damage. So I poured the whole thing out. Is sassafras root safe to make this fermented root beer? Did I throw it away needlessly? I’m confused.
Hi Sandra. Sassafras has been traditionally used in small amounts for teas and root beer, but it naturally contains safrole, a compound that isn’t removed by fermentation and is linked to health risks. As a cancer survivor, it’s wise of you to avoid it unless you’re using a verified safrole-free extract, which I did not. You can safely swap the sassafras for toasted dandelion root, which will give you a similar flavor profile.
I’m on fermenting now after introducing the ginger bug. No bubbles but has a slight sour taste. Still sweet as well. Should I bottle or give it more time. It’s been about two days. Thanks!
I would give it more time and move it to somewhere a little warmer.
Thanks, I will give it a try. Is it normal to be sour?
Does it matter of the molasses is unsulphured or sulphured?
You’ll want unsulphured molasses. Sulphured molasses is treated with sulfur dioxide as a preservative, which can leave behind a sharp, sometimes chemical taste.
I don’t drink alchohol for religious reasons. I understand that any fermentation will cause alcohol but what would be the percentage from this?
Is it so low it’s almost negligable like kefir and sparkling pre-biotic sodas? How do I make sure to limit the alchohol production?
Hi there. Yes, you are correct. I didn’t take a reading of the ABV when I made this recipe, so I can’t tell you exactly how much alcohol was produced, if any. But the finished root beer will have negligible alcohol like water kefir and kombucha. You can limit the alcohol production by shortening the length of fermentation and straining out the ginger pieces. It’s already pretty short at 3-4 days, but you could try only 2 days, if you prefer.
I am an experienced kombucha brewer and typically burp my swing top bottles every other day. Is this the same practice I should use for the root beer?
Yes, you can burp it!
This recipe worked well and because we used an established ginger bug it fermented very, very quickly!
However, it doesn’t taste good at all! It is so heavily astringent and bitter and not sweet that we were not able to enjoy it. Adding some maple syrup to each glass did help slightly but the taste is still so overwhelming that we are a bit disappointed.
Is it possible that the ginger bug was just strong enough that too much of the sugar was eaten up?
Hi Maggie. Yes, it’s likely that your ginger bug was so active that it consumed most of the sugar, leaving your root beer overly dry and bitter. You do another batch with the same ginger bug, I would shorten the fermentation time to 24 hours after you start to see bubbles form and then refrigerate immediately to slow down fermentation and preserve sweetness.
my root beer has bubbled yet and it is the third day. Should wait another day or two or should bottle it.
I would move to a warmer location and see if that helps the fermentation come along before bottling.
It finally did something and I bottled it and today I checked it and it definitely foamed I tasted it but I wasn’t sweet enough. I’m guessing the longer it sit the root beer flavour and sweetness comes alive.
Hey there Coleenmy root beer tastes sour what went wrong .
Is.there anything else I can other than a gallon glass jar to frement my root beer.
Any food safe container should work.
My root beer is on the third day but no billing yet. Is that okay should I give another day or two or should I bottled it.
Hello Colleen, this is my first time making sodas and I’m curious about the ferment process…
I am almost done with the first 24 hrs of the first ferment. My soda already has a good head of foam. Your recipe says “it should start to bubble up within 3-4 days, then it is ready to bottle.” Since mine is already so bubbly, should I start the second ferment?
Thank you for this recipe! I am so excited to be able to provide my husband with homemade root beer!
Yes, if you think it’s time, go ahead and bottle!
Hi could you use honey instead of sugar?
Yes, that should be fine. You’ll need to use less honey, though. 1 cup of sugar is equal to 2/3 cup honey.
Can this recipe be halved?
Yes!
Some herbal stores sell a dried root-beer mix. Have you every used this?
No, I haven’t.
This will be my first time making homemade soda. My husband and son foraged some sarsaparilla root, but I don’t have “bark”. Would it alter the recipe too much if I just used a cup of the foraged root rather than a half up root and a half cup bark?
Thanks, we are all exited to try this!
Hi Julie. I’m honestly not sure. You can experiment and find out!
So want to try this, but it’s cost prohibitive for me. Could I use a concentrated root beer extract?
You can try, but I can’t say how the finished product will taste.
Can I use bal jars to bottle it or do flip top jars do a particular job that a ball jar would not?
Flip top jars are built to withstand pressure build up in the bottle, so I would only use those or wine bottles.
What do you do with the ginger that you used for your started? Pitch it? Can you dehydrate it for ginger powder?
Yes, you could do that. I usually either keep feeding it for another batch of fermented soda I want to make right away or store it in the fridge where it’ll go dormant until I’m ready to make another batch in the future.
Assuming the cinnamon stick goes in with the roots and the half to 1 cup ginger bug, what percentage do you use? Half or whole cup?
If you have a cup of ginger bug, I would use that.
My rootbeer has lost its bubbles, is there away to start fermentation up again. It is ready to bottle.
If it’s no longer bubbling, it’s time to bottle.
I was skeptical about leaving the bottles to ferment for at least a week at room temperature. I had no plans of going that long, but because of that being in the recipe, I didn’t even bother to check the carbonation after they were bottled.
After just two days I ended up with a call from my wife telling me my bottles are exploding and waking up the whole household. It’s now 2:30 am, I just got off of work and had to come home and sneakily take the remaining bottles outside to let the pressure off. Paranoid the whole time they would blow while I was holding them.
I got them outside and was able to open them up in a semi controlled manner, however the sound of them popping at this hour of the morning had me convinced the police would be showing up. The sound was literally echoing thought the neighborhood.
I’m not sure what exactly would have caused them to pressurize so quickly. It is fall time in Michigan. It has not been even close to being warm out.
So, I guess I lost this batch. I look forward to trying again. Assuming I am allowed to ferment under this roof anymore 😭
Ohhh no!! I’m so sorry to hear you lost your batch. But on the plus side, it sounds like you had a really healthy ferment! I would try only a day or two of bottling before refrigerating.
If I were to use wintermint, how much would you suggest using? I don’t want to throw the flavor out of wack.
Hi there. I’ve never made it with wintermint, so it’s hard for me to say.
I do kombucha and definitely use the glass wing cup bottles. They were great. Overtime you do need to replace the seals after so many uses as the rubber seals on the lids start to wear out. I sometimes have problems with carbonation on second fermentation of kombucha even and just add a little tiny piece of crystallized ginger. I’ll leave it out a little longer like a day or so and I definitely helps create the carbonation needed
This recipe looks fantastic! Being born in the US I still remember the yummy taste of root beer during my childhood. Living in Germany I just made my first lot of ginger beer, never even thinking that I could ever make my own! yay!
Does anybody have an idea where I could order a set of (preferably organic) root beer herbs and have them sent to Germany, even just for the “once a lifetime” experience? I appreciate any suggestions!
Hey Colleen,
Thanks a lot for this recipe! I’ve wanted to make root beer for quite a few years now, and it just turned out perfect. Added some allspice, claves and star anise.
Just took three days primary fermentation, two days secondary. Already made a batch with twice the amount- loving it. Cheers!
Wonderful! I’m so glad to hear this recipe turned out so well for you! Enjoy!
Can’t wait to try this. Ever made any of your sodas with coconut sugar instead of cane sugar?(when you combine the root/bark that has simmered with the sugar, molasses, finer bug, ect.)
I have not, but you totally could!
Looks like a tasty recipe! I would like to try it out.
How many 1/2 cup volume measurements can you get out of the 4 oz net weight bags of the barks?
Have you tried vanilla bean in a root beer recipe?
Hi Alex. I’m honestly not sure. I didn’t measure the bark by volume when I made this recipe and no, I haven’t tried vanilla bean in a root beer recipe, but I’m sure it would be good!
I’m trying this recipe now. It smells good. So happy to have found a recipe that uses molasses!
You’re so welcome, Kristin. Enjoy!
Is it possible to get this recipe by weight instead of volume?
Yes, under where it says, “Ingredients”, click on, “Metric”.
Hi,
Gee, I’d love to try this, but $50 + shipping for the roots to make, how much? 4 oz of roots can’t go that far. And that doesn’t count the cost of the other ingredients. So, like $60+ for a gallon of root beer? Not for me, thanks.
For the barks, how much does a 1/2 cup of volume weigh?
…the 4 oz ‘net weight’. bags from Mountain Rose Herbs are decent size.
…I would think you you could get more than one of the 1/2 cup ‘volume’ measures out of each bag.
But now I would want to use some vanilla bean pod if I made homemade root beer. That would jack the cost up quite a bit, as vanilla bean pods are insanely expensive.
If you got 2 or 3 portions per bag of roots, then you could get your gallon cost down to $30. About $3 for a 12 oz soda. That’s not too bad for a homemade root beer making small batches.
…I am not a coffee drinker, never been a fan, and the caffeine causes me massive migraines. But I’ve read 12 coffees from Starbucks can run about $100 per gallon.
I’m made the root beer recipe, and after it left lots of bubbles at the top of the jar after a few days, but no bubbles rising within the jar, I bottled my second ferment. I put it in a large plastic soda bottle, and after 24 hours, the bottle was rock hard. I released the pressure, but there wasn’t any fizziness in the bottle. After 4 more hours, I opened it up to drink, but still not much carbonation. Any suggesting to get a very fizzy product?
You need to get a different bottle for your second ferment; like one of those flip top kinds that are all glass. Something like the Ilyapa 16 Ounce Amber Swing Top Glass Beer Bottles for Home Brewing – Carbonated Drinks, Kombucha, Kefir, Soda, Juice, Fermentation, Glass Bottle with Airtight Rubber Seal Flip Caps.
It’s really important to have these types of bottles for your second ferment because they can handle the pressure that will take place to allow carbonation to occur in that second ferment.
Another thing, never let off the pressure until you’re ready to drink, this basically will kill your process. Those bottles need to sit under pressure for about 5-7 days depending on how cold the area is that you put them in (could be longer).
Btw, I was a chef for 8 years and specialized in fermentation/preservation; my last kitchen job was at Canlis in Seattle if you want to see if I’m legit or not lol
Happy fermenting!
I read you need to burp the flip top bottles in the second fermentation everyday so it doesn’t explode. I’m almost to that step and nervous and confused on what to do!
I once tried making ginger bug soda and doing the second ferment in old soda bottles- definitely did not work. I tend to make do with what I have, and that would be a super cool way to reuse them, but my dad (who is really good at ferments) said they just don’t work, and he was right!!! I think this is one thing you actually need those pretty flip top bottles for. I wonder why though?? Maybe the old plastic bottles don’t have a tight enough seal?
Old second hand plastic emits toxins which likely kill the prebiotic ferment. Never reuse water or soda plastic bottles due to toxicity.