


Once you’ve brewed and fermented a one gallon batch of hard cider, mead, or other homebrew, it’s time to bottle it! This is my simple method for how to bottle hard cider or mead.

Want to save this post for later?
How to Bottle Hard Cider or Mead
Before bottling hard cider, you need to brew up a batch! This same method works for bottling a gallon of mead as well.
See my posts on How to Make Hard Cider or How to Make a Gallon of Mead to get you started.
After the fermentation of your cider has completely subsided, and the bubbling in the airlock and jug has totally stopped, it’s time to take the hard cider off of the sediment that has formed in the bottom of the jug.
I often get asked if the brew can just be put through a strainer or coffee filter, and the answer is no. The sediment is too fine and will go right through the finest mesh strainer. It’s also very sludgy, so will clog up a coffee filter in no time.
I’ve tried all different methods of removing the sediment from the brew, and the truth is that getting a few pieces of simple bottling equipment makes things so much easier.
Get recipes for desserts, snacks, breads, side dishes, drinks, and preserving using apples, pumpkins, winter squash, cranberries, and more in my ebook, Cozy Autumn Recipes!
Hard Cider Bottling Equipment
The main bottling equipment you will need is a mini auto siphon with tubing and a bottling wand.
These items make bottling really easy, so I highly recommend getting them.

The next thing you need are bottles of course!
The best bottles to use in my opinion are ones that have built in flip top lids (grolsch style). They are the simplest to cap, and can be reused over and over.
Sometimes the gaskets on the caps need to be replaced, but they are very inexpensive.
One gallon of hard cider or mead will fill approximately eight 16oz bottles.

Sanitize the Bottles & Equipment
You should already have sanitizer from when you brewed.
I always sanitize more bottles than I think I will need, as it’s a bummer to be right in the middle of bottling and not have enough ready.
You will also need to sanitize all of bottling equipment.
Bottle the Hard Cider
This really is a two person job, so grab a friend!
Once everything is sanitized and dry, attach one end of the tubing to the auto siphon and the other end to the bottling wand.
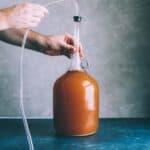
Put the jug of cider or mead onto a counter or table and one person will put the auto siphon into the jug without touching the sediment on the bottom.

Put all of the bottles on a towel on the floor below the gallon jug. Gravity is your friend while bottling.
This is the basic set up that you want.

The second person does the bottling.
Put the bottling wand into one of the bottles, all the way to the bottom, pushing down to create flow.
The first person pumps the auto siphon a few times, and the cider should start moving through the tube and into the bottle.

When the cider gets almost to the top of the bottle, an inch or so from the top, pull the bottling wand up and the flow will immediately stop.
There should be an inch or so of head space at the top of the bottle, which is what you want.
Move on to the next bottle and once again push the bottling wand into the bottom of the bottle until it’s full.

Keep filling each bottle until you’ve gone through all of the hard cider in the jug, stopping when all that’s left is sediment. Cap the bottles with the flip top lids.
That sediment is the main reason why bottling is necessary. You technically don’t have to bottle, you could drink right out of the fermenting jug if you’d like (not recommended), but that sediment can be a little much. It also can affect the flavor of the finished cider.
The sediment won’t hurt you, by the way, and is actually full of B vitamins. So don’t worry if a little bit gets into your bottles. It also makes great compost, so that’s where I put it!
Aging & Drinking the Hard Cider
Once you bottle the flavor of the cider continues to develop into something even more wonderful.
Hard cider doesn’t need to be aged for very long, but a few days to a month really improves the flavor and takes away much of the harshness.
(Mead is much better after several months of aging, however).

I have to admit, I enjoy the flavor and will often drink it right away.
But that’s just me.

This isn’t fine wine, however, and you don’t need to wait long for cider. Who has the time (and patience) for that anyways?
I say drink up (with a cinnamon stick on the side, of course)!

This hard apple cider is also very tasty (and festive) when you make it into mulled hard cider! It’s a great way to warm up on a chilly fall or winter day.
Or try hard apple cider jelly, which is amazing on a fall appetizer platter with goat cheese.
Ready to start your next brewing project? Here are some more tasty home brews to try!
- Hard Cider with Wild Yeast
- Fermented Apple Ginger Beer
- Homemade Spiced Pomegranate Wine
- Mugwort Lemon Beer
- Spruce Beer
How to Bottle Hard Cider (or Mead)
Ingredients
- 1 gallon hard cider or other homebrew
Instructions
- Sanitize all of the bottling equipment and the bottles.
- Once everything is sanitized and dry, attach one end of the tubing to the auto siphon and the other end to the bottling wand.
- Put the jug of cider or mead onto a counter or table and one person will put the auto siphon into the jug without touching the sediment on the bottom.
- Put all of the bottles on a towel on the floor below the gallon jug. Gravity is your friend while bottling.
- A second person will do the bottling. Put the bottling wand into one of the bottles, all the way to the bottom, pushing down to create flow.
- The first person pumps the auto siphon a few times, and the cider should start moving through the tube and into the bottle.
- When the cider gets almost to the top of the bottle, an inch or so from the top, pull the bottling wand up and the flow will immediately stop. There should be an inch or so of head space at the top of the bottle.
- Move on to the next bottle and once again push the bottling wand into the bottom of the bottle until it’s full.
- Keep filling each bottle until you’ve gone through all of the hard cider in the jug, stopping when all that’s left is sediment. Then cap the bottles with the flip top lids.
- Age the cider for a few days to a month before drinking.
Notes
- Bottling hard cider is a two person job, so grab a friend!
- The sediment won’t hurt you, and is actually full of B vitamins. So don’t worry if a little bit gets into your bottles. It also makes wonderful compost.
- Hard cider doesn’t need to be aged for very long, but a few days to a month really improves the flavor and takes away much of the harshness.
- Mead is better after several months of aging.
- Hard apple cider is tasty (and festive) when you make it into mulled hard cider! It’s a great way to warm up on a chilly day.

I actually used more than half the packet of yeast.. whoops. Not the entire packet, but more like 2/3. Is that going to affect my fermentation?
It may ferment faster, but shouldn’t noticeably change the flavor.
When you bottle the cider, do you need to put in anything to preserve it? Should it be kept cold? Is room temperature okay?
A cool room temperature is ideal. The fermentation process preserves the cider.
hello! i’m just about to bottle my first 3 gallons using your recipe, it’s looking great! i forgot to get a hydrometer reading after following the instructions/ingredients to a t, is there any way you could let me know what the gravity of it all is from the start? i’ll be backsweetening one of the gallons and carbonating them all (i made a couple gallons of mead last year but i’m much more excited about these!!)
Hi Kyle. Unless you took a gravity reading at the start, there really isn’t any way to know.
Do I need to add sugar to the swing top bottles to carbonate the cider
Actually, I pull the syphon out of the bottle when the liquid gets ALL THE WAY to the top.
Archimedes principle brings the level just about perfectly back down to an inch below the top, once you withdraw the filler tube! :-)
My internal grammar Nazi prevails:
“The next thing you need IS bottles of course!”
:-)
Doesn’t sound right. I tried “next thing you need is bowls” and it still sounds correct. I shall ponder it some more.
how about bottling into wine bottles with corks? any issues?
Sure, you can definitely do that.
Hi! I have a 1 Gallon Jug for mead and I have been bottling into smaller bottles like you mention. I want to do more batches and less bottles. Do you suggest a way to store a larger amount of mead like another large jug with a spout (like a beer spout)?
Thanks!
Hi there. Brewery supply stores usually carry larger vessels for fermenting and bottling. I also have a recipe for making 5 gallons of mead that could be helpful: https://www.growforagecookferment.com/how-to-make-5-gallons-of-mead/
Is it possible to let the cider sit on the sediment for too long? My husband and I made three gallons, became overwhelmingly busy and then decided to pour some for the holidays before we had a chance to bottle. I though – what could it hurt – but we both got to be pretty darn sick the next day. Any recommendations?
Hi Ariel, the sediment will not cause any sickness even if it sits for months, it is mostly just yeast and b vitamins. Homemade hard cider often has a higher alcohol content than store bought, so you may have misjudged how much you were consuming!
Once the cider or mead is bottled, will it stay ok on a shelf in a cool space or does it need to be refrigerated? Do i need to “burp” it? Thank you
On a shelf in a cool space is ideal. No, you don’t burp it after it goes to bottle.
Do you ever rack a fresh wort onto the yeast? If I’m making spruce beer and rack off the first batch, have you ever put a fresh batch on the old yeast right away?
Thanks!
Sounds like a fabulous idea….IF you’re confident that the first ferment went well and everything is……”sweet”!
I’LL definitely give that a try; it SHOULD eliminate a lot of waiting and the amount of yeast should be double or triple what you started with on batch #1. Which SHOULD be a good thing, if, as I say, the first batch went well.
What have you got to lose? Try it and post back here, please!
I made a ginger beer recipe from Townsends with some really old (over 5 years past use by date) ale yeast – the initial batch struggled to get a good fermentation started but eventually took off. Was harsh and fiery – less dark and stormy and more ancient potent herbal medicine vibe.
Second batch was racked in immediately after bottling the first batch. Took right off, smooth flavor, and all around just a significant improvement over the first.
Harvesting used yeast is a kinda fun way to experiment as well – there’s an Australian beer (can’t remember the name atm) that actually used to have instructions on their website on how to cultivate the yeast from their empties to brew your own.
Hi I don’t have a siphon , can I just pour from my jugs through a sieve into my bottles?
Also I read that adding sugar helps carbonate , 2 extra weeks for that?
Thank you
Hey, would this work using Mason Jars and a sieve to remove the particulate?
Hello! Thanks for this post. How long will these last on the shelf? Will they turn into vinegar or do these bottles seal it completely, to last at least a year?
I have a “Mr. Beer” kit. Can I ferment this recipe in the 2-gallon keg that came with the kit?
I would just double the recipe then and make 2 gallons :) You don’t want too much airspace in the jug or else it can cause it to go off.
Hi
I followed your guide here and made two batches. They bubbled for two weeks then stopped then it took me another two weeks to get around to siphoning it and it smells a little funky like vomit…. maybe sulphuric? Is it safe? How can I make it taste better? I siphoned into a clean gallon jug and n hopes that maybe it will smell/taste better ?
Hi Jen! So it’s not going to taste super great right away. You will need to bottle and cap it and let it sit for several weeks before the flavor improves.
Does the cider produce any carbonation after bottled or has the yeast been used up? If you added more sugar at this point would it carbonate? I am hoping to make a fizzy cider
Yes it would. Put 8grams per litre of sugar to it before bottling. Put in room temp for 2-3 weeks. Also use one plastic bottle (coke or so) with screw cap and one reference bottle unopened with the same soda. That way you can squeeze it and feel when it’s carbed to a nice level. Be careful of bottle geisers though. Put all bottles cool when carbing is done. Or find a way to pasteurizing them.
What kind of sugar would you use?
Thank you Colleen for your very useful and practical post on How to Make Cider from Wild Yeast and the this post on bottling. I refer to them often and have you bookmarked. Last year was my first time making any type of cider and I made some out of about everything we had grown but I didn’t shoot for making it a hard cider although. I also am terrible for being unconventional and cheap and bottled some in some old wine bottles and threw a cork in it; some I put in mason jars. Needless to say some sustained and some eventually turned to vinegar. This year I purchased some suitable bottles in hopes of better success. Thanks again for all the inspiring information.
i followed your instructions – especially the sanitizing of all the bottles and tools. My two one-gallon jars started fermenting right away with the airlocks bubbling periodically. No problem there. But everything stopped after one week. I am concerned that I did something wrong since I expected it to bubble for two weeks before it stopped. ? Any ideas?
Sometimes they ferment quicker than others. As long as you saw bubbles everything should be fine :)
If I wanted to bottle this into mason jars, would I water bath process it?
How can you make the cider carbonated?
Tried making my first gallon of mead, and think something is wrong. Top of jug looks like mold, and everything is floating has the stuff on it. I sanitized everything before hand and made sure nothing was contaminated. Kind of disappointed. Not sure what happened.
It’s hard for me to know what’s going on without seeing it. Did you use an airlock? Did you see bubbles for a few weeks? If so, then it fermented right and everything is probably just fine. Sometimes there is some white stuff (not mold) on the top of the fruit when it’s finished. How long ago did you start it? My guess is that if you followed all of my instructions, then it should be all good.
Had the same problem, I looked up the mold, it was regular mold which appeared on the exposed apple fibers which were floating up top. I looked it up, the most frequent answer was: scoop it off and clean the exposed glass, if it stays gone, no problem, if it comes back: toss and start over. Mine was your run of the mill green-white mold and it stayed away after I scooped it off and after the fermentation process really started to take hold. Also smell is an important factor. After the mold was gone, my cider smelled “soury-fresh” again.
can you put in fruit jars and put in refrigerator
True , it is a pain to transfer a gallon to a bottling bucket but the advantage is that it ensures that you do not bottle any of the lees and sediment, AND if you wish you can add stabilizers (K-meta and K-sorbate) and so back-sweeten the cider or simply add about 20 gms of sugar and so carbonate the cider. It is far easier to backsweeten or carbonate in “bulk” rather than adding sweetener to each bottle – and adding stabilizers to the jug can result in a volcano of cider as any powder you add will “nucleate” the carbon dioxide gas in the jug causing it to force the liquid out the mouth of the carboy
Apple juice without any additional sugar generally has a specific gravity of about 1.050 and that translates to about 5 or 6% alcohol by volume when all the sugar has been converted to alcohol and carbon dioxide.
That said, a simpler way to bottle is to siphon (rack) the cider from the jug into a bottling bucket. Bottling buckets have a spigot located near the bottom and to the spigot you can attach a plastic tube and to that tube a bottling wand. It then becomes a one person job to fill the bottles as all you need to do is open the spigot to fill the wand and once filled you simply press the tube down to allow the spring to open the tube and so fill the bottle.
To fill the bottling bucket from the jug you may want to use a close pin or some other device to keep the tube from the siphon facing down into the bucket – but again, filling the bucket does not need two people..
Yes, I have used bottling buckets, and always use them when I do 5 gallon batches of brew. You can see my method for that in my post How to Bottle 5 Gallons of Mead. I usually don’t fuss around with it for only a gallon or two, though, as it seems easier to me to just siphon it right into the bottles. I do like your clothespin idea, though!
Good morning Colleen, I hope this finds you well :)
Thanks so much for posting your recipes, my first batch of mead is fermenting as we speak, I’m very excited.
I am keen to have a crack at your hard cider recipe this weekend, I would like to know how much sugar I need to add to each bottle during bottling to end up with a carbonated cider?
Also which type of sugar?
Thank you so much for your time.
Regards,
Zac.
What would you estimate the proof of this to be after fermenting for 2 weeks? 2 months? 2 years?
I don’t ever use a hydrometer, which is the tool for measuring alcohol levels, so to be honest I’m not sure. What I do know is that the yeast will hit a breaking point and die off once the alcohol percentage gets to a certain level, and that happens a different points depending on the strain of yeast that you use. This is why some yeasts make a sweet product and others a dry. So, after the initial ferment of 6-8 weeks, the alcohol level will remain pretty much constant. My educated guess of the alcohol content for my recipe for hard cider is similar to a strong beer, maybe around 8-10%? It’s hard to tell without a hydrometer, though.
I’m not sure about your recipe but if it was straight apple juice with not additional sugar added, it’s most likely around 7.5% if finishes dry. Most cider must is around 1.050 starting SG.
Hi Colleen & Joel, thanks for the how to on hard cider. How long does the cider last on the shelf once bottled? Thanks!
Being that it’s alcohol I would say it would last quite a while, as long as you have it bottled in airtight containers. Probably fairly equivalent to beer. Not that I have any experience with that because it all gets consumed pretty quickly around here!
Add potassium sorbate to the cider to improve aging.
Potassium sorbate does not improve aging. It stabilizes a brew by essentially neutering the yeast so they stop reproducing.
Since it is alcohol it doesn’t really go bad but the taste does change, slowly turning into more of an apple cider vinegar than hard cider. So I would say…half a year to a year? +-a year if you pasteurize it and/or use additives.