You must have known this was coming after my homemade sourdough starter post last week, and I hope you’re happy about it because this bread is amazing! Not only is it wonderfully tasty and sour, but it is really easy to make. I’m sure you’ve heard of the no knead bread craze, but it has changed my world in bread making! Not only is it easier, but it makes some of the best bread I’ve ever had. Can’t argue with that! Look at how amazing this no knead sourdough bread is.
No Knead Sourdough Bread Recipe
This method was largely popularized by Jim Lahey in his book, My Bread: The Revolutionary No Work, No Knead Method (a really great book in my opinion). This sourdough version was inspired by this recipe from Mother Earth News magazine. I used part whole wheat flour because that’s how I roll, but feel free to make it how you like. So, let’s get to it and make some no knead sourdough bread!
You will need a 4-6 quart Dutch oven that you will bake your bread in. Lodge brand makes nice cast iron or enameled cast iron ones that work well and are reasonably priced. It really is a kitchen tool that you should have if you don’t already. Another really helpful tool is a dough scraper (or two!), but regular metal spatulas will work in a pinch.
Making this bread requires a bit of forethought as you’ll need to start it the night before. No big deal, you just have to remember to do it! So, the night before you’ll stir together the some flour, salt and yeast, and then add your sourdough starter…

Want to save this post for later?
And the water and stir it all together. I almost always need to add a tablespoon or two more water to properly hydrate the flour, probably because of the whole wheat flour. This will make a fairly moist and shaggy dough, a little bit too wet to knead (thankfully we won’t have to deal with that!).

Now you cover it up with plastic wrap and leave it on your counter overnight. After about 12-14 hours it will look like this:

You will notice that it has risen a lot! Check out these bubbles:

Use a rubber scraper to turn the dough out on a well floured board. Put a little flour on your scrapers or spatulas and use them to fold the dough over on itself a few times until it looks like this:

Sprinkle the top of the dough with flour, cover with a clean cloth and let sit to rise for another 1-2 hours.

About 30 minutes before the dough is done rising, preheat your Dutch oven in your oven at 450°F.
Here is the dough after it has risen and is ready to be baked:

Take your bread scrapers and fold each side of the bread in on itself. It doesn’t have to be pretty!

Pull the Dutch oven out (it will be smokin’ hot!), take off the lid, and sprinkle in a little bit of cornmeal. I have to admit, this next part is probably the hardest and always makes me a little nervous, but it turns out fine every time. Use your dough scrapers or metal spatulas and scoop up your dough on either side and then plop it into the hot Dutch oven. Don’t stress.

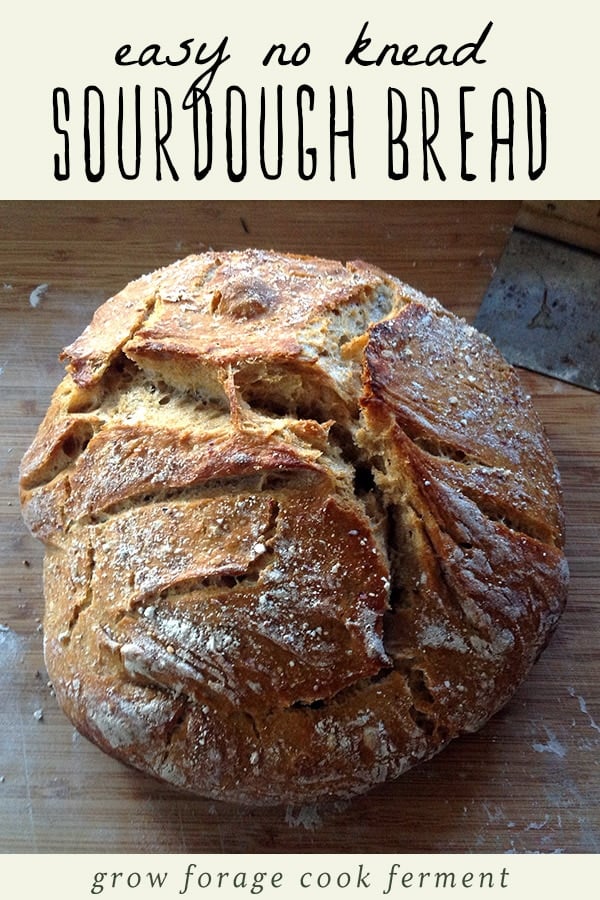
Sometimes it lands funky, don’t worry about it, just give the Dutch oven a little shake back and forth to center it if need be (remember to use hot pads!). Sprinkle a little more cornmeal on the top of your dough, cover it with the lid, and put it back in the 450°F oven for 35 minutes. Then take the lid off and bake for another 15 minutes. This is what you’ll get:

Unbelievable! I was shocked when I first made no knead bread by how wonderful it turned out, just like bread from an artisan bakery! Take the bread out of the Dutch oven and allow to cool completely before you cut into it. This is actually the hardest part of all! The bread will smell amazing and will tempt you. But you need to wait!

When it’s time it will be wonderful! You really don’t need to put anything on it because it will taste so good… A little butter never hurts anything, though. The sourdough flavor really shines through and it makes wonderful garlic bread. Or perhaps a spoonful of Strawberry Rhubarb Butter or Hard Apple Cider Jelly. Really, it makes wonderful everything!
Once you have your hands on some sourdough starter you have no reason not to make this bread. While it does take a little bit of planning ahead and a lot of mostly hands off time, it is actually unbelievably easy and the taste can’t be beat. With all the processed junk in conventional bread and the price tag for artisan loaves I’m certain this bread will have you hooked on homemade forever!
Here are a few of my other favorite sourdough recipes:
- No-Knead Sourdough Bread
- Sourdough Rye Bread
- Sourdough Pizza
- Sourdough Blueberry Pancakes
- Sourdough Naan Bread
- Mini Sourdough Appetizer Pizzas
- Sourdough Flatbread
- Sourdough Discard Bagels

No Knead Sourdough Bread Recipe
Ingredients
- 2 cups bread flour
- 1 1/2 cups whole wheat flour
- 1 tsp salt
- 1/4 tsp rapid rise bread yeast
- 2/3 cup sourdough starter
- 1 1/2 cups cool water
- cornmeal for dusting
Instructions
- Stir together the bread flour, wheat flour, salt, and yeast.
- Add the sourdough starter and water and stir together until a moist and fairy shaggy dough forms. It should be just a little too wet to knead (see post photos).
- Cover with plastic wrap and set aside to rest at room temperature for 12+ hours. It should rise quite a bit and become very bubbly.
- Flour a work surface, then use a rubber scraper to turn the dough out. Place a little flour onto a dough scraper or rubber spatula and use them to fold the dough over itself a few times.
- Sprinkle the dough with flour, cover with a clean cotton towel, and set aside to rise for another 1-2 hours.
- Place a dutch oven, including the lid, into your oven, then heat the oven to 450°F.
- Using a bread scraper, fold each side of the bread in on itself.
- Remove the dutch oven from the oven (use potholders, it will be very hot!), remove the lid, and sprinkle some cornmeal into the bottom. Use your dough scrapers to scoop up the dough on either side and transfer to the dutch oven. Sprinkle the top with cornmeal, cover, and transfer back to the oven.
- Bake for 35 minutes. Then remove the lid and bake for an additional 15 minutes uncovered.
- Remove the bread from the dutch oven and allow to cool completely before slicing.
Notes
- Use a sourdough starter that was fed about 12 hours before preparing the bread dough.

This is so wonderful! When you say fed for 12 hours, do you mean doubled in size? I live in a warm climate and after 12 hours my starter would have collapsed again. Maybe your suggestion would be after it reached the top and just started to drop? Or can it still be busy rising? (this would in my case be 3 – 6 hours as I have to fee 3 times per day if not in the fridge)
My other question is, would a bit of stretching when folding in point 4 and 7 do harm?
Thanks!
I feel so accomplished when I take these loaves out of the oven. Perfection, and I’m on my 5th one! Thank you for sharing your knowledge with us, I’ll forever be in your debt. Lovin your herbal remedy book, too! You make learning fun.
Enjoy!
One quick Q- would I be able to double the salt without it affecting the rise? Many thanks in advance!
I haven’t tried using more salt, so I’m really not sure.
I just found your blog and recipe. Our oven died and was wondering if this could be made in air fryer or in a bread machine with smaller loaves? I’d be fine kneading it if it meant I could make my own bread 😂
Hi Rebecca. I haven’t tried this recipe in either a bread machine or air fryer, so I can’t say for sure if that would work.
Hi how much flour would I use if I’m just using all-propose flour?
You would want to use the same amount of flour, a 1:1 ratio.
I just made this lovely recipe for my first loaf of bread made with my recently homemade starter.
My partner and I are barely resisting cutting into it as I type this. But, it was, what I thought, a straight forward recipe that yielded drool-worthy aromas throughout my house. It looks amazing, we look forward to enjoying it soon
Thank you for sharing this recipe. It will certainly be a keeper for me. 💛
Hi Amanda! I’m so glad you liked this recipe and I hope you enjoyed the loaf once you cut into it!
The 2nd loaf after the starter matured was way better!
Did anyone else’s dough turn super soupy after being left out all night for the 12 hrs? I’m not sure how this is going to turn out now hopefully not a waste I’m not sure what I did wrong
Hi Lala, the dough does tend to get a bit softer overnight, but it shouldn’t be soupy. I’m not sure what happened there.
My loaf turned out, but I think I need to add more salt. Do you have a garlic recipe?
I’m sorry, I don’t.
Love this recipe, I make this bread on the boat and it turns out perfectly. If you have any other recipes to share with sourdough would like to try them.
Hi Debbie! Wow, you make sourdough on your boat? That’s awesome! I have a delicious recipe for sourdough tortillas and also a sourdough rye bread.
Novice cook with sourdough. This came out great THANK YOU!
You’re welcome, Adam!
Why doesn’t my bread get done in the middle ?
Amazing recipe!!! I have used this many times and it’s always been successful
Tonight added shredded cheese and jalapeños and I can’t wait for it to cool to try it out!
I’ve made this recipe a couple times now and i’m SO HAPPY with it! I love that I don’t have to babysit it ALL day and I still get a great loaf! This morning I pulled it to cool and it was still cracking! So much fun!!!
Hi Stephanie, I’m so happy to hear that it’s working well for you, yay!
Yay!! I’m so glad you love it!
I have made this bread without the added yeast several times, and the dough always seems to be much stickier and doesn’t rise the second time. I end up with a flat and very dense bread. It tastes great, but I want it to rise more and be better for sandwiches and such. I always test it with the float test, and it passes. I leave it overnight at least 13-15 hours in a warm place, and proof it for 30-60 minutes again in a warm place. Without fail, it is sticky and difficult to get into the pan even when I add a lot more flour before proofing. I cannot figure out what I am doing wrong. I live in Florida at sea level, and I use all purpose flour, filtered water, and pink sea salt…using a cast iron dutch oven on 450 for 30-35 min covered, then 10 min uncovered. I’ve tried more flour and less starter/water, and it is always the same result. Any advice??
This bread was a disappointment. The dough was much too wet and the loaf didn’t rise well.
Hi Elaine, sorry it didn’t work for you. This method does create a more wet dough than usual, as many no knead and sourdough recipes do, but it sounds like yours may have been a bit too wet. Did the dough match the consistency in the photos? Also, did you use a 4-6 quart size dutch oven? If you used a bigger one it may have spread out too much rather than rising up.
Yeast is very hard to find right now. I only have regular yeast (not rapid rise yeast). Do you think this would work with that kind of yeast? Thank you!
Hi Renee, yes it should work fine with regular yeast!
Nice recipe, adding the whole wheat flour. I’ve added a little instant yeast in the past and have had good results. I live in Reno at 5000′ so I increase liquid by 1/4 cup, increase cook temp to 475, and reduce initial covered to 25 minutes, and uncovered to 13 minutes. Internal temp of loaf should be 200 deg. I use have used Carl Griffiths starter for 10 years, (bacteria started in 1847) and the boys are pretty perky. They will send you dried starter for free. You can also add 1/4 to 1/2 tsp ascetic acid to increase “sour” in the loaf. *
* per Truckee Sourdough CO.
Why add yeast with a sourdough starter ?
Takes longer without yeast especially using whole wheat.
Hi, does it have to be baked in a Dutch oven or can I use a bread tin and the regular oven? This Dutchy doesn’t have a Dutch oven (yet). Groetjes, Marieke
I have the same question!
I’ve made this bread several times and it always turns out great! Thanks so much for sharing your knowledge!