I love homemade bread, and I especially love rye bread. The problem is that I haven’t always been too successful in making bread the traditional way with kneading and rising. It always seems to turn into a hard lump of some sort, and I’ve never been motivated enough to learn how to do it the “right” way.
However, several years ago I was introduced to the book My Bread: The Revolutionary No-Work, No-Knead Method by Jim Lahey, which pretty much changed my world. Now I could easily make wonderful bread with very little work and just a bit of forethought.
Shortly thereafter, I made my first sourdough starter, and soon started tweaking all of my homemade bread product recipes into sourdough (sourdough tortillas, sourdough pizza, sourdough naan bread, and sourdough blueberry pancakes to name a few).
But, the recipe I made the most was my no-knead sourdough bread, which always turned out amazing. So, when I got on a rye bread kick I decided to adapt that recipe into a no-knead sourdough rye bread, with great results!

Want to save this post for later?
I have to admit, the whole reason for making this bread is because of my favorite sandwich, the almighty Reuben. I have a goal (call it a new years resolution if you will) to make a completely homemade Reuben sandwich, and by homemade I mean everything from the bread to the sauerkraut to the cheese is made from scratch and home fermented.
I will even corn my own beef and make my own fermented ketchup for the Russian dressing. I may even attempt a vegetarian tempeh version. I’ve already got the sauerkraut down, so this bread is the next step. Hope you’ll follow along and support me in my Reuben from scratch journey!
No-Knead Sourdough Rye Bread Ingredients
Here is what you will need for this no-knead sourdough rye bread:
- 2 cups bread flour
- 1 cup rye flour
- 1 teaspoon salt
- ½ teaspoon rapid rise bread yeast
- 2 tablespoon caraway seeds (optional, but highly recommended)
- ½ cup sourdough starter
- 1 ⅓ cup cool water (possibly more or less)
- cornmeal for dusting
This recipe also requires a 4-6 quart cast iron, or enameled cast iron, dutch oven. I use the Lodge 5 quart cast iron dutch oven and love it, but it’s not that much more expensive to get a 6 quart enameled cast iron dutch oven from Lodge. I may consider upgrading myself, as I use mine all the time!
How to Make No-Knead Sourdough Rye Bread
The first rise takes 12-18 hours, so it’s best to start this the evening, the day before you want fresh bread. First stir together the flours, salt, yeast and caraway seeds.

Then add the sourdough starter and water and stir together until a shaggy dough forms. You may need a little more or less water, but 1 ⅓ cups is usually pretty spot on. The dough should be fairly wet, too wet to knead, but not overly so.

Cover with plastic wrap, or no-plastic wrap if you have it, and let sit in a warm spot in your kitchen for 12-18 hours. It should get bubbly and have risen noticeably.

You can see the bubbles well from the side view. Yay, dough bubbles!

Turn the dough out onto a floured board and turn the sides in. You’re not really kneading, just more like folding. A dough scraper helps.

Then flip the dough over so the seam side is down and place on a tea towel that has been dusted with cornmeal.

Top the dough with a light sprinkle of cornmeal, then fold the ends of the towel in loosely to cover the ball and set in a warm place to rise for another 1-2 hours.

I usually do 2 hours in the winter because it is colder, but if you live in a warm climate (or if it’s summertime) 1 hour is usually sufficient. ½ hour before the second rise is done, put the dutch oven, with the lid on, in the oven and preheat it to 475°F. The dough should have spread out a bit when it’s finished rising.

Now this is the tricky part, and the one thing that I have the most trouble with. I usually have Joel do it for me! The good thing is that it usually works out just fine, so don’t worry. Take the hot dutch oven out of the oven, take off the lid, and flip the dough over into it, upside down.

You can shake the dutch oven a little to get the dough centered if need be, then cover and return to the oven for 30 minutes. Then take the lid off and cook for another 15 minutes.

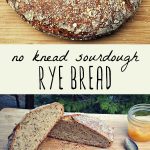
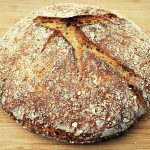
When it’s all said and done you should have a gorgeous loaf of rye bread! Cool for several hours on a rack before cutting. I know, that’s the hardest part!

The caraway seeds gives it that distinctive rye flavor and smell. It’s especially good with a little bit of homemade marmalade!

Rye bread often doesn’t rise quite as much as regular bread because there isn’t as much gluten in rye flour (which is why it needs some regular flour as well). This bread was still tender and delicious, tangy from the sourdough and perfect for a sandwich.
Yummy, I can’t wait for that Reuben!
Get more sourdough recipes here:
- No-Knead Sourdough Bread
- Sourdough Rye Bread
- Sourdough Pizza
- Sourdough Blueberry Pancakes
- Sourdough Naan Bread
- Mini Sourdough Appetizer Pizzas
- Sourdough Flatbread
- Sourdough Discard Bagels
No-Knead Sourdough Rye Bread
Ingredients
- 2 cups bread flour
- 1 cup rye flour
- 1 teaspoon salt
- ½ teaspoon rapid rise bread yeast
- 2 Tablespoons caraway seeds optional but highly recommended
- ½ cup sourdough starter
- 1 ⅓ cup cool water approximately
- cornmeal for dusting
Instructions
- Because the first rise takes 12-18 hours, it’s best to start this the evening before you want fresh bread.
- First stir together the flours, salt, yeast and caraway seeds.
- Then add the sourdough starter and water and stir together until a shaggy dough forms. You may need a little more or less water, but 1 ⅓ cups is usually pretty spot on. The dough should be fairly wet, too wet to knead, but not overly so.
- Cover with plastic wrap, or no-plastic wrap if you have it, and let sit in a warm spot in your kitchen for 12-18 hours. It should get bubbly and have risen noticeably.
- Turn the dough out onto a floured board and turn the sides in. You’re not really kneading, just more like folding. A dough scraper helps.
- Then flip the dough over so the seam side is down and place on a tea towel that has been dusted with cornmeal. Top the dough with a light sprinkle of cornmeal, then fold the ends of the towel in loosely to cover the ball and set in a warm place to rise for another 1-2 hours. I usually do 2 hours in the winter because it is colder, but if you live in a warm climate (or if it’s summertime) 1 hour is usually sufficient. The dough should have spread out a bit when it’s finished rising.
- 30 minutes before the second rise is done, put the dutch oven, with the lid on, in the oven and preheat it to 475°F.
- Remove the hot dutch oven out of the oven, take off the lid, and flip the dough over into it, upside down. You can shake the dutch oven a little to get the dough centered if need be, then cover and return to the oven for 30 minutes.
- Take the lid off and cook for another 15 minutes.
- Cool for several hours on a rack before cutting.
Notes
- This recipe also requires a 4-6 quart cast iron, or enameled cast iron, dutch oven. I use the Lodge 5 quart cast iron dutch oven.
- Recipe time does not reflect a Second Rise of 2 hours.
Nutrition

first time — great but too small. making again with a little more of everything. question: when my 24 hours are up, it will be too late to deal with the second rise. could i put it in the fridge overnight, bring back to room temperature in the morning then continue?
Yes, that should work!
I have made the recipe three times now and it always comes out so flat. There are nice holes inside, great taste and texture, but is there any way to get it to hold a nice rise? It looks great after the overnight rise but seems to go flat after that, even if I do a few extra folds and give it an hour and a half or two on the second rise. Any ideas?
It sounds like your dough may be over-proofing, so I’d try shortening the second rise a little and making sure the dough has good surface tension after shaping.
This is a keeper. Excellent flavor and excellent texture. I’ve made it twice, with the second version involving some tweaking.
The first attempt I followed to the letter, but I found the 1 1/3 cup of water to be too much. The dough was very slack and difficult to work with or form. And I found 2 TBSP of caraway to be waaay too much. But the outcome was good, and worth trying again with tweaks.
My initial inclination was to include some stretch and folds to see if that would increase the gluten development and make it easier to handle, but rather, I stuck with the no-knead concept, and dropped the water, first to 1 cup, and then creeping up to 1 1/4 cup, which was just enough to have the dough come together before the resting/rising. And only 1/2 tsp (not TBSP) of caraway. I also kept track of all the measurements in grams for easier replication later. The result was a loaf with great crust, chewy interior, great flavor, and just a hint of caraway. I love the texture of the cornmeal too.
Thanks for putting this out there!
Jeff
I’m so glad you enjoyed this recipe, Jeff!
Made this today after reviving my starter. I used a cup of wholemeal flour instead of rye as it was what I have. Amazing tall loaf in Dutch oven. So excited to have a good result. A recipe I shall make often. I going to open the last 2021 jar of blackcurrant jelly to go with it.
Thanks so much
So happy you liked this recipe, Jan!
Just a thought, my husband and I are partial to traditional rye without the seeds (seeds get caught in our teeth) so I boil the caraway seeds, let them cool and use that water as part of the water for the bread. Works great and give the bread the “extra” rye flavor
That’s a great tip, Pauline. Thanks for sharing!
Cool idea about using the caraway seed water – we don’t like the seeds. So, I will try this. Thanks, Ute
Thank you for a wonderful recipe :-) Can I ask if the added yeast important for the recipe. I am trying to learn to make rye sourdough in order to avoid yeast, so just wondering if the addition of it is to do with it being knead free. Thanks
I would like to make this Rye Sourdough Bread recipe, but I don’t have a cast iron roaster. Is it possible to use a loaf pan?
Yes, that should still work, Holly.
Hi. Love this loaf. I don’t understand why you say to put it in the pan upside down. Do you mean with the seam up?
Anyway, I always put the seam down and it works very well. Many of my friends have become new bakers after the gift of this loaf.
Hi Susan, yes with the seam up! That helps the bread to grow and get a crack in the top. But of course you can do it however you like as long as it’s working for you!
If the first time you make a bread recipe it was great, better do it again and again to be sure it wasn’t a fluke. I am a new-five months-sourdough baker. I prefer the over night raise methods, not matter what sort. I have been making the very seedy Danish style in a Pullman pan and have success with them. I wanted a simple rye sour dough that I could mix up quickly. Your recipe is IT! The first time, I followed the recipe to a T. Great bread. Nice chew to the crust and sourdough aroma throughout. After a few weeks, I baked this recipe two days in a row. I had gotten a 7” proofing basket as I thought that would be perfect for this sized loaf. It WAS perfect and it was fun to see the circular lines on the bread. The third loaf was the best. I was more mindful to not let it raise too tall so there would be some oven spring left in the dough. (I have been reading all sorts of advice on sourdough baking this last few weeks. I actually got about an additional 3/4” taller loaf today over yesterday. Thank you so much for this great recipe. We made avocado toast with it to accompany a Thai/Mexican soup for dinner.
Yum! Avocado rye toast sounds wonderful! I’m so happy you’re happy with this rye bread recipe!
I have now made this recipe at 150% size three times. Everyone who tastes it is thrilled by the sourdough flavor and the lightness of the rye. (I give away lots of slices!) I did use a 9” proofing basket and my 7 quart Dutch oven to accommodate this size. They worked perfectly. I have been feeding my starter about 2pm and then mixing up the dough about 7pm. Perfect timing as the starter is nicely active. Thank you so much for this wonderful recipe.
You’re welcome, Patricia! I’m thrilled you love this recipe!
Do you have any advice on doubling the recipe? Is it possible? What adjustments would i make?
You would need to multiply all the ingredients by 2.
Thanks for a great recipe. Easy to follow and explained well! I used a Benetton to do the 2nd rise and got a nice round shape. My dough was very soft and wouldn’t maintain its own shape so I ended up baking it in a smaller metal pan with the cast iron cover and it came out wonderful! Now to the hardest part, waiting for it to cool… 😅
YES! I’m so glad it came out wonderful!
I am curious to adapt this to using beer instead of water, or partially, as I have seen many rye beer recipes. Do you have any experience or suggestions with that adaptation to the recipe? Thanks!
Outstanding bread. only thing wrong with this recipe is that the loaf isn’t big enough to last us beyond one meal. Will make 2 next time. Suggestion – I flipped the dough onto a wide strip of parchment paper on my counter and then just lifted the edges of the paper and dropped the whole thing into my dutch oven. It worked great and also made it easy to lift the hot bread when removing it from the dutch oven.
This will be my next bake. I have a 3+ y/o Rye starter from a King Arthur baking class which has made quite a few loaves of a deli rye.
I do like the no knead concept however and not for the no knead aspect but for the fact the much longer proofing time adds flavor and, if one believes everything about sourdough, should make it better for you.
Regarding the comments about leaving out the yeast. We love the smell and taste of yeast and it is missed when only a starter is used. Just a personal preference.
I’d also, for the 2nd bake, after we see how this 1st bake turns out, like to incorporate Barley Malt Syrup. I believe I’ll have to back out a little water to compensate but it should be an interesting experiment.
I do not know what I did wrong but my dough was very soft n wet.
Was very hard to handle it while forming the shape.
Any advice?
Colleen, have you made this recipe with just the starter and no yeast? Could you please advise me on how to achieve this?
My first attempt didn’t rise explosively, and I’m going to try again with my starter on the way up instead of at its peak. . . but a slice of good Swiss cheese on this bread is OUT OF THIS WORLD GOOD! And I avoided the problem of dumping the dough into the hot Dutch oven by dumping it onto parchment and lowering the parchment into the hot pan bt holding the corners. Easy peasy, and the baking time was spot on.
What if I don’t have a big cast iron pot like that? Could I use something else?
Hi, if you are looking for an easier way to avoid the clumsy last step (rolling the risen dough into the hot Dutch oven), I use the Lodge cast iron pizza pan. I put the pizza pan in the oven while it’s preheating. I fold my dough and prepare it for the second rising, but place it on baking paper. I then use a pizza peel to pick up my dough and with a quick movement place the baking paper with the dough directly on the hot pizza pan. Right before I do this, I spray a little water into my hot oven to get the humidity.
I can’t wait to put this in the oven! I doubled the recipe last night and just shaped the loaves-they are resting now. I have two Wagner Ware old school Dutch ovens that belonged to my grandmother so they are easily over 100 years old and I bake my sourdough in them. Very excited and I hope my loaves in their finished form look as gorgeous as the above!
Hi! About flipping it into the Dutch oven. I’ve got burned a few times and now use baking paper inside a pasta drainer to prove the dough. Then I lift the dough up with the corners of the baking paper and lower it into the Duch oven. Paper and all. It works a treat. I haven’t done it with a starter so thanks. ????
I have been making this for a couple years. I proof it in a high sided mixing bowl lined with parchment and gently move it to my preheated lodge covered dutch oven by lifting the parchment. Also easy to remove from pan at finish. Perfect every time. Lovely recipe.
Awesome. I’m so glad you’ve been liking this recipe!
What an excellent idea Silli! I have a strainer and that shape is perfect. I’m always looking for ways to have less that does more. Yay! So glad you told us all about this.
Why isn’t fibre content listed on sourdough rye bread wrapper, please advise fibre content
Because this is a homemade recipe that does not include the wrapper. I don’t know the fiber content.
I love this recipe, and it’s become a staple in my homemade bread repertoire, but I would really like to find some way of adapting it to create a loftier loaf. What do you think would happen if I tried 1-1/2 times the ingredient quantities, and a longer bake time at a lower temperature? Thanks in advance for advice. Karen
It definitely wouldn’t hurt to try… Let me know your results!
I was just going to mention that I place my dough on a lightly dusted piece of parchment paper and just lift the whole piece into my Dutch oven and bake. It also makes it easier to grab and remove once finished baking. With that said i’m Usually baking multiple loaves and leave my Dutch ovens going in the oven.
You need the high temperature to get the oven spring of the dough. 450 should do it, after it rises in the oven you can lower the temp to 375 – especially for a larger loaf so it’s doesn’t get too brown. I remove the lid in the last 10 minutes to let the crust brown. A smaller cast iron pot would also make it rise higher – the walls of the pot would keep it from spreading to much.
. Decided to look up the definition of oven spring so it would be a correct explanation: ” oven spring The sudden increases in the volume of a dough during the first 10–12 minutes of baking, due to increased rate of fermentation and expansion of gases.”
Rye flour is hard to get to rise. You might want to add some vital wheat gluten if you want a loftier rise. Also she did not score her bread before baking. The high temp is correct and using DO is the best way to get the loft. The lid on it helps it steam and gives it rise.
I am cooking mine at 450 as 475 seems a bit extreme, I’ll let you know how it does!
Thank you for the recipe! I can’t wait to try it.
I will admit that I am not very good on a computer, old school, a dinosaur. Most other sites have a printer friendly version of the recipes that eliminates a lot of the photos and the advertisements. Maybe it is just me or my system. I consider myself a grommet (not gourmet, ha ha funny funny) cook and am not afraid to try any different ideas. after reading an entire recipe (photos and all) I can usually make the recipe with an ingredient list and basic directions.
Because of the cast iron, this recipe looks like with a little prep, planning and practice could be made over a camp fire or backyard bbq (gas grills not acceptable) . Maybe with some garlic butter and grated parmesan or in the mourning with some cream cheese, YUMMY.
By the way, I am heavily into raised bed organic gardening and am willing to share what I know with anyone that is willing to contact me. (cam.man1956@gmail.com)
Thanks for the reply and the recipe. I look forward to trying it very soon.
There is a printer friendly button at the top and bottom of the post, and I won’t be approving any more comments about printing this recipe :)
Three things, Rye bread, sour dough, cast iron. all things I like. Well four, I wish I did not have to print 30 pages just to get the recipe and basic instructions. It is not good for the carbon footprint. Maybe in the future, you could post printer friendly versions of the recipes. Okay?
Glad you liked the post! But, hmm… I find it hard to believe that it was *30* pages (I just print previewed that entire post and it was 7). Thanks for the input, though, I will look into printer friendly options :)
Printer Friendly recipe would be greatly appreciated. Starting tonight, can’t wait.
There is a printer friendly button at the top and bottom of the post, and I won’t be approving any more comments about printing this recipe :)
I just bookmark everything on my phone but if you use a pencil and write it put, you’ll save even more footprints….love this recipe and great instructions!
I’m just about to try this but I’m won’t be using the yeast, as that’s what the sourdough is for. It’ll just need a longer resting time to develop, usually at a colder temp, which creates a much more flavourful loaf.
I meant to add…if you’re not going to use the yeast, don’t add the salt for the initial rise, as salt retards yeast.
how much longer do you leave it to rise if you don’t use yeast?
There is a printer friendly button at the top and bottom of the post, and I won’t be approving any more comments about printing this recipe :)
I want to make this! It’s been awhile since I have made the no rise bread. It is such fun and so easy!