


{This post is sponsored by Ball® Fresh Preserving}
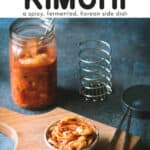
Kimchi is a spicy Korean side dish that is traditionally fermented, similar to sauerkraut. It is usually made with napa cabbage along with other vegetables like carrots, onions, ginger, and garlic. Korean chili flakes give it a spicy kick! Kimchi is surprisingly easy to make and so delicious!

Want to save this post for later?
Ball® Fermentation Kit
I’m really excited to show you this brand new Fermentation Kit from Ball® Jars! I’ve used a lot of fermentation kits over the years, but this one is definitely a new favorite.

Each Fermentation Kit includes:
- 1 Ball® Wide Mouth Quart Jar
- 1 Wide Mouth Fermentation Lid
- 1 Fermentation Spring
- 1 Package Salt for Pickling & Preserving
- 1 Recipe Booklet

The spring is used instead of a weight to hold the vegetables underneath the brine during fermentation. The flat side of the spring is placed on top of the vegetables in the jar, then the fermentation lid is screwed on, which makes the spring push the veggies down. I think this is such a great idea!
The recipe booklet is handy and includes four delicious fermentation recipes, including this kimchi recipe!
Get the Ball® Fermentation Kit here!
How to Make Kimchi
This fermented kimchi recipe is so easy to make, and absolutely delicious!
Two things I want to mention first. It’s very important to use Korean chili flakes, also called gochugaru, in this recipe, rather than any other chili flakes you might have.
I also recommend to not omit the fish sauce, unless you are vegetarian or vegan. The unique flavor of both of these traditional ingredients really give this kimchi an authentic flavor profile!
Now, on to the kimchi recipe!
First you will need to cut a two pound napa cabbage into quarters. Then remove the core and cut the cabbage quarters again lengthwise into long ribbons.

Put the cabbage ribbons into a large bowl and sprinkle them with salt. Massage the salt into the cabbage (this works best by using your clean hands), squeezing to release the liquid.

Then cover the bowl and let it stand for 1-2 hours to release some of its liquid.
Meanwhile, process the garlic, ginger, Korean chili flakes, soy sauce, and fish sauce in a food processor until a paste forms.
After the salted cabbage has sat for 1-2 hours, add the grated carrot, green onions, and chili paste.

Massage everything in the bowl to combine. Again, this works best with your hands. If you are sensitive to hot peppers on your skin, then you can wear gloves.
I like to get in there with my clean washed hands though, as that’s traditional. It’s even said that mixing the kimchi with your hands imposes a unique flavor!

If you use your bare hands, be sure to wash them well afterwards to get all of the spicy chili paste off of your skin.
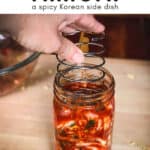
Then pack the kimchi into a Ball® Wide Mouth Quart Jar, pressing it firmly down with your hands or a spoon. Leave at least 2 inches (5 cm) of headspace.
Pour any liquid from the bowl over the kimchi, pressing down firmly to help the liquid cover the cabbage. There may or may not be a lot of natural brine, but the cabbage will continue to release it as it ferments.
Place the fermentation spring on top of the kimchi, flat side down, then twist the lid on. The spring will keep the cabbage under the brine.

Wipe the jar down and cover it with a cloth. Store in a cool place for 24-36 hours.
After this time, if the brine is still not covering the cabbage by one inch (2.5 cm), remove the lid and spring and add some additional brine to cover. You can make more brine by dissolving one teaspoon Ball® Salt for Pickling and Preserving into one cup of water.
Wipe the jar rim before replacing the spring and lid, and discard any unused brine.

Check daily to make sure that the cabbage and vegetables stay under the brine.
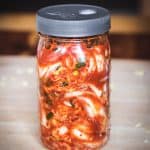
Let the kimchi ferment for one week, then do a taste test. If you prefer a stronger flavor, you can ferment for up to two weeks total. That’s what I did and the resulting flavor was amazing!

Store the kimchi in the refrigerator for up to 6 months. Chances are it won’t last that long because it’s so delicious!
This fermented kimchi is so good, I want to put it on everything! It’s great on eggs, with rice, or added to soup or noodles.
Try making kimchi fried rice, kimchi grilled cheese, Korean kimchi tacos, or even kimchi pancakes!

It’s also just great as a simple spicy vegetable side dish! That is often how it is traditionally eaten, and I can see why. It’s that good!

More Fermented Vegetable Recipes
Here are more delicious recipes for fermented vegetables!
- How to Make Sauerkraut
- Fermented Cherry Tomatoes
- Fermented Green Tomatoes
- Fermented Asparagus with Garlic
- Fermented Cucumber Pickles
- Fermented Dilly Beans
- Fermented Garlic
If you want to learn more about fermentation, check out my favorite books on fermenting and homebrewing!
Kimchi
Ingredients
- 2 pounds Napa cabbage about 1-2 medium cabbage
- 1 Tbsp Ball® Salt for Pickling and Preserving plus more as needed to make extra brine
- 3 cloves garlic
- 1/2 cup dried Korean chili flakes (gochugaru)
- 3 Tbsp fresh ginger grated
- 1 Tbsp fish sauce
- 1 Tbsp lite soy sauce
- 1 unpeeled carrot scrubbed and grated
- 1 bunch green onions (scallions) green and white parts thinly sliced
Instructions
- Remove any bruised outer leaves of the Napa cabbage, then cut it into quarters. Remove the core and cut the cabbage quarters again lengthwise into long 2.5 inch (6 cm) wide ribbons.
- Put the cabbage ribbons into a large bowl and sprinkle them with salt. Massage the salt into the cabbage (this works best by using your clean hands), squeezing to release the liquid. Cover the bowl and let it stand for 1-2 hours.
- Meanwhile, process the garlic, ginger, Korean chili flakes, soy sauce, and fish sauce in a food processor until a paste forms.
- After the salted cabbage has sat for 1-2 hours, add the grated carrot, green onions, and chili paste. Massage everything in the bowl to combine, wearing gloves if desired.
- Pack the kimchi into a Ball® Wide Mouth Quart Jar, pressing it firmly down with your hands or a spoon. Leave at least 2 inches (5 cm) of headspace. Pour any liquid from the bowl over the kimchi, pressing down firmly to help the liquid cover the cabbage. There may or may not be a lot of natural brine, but the cabbage will continue to release it as it ferments.
- Place the fermentation spring on top of the kimchi, flat side down, then twist the lid on.
- Wipe the jar down and cover it with a cloth. Store in a cool place for 24-36 hours.
- After this time, if the brine is still not covering the cabbage by one inch (2.5 cm), remove the lid and spring and add some additional brine to cover. You can make more brine by dissolving one teaspoon Ball® Salt for Pickling and Preserving into one cup of water. Wipe the jar rim before replacing the spring and lid, and discard any unused brine.
- Check daily to make sure that the cabbage and vegetables stay under the brine.
- Let the kimchi ferment for one week, then do a taste test. If you like the mild tangy flavor, proceed to the next step. If you prefer a stronger flavor, you can ferment for one more week, tasting every 3 days, until the desired flavor develops.
- Once it has finished fermenting to your liking, remove the spring and add fresh brine as necessary to cover. Wipe the jar rim before replacing the lid. Store in the refrigerator for up to 6 months.

Can this be made with regular cabbage?
Yup.
Can not wait to try this recipe! Is there a way to make it shelf stable? I have A LOT of cabbage from my winter garden 🙃
Hi Jessah. Kimchi already is shelf stable after it’s fermented! Lactic acid bacteria inhibit spoilage, so as long as you keep your cabbage submerged under the brine, it’ll stay good for many months without refrigeration and the flavor will only become more deep and complex as it ages.
When storing in fridge after you’re satisfied with the fermented taste do you keep the fermentation lid on or switch to standard jar lid?
Thank you.
At this point, you can switch to a standard lid.
What can I substitute the fish sauce with? Or can I simply leave it out?
Thanks!
Leave it out if you prefer.
When fermenting vegetables is it necessary to keep the weight on after the fermentation process is complete? I’d need a lot of weights if that is necessary.
Hi Paula. No, the weight is no longer necessary once your ferment is refrigerated.
Does the salt have to be pickling salt? Can I use kosher salt as long as it is well dissolved?
It is not recommended to use any kind of table salt containing iodine, including kosher salt. I personally prefer pink Himalayan salt. You can learn more about choosing salts for fermentation here.
I am new to Kimchi and would love to know how others incorporate it into your diet. Thanks!
I add it as a side to my morning eggs, over rice, onto sandwiches. Pretty much anywhere that could use a bit of spice and tang.
Hi, how long can this be stored and does it have to be refrigerated?
Yes, it needs to be refrigerated after it is finished fermenting, and it will last for about 6 months in the fridge!
I’m a complete newbie here.
is the brine in question poured hot alike pickling brine, or do you pour it cold?
The brine is cold, if it were hot it would destroy all of the beneficial bacteria.
I did not see anyone ask, but will it still work if your fish sauce does have preservatives?
Preservatives can hinder the fermentation process, so I wouldn’t use anything that contains them.
This past weekend we ate at the Coho Cafe in Issaquah WA. Part of my brunch meal included a fried rice and kimchi cake. It looked like they mixed kimchi that had been chopped into small pieces with cooked rice, compressed it tightly into a patty (about the diameter of a 15 oz can of veggies and about 3/4 – 1″ tall) and then fried it till it was nice and crispy on both sides. I can’t wait to try and that at home.
Ok. Bring on the kimchi! This is great, Colleen! Always makes me happy to read these.