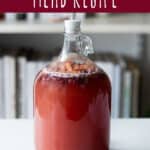


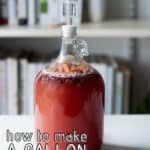


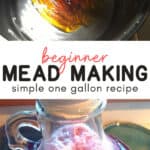
You may have heard of mead before or maybe you haven’t, but one image that always seems to come to mind when mead is mentioned is Vikings drinking their grog. I don’t know a whole lot about Vikings, but I do know a bit about mead! Mead is a fermented honey and water mixture, some call it honey wine, and it is quite possibly the first fermented drink that humans purposefully made. Luckily for us, it’s quite easy to make your own mead! I’m going to show you how to make one gallon of mead with this simple blueberry orange mead recipe.

Want to save this post for later?
Simple Mead Making eBook
Want to learn more about making mead? I have a Simple Mead Making for Beginners eBook just for you!
It has ingredient and equipment checklists, detailed instructions for brewing and bottling your mead, and simple mead recipe ideas! Be sure to check it out if you’re new to the mead making process and want a step by step guide.

One Gallon Mead Recipe
Here is my simple method for making one gallon of mead!
What is Mead?
Mead is a fermented alcoholic beverage that is traditionally made with just honey and water, and maybe some yeast (wild yeast is often used).
Whenever you add fruit to mead it’s technically called a melomel rather than mead. I still usually default to calling it mead, though.
You could also use apple cider instead of water and then you’d have what’s called a cyser. If you add herbs and spices or other flavorings it’s called a metheglin.

Mead Equipment and Ingredients
There is some special equipment and ingredients that you will need to make this mead.
Rather than list it all here, I’ve created a page that has links to all of my favorite mead ingredients and equipment: Mead Equipment & Ingredients: Everything You Need to Get Started.
There you will find links to the sanitizer, brewing jugs and buckets, airlocks, yeast, tubing, bottles, and honey and I recommend!

How to Make Mead: One Gallon Mead Recipe
Alright, let’s get started on making this mead!
This is a recipe for one gallon of mead, but I’m always of the mind that if you’re making one you might as well make two.
You can split a package of brewing yeast up between two jugs (one package can make up to 5 gallons of mead).
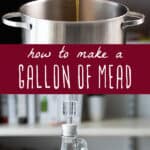
Sanitize Everything
The first thing to do is sanitize everything that will be used in the brewing process: the jug, airlock, big pot, spoon and funnel.
Simply follow the directions on the sanitizer and don’t throw it out until you’re totally done (just in case your dog licks the funnel or you drop your spoon).
Make the Mead Must
Once everything is sanitized, put about 1/2 gallon of non-chlorinated (filtered) water in a large pot on medium heat. When it’s warm, but not boiling, add the honey and stir until it dissolves.
Using two pounds of honey will make a very “dry” mead (not sweet), while three pounds will create a sweeter mead.
The type of yeast you use will also affect how dry or sweet the mead is.

Turn the heat off. It may be a little foamy, but that’s ok.
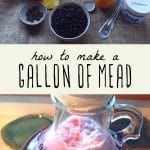
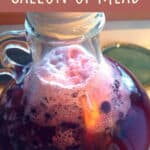
In the meantime, put the berries (or any fruit of your liking), orange slices (skin and all), and raisins into the one gallon jug.
Raisins are added as a natural nutrient for the yeast. You will not notice any flavor from them in the finished mead.

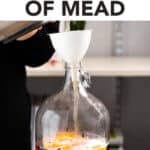
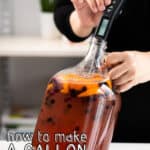
Then, using the funnel, carefully pour the honey water mixture (technically called “must”) into the jug.

Top off the jug with cool non-chlorinated (filtered) water, leaving at least 2 inches of head space on top.
Then put the lid on the jug and gently mix everything around a bit. If you bought a jug that came with an airlock it may not come with a lid, so you’ll have to find a lid that fits or improvise a bit here. A solid cork (without a hole for the airlock) would work.
Pitch the Yeast
The next step is to add the yeast, but you need to make sure that it isn’t too hot, which will make your yeast inactive. It should feel lukewarm, no more than 90° F (32° C). I recommend using a thermometer before adding the yeast to be sure.

Once it is less then 90° F you can pitch the yeast into the jug.
You don’t need to use the whole package of yeast for one gallon, 1/2 package is enough (it doesn’t have to be an exact measurement). Store the opened yeast package with the remaining yeast in an airtight zip top bag in the refrigerator for later use.

Now the fermentation fun can begin!

Once you’ve pitched the yeast, put the lid back on tightly and this time you’re really going to shake it up for several minutes.
It’s a good workout for your arm muscles, so you can skip the gym on days when you make mead!

Add the Airlock
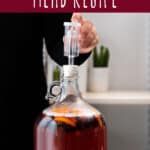
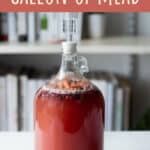
Put a little water in the airlock to the line, then put the rubber stopper into the jug.

In a few hours you should start to see bubbles forming in the jug and in the airlock.

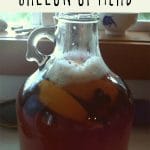
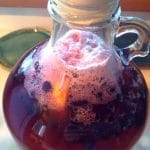
After several hours or overnight, you may see a lot of bubbles rising up the neck of the bottle! The whole top might get a little foamy at first, but things will settle down.
Don’t worry if the bubbles rise up into the airlock for the first couple of days, that just means that you have a very active (and happy) batch of mead! You can periodically remove the airlock to rinse it out, then replace it back into the jug.
I love watching all the little bubbles! Fermentation is so cool.

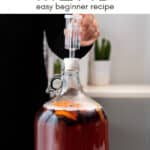
Set Aside to Ferment
Keep the jug in a cool (not cold) dark place out of direct sunlight to ferment.
Mead can take longer to ferment than hard cider or beer, depending on the ambient temperature it will take anywhere from 3-6 weeks.
I usually give it 5-6 weeks before bottling to be on the safe side, as you don’t want any broken bottle explosions! I’ve definitely had some very champagne like mead before.
You want to wait until you don’t see any bubbles in the jug and your airlock is still before bottling.
Bottle the Mead
Bottling one or two gallons of mead is the same process as bottling hard cider. Follow my tutorial there to get a detailed process.
You may want to wait a while to drink your mead as it definitely gets better with age.
I often drink it “green” (young) as I enjoy it either way. It is fun to save a couple of bottles for several months, or even a year, just to see how the taste changes with age.
More Mead Recipes
Now that I’ve shown you how to make this simple one gallon of mead recipe, chances are you will want to make more soon!
I have written posts on How to Make 5 Gallons of Mead and How to Bottle 5 Gallons of Mead if you want to try making a larger batch.
I have one gallon mead recipes for Wildflower Mead, Dandelion Mead, Blackberry Mead, Elderberry Mead, Elderflower Sparkling Mead, and Maple Orange Mead that are all delicious and follow this same basic mead recipe.
See my post on 15 Easy Mead Recipes for Beginners for even more!
If hard cider is your thing, see my posts on brewing hard cider and making hard cider with wild yeast.
Be sure to check out my Simple Mead Making: A Beginner’s Guide to One Gallon Batches eBook for more detailed information on brewing, bottling, and recipe ideas!
Cheers and happy mead making!
Simple One Gallon Mead Recipe
Equipment
Ingredients
- water non-chlorinated or filtered
- 2-3 pounds honey depending on how sweet you want to end product to be.
- berries or fruit of any kind fresh or frozen, about a cup
- 1 orange
- 10 raisins
- 1/2 package champagne yeast or other wine yeast
Instructions
- Sanitize everything that will be used in the brewing process.
- Heat about 1/2 gallon of non chlorinated water in the pot on medium heat. Once it's warm, but not boiling, add the honey and stir it so it all dissolves. Turn off the heat.
- Put the berries or other fruit, orange slices (skin and all), and raisins into the one gallon jug.
- Use the funnel and carefully pour the honey water mixture into the jug.
- Top off the jug with cold (preferably filtered) water, leaving at least 2 inches of head space on top. Put the lid on the jug and gently mix everything around a bit.
- Make sure that the temperature of the must is below 90°F, then add 1/2 packet of champagne yeast. Put the lid back on tightly and this time shake the jug for a minute or two to distribute the yeast.
- Put a little water in the airlock to the line, then put the rubber stopper end into the jug. Put the jug in a dark place. It should start bubbling within 12-24 hours.
- After about 4-6 weeks of fermenting, once all bubbles have stopped rising in the jug and airlock, the mead can be bottled and aged.
Notes
- Please see my Mead Equipment and Ingredients page for a detailed list of what you need to get started.
- Use my tutorial on Bottling Hard Cider to bottle the mead - the process is the same. The flavor of homemade mead will improve after bottling and aging.
- My Simple Mead Making eBook is a helpful resource if you are just getting started with making your own mead.

Thanks for this receipe. I’ve had mine (first batch ever) sitting for a month and it still bubbles every 5 seconds. Is there a point that time you would rack anyway to avoid off taste from the dead yeast and remaining fruit?
I would give it 6 weeks at least. I’ve let mine go for 2 months with no off tastes at all. Good luck on your first batch!
Hi! I was wondering can i keep it longer than 6 weeks in the 1 gallon bottle?
Sure! Sometimes it will take longer than 6 weeks to finish fermenting. I would say that you could probably leave it in there for 2-3 months without a problem.
Oh good, because I was going to make some in like may and then planned on bottling around August.
What’s the starting and ending Specific Gravity or Brix?
I don’t know, as I don’t take any specific gravity readings. This recipe is meant for beginners, and I don’t really feel that it’s a necessary step.
Why do you meticulously sterilize all your utensils, then just throw in unsterile fruit?
I’ve never really had an issue with this, but if you’re worried about it you can boil your fruit first, or you can do as Travis says and soak your fruit in vodka first.
Or you could add campden tablets which would kill any nasties
Hi – I’ve also been making 1-gallon batches of mead for quite some time, and pretty much by the same process you describe so well here. The small batch size really lends itself well to experimenting with different fruit and/or herb combinations (kaffir lime leaves are fantastic in mead, by the way!). Also, it’s been interesting to see how different yeasts affect the end product – I’ve used fruit wine yeast the most (leaves just a touch of nice residual sweetness). Ferment on!
Just finished my first batch of mead ever. I’ve been a Beekeeper for over 5 years and finally tried it thanks to this easy recipe. And took the advice and made two gallons :) Thanks so much!
Awesome, I’m so excited for you on your first batch of mead! I hope to have my own bees someday :)
I have a question. My batch has been going for about 4 weeks now and I took a whiff and smelled like my fruit has gone rotten. A very sour rotten fruit smell. Is this normal? Is my batch ruined? Is there anything I can do to fix it or dump it and start over? I used grapefruit, blackberry, raspberry, strawberry, blueberry and raisins.
Hi Cassidy, it will definitely have a pungent smell while fermenting, like a strong and fruity alcohol. What you are describing sounds normal to me. Did you use an airlock and packaged yeast? If so, it should be just fine. Once you rack or bottle it off the fruit it will start to smell better. Don’t worry :)
You should always do as in making beer with helping on fruit infections
Is to soak your fruit in vodka the day before you make it. This will kill any wild yeast on the fruit. This is good practice for adding fruit to anything that is going to be fermented. Wild yeasts will produce off flavors and you could get a possible infection in the mead. Even tho the alcohol will kill some of these nasties brettamyaces (not a good yeast unless your making sour beer ) loves sugar and a little warmth
And then after you will have some fruit flavored vodka. Cheers
What should happen if I kill the yeast? How will I know? If I did is the batch ruined?
Will Clove honey work? With grapefruit?
How about grapefruit would that work a little better?
Another question i forgot to ask was do you really have to heat the ingredients? I’ve seen some where you skip that step, was just wondering if there was a difference… Also is there a way to sanitize without the ordered sanitizer? Like boiling and heating everything? Or something?
Hi Michael, if you only have access to bread yeast (Fleischmanns) and can’t get sanitizer, I would try this simple recipe from Storm the Castle: How to make some Mead today – the cheap, fast and easy way . This is actually the first mead recipe I ever made and it turned out pretty darn good!
In the list of ingredients, I don’t see how much Honey to use. How much honey do you use for a gallon of Mead?
Hi Glen, the recipe says to use 2-3 pounds of honey to make a gallon of mead, 3 pounds is a good place to start as 2 will create a very dry (not sweet at all) mead. Most honey containers list the weight in pounds (or ounces if it’s less than a pound). For reference, 3 pounds of honey is approx. 1 quart. Hope that helps!
Lets say you’re making your home made mead and 8 weeks later you try it,….how do you know if it’s “no good”. Not taste bad, I mean near poison ? I don’t think I could tell the difference. Is there a certain smell or way of determining if its bad for you without drinking a full gulp ?
If you use commercial yeast like I did in this recipe, there really isn’t any health risk at all. It will never become “near poison”, but it could become vinegar, and you will know that because it will smell and taste like vinegar (and honestly, you’d have a darn good vinegar on your hands that you could use as such). In fact, way back in the day, people used to brew contaminated water into a light beer to make it drinkable and safe. If you don’t sanitize everything well you may get an off tasting brew, but you will know by the smell and taste. Ever had wine that’s gone bad? It’s horrible tasting, but it won’t kill you! The point is, don’t worry about it… it probably won’t happen, and if it does you’ll know!
Hi there! I recommend the use of sherry yeast instead of champagne yeast. It gives the mead a smoother flavor. Awesome article!
Is there a need for a secondary fermentation process or do you just leave it as you mixed it for 4-6 weeks and then bottle?
For just a simple mead there is no need for a secondary fermentation. You can definitely do that if you want, but it is not necessary at all.
After thirty days you can rack your mead (“siphon” to us common folk) into a glass car boy. It will ferment some more. That is okay.
Is there a reason I couldn’t make one or two gallons in a 6 gallon bucket fermenter? I’m pretty sure I would want to brew the larger amount at some point as well as beer so don’t see a reason to buy the small scale stuff… Thank you for a really simple and well done article.
I’ve personally never done it, but I don’t see why you couldn’t. I’m sure it will turn out just fine! Glad you like the post!
I just discovered your blog through a Facebook link from Wild Fermentation. I’m an experienced brewer, but I am inspired by the simplicity of this recipe! I’ve been feeling too lazy to go through the whole rigamorole of making a “proper” batch of mead, but this, I can handle! It’s going to be rhubarb mead! Thanks for the inspiration!
How did your rhubarb mead turn out? If good, how did you do your rhubarb?
Hello I was wondering how I could make this a sweet mead? Let it sit longer or shorter? Thanks will
Definitely use 3 pounds of honey per gallon or maybe even a little more. You may want to look into using a yeast that is made for sweet mead as the champagne yeast ferments out fairly dry. Either way, you do want to let it ferment out completely before you bottle it (no bubbles left) so that you don’t get bottle explosions!
And what would a good yeast be? Brand I mean. Thanks
You’ll get a better flavor and do less work racking if you skim the white foam off as it forms when you are heating your must. That is wax and other stuff left behind even on the highest quality honey. Do this until the foam stops forming and you will get super clear and clean tasting mead…
Yes, I’ve seen a lot of people do that, but it’s to fussy for me. My mead tastes great without that extra step, so I figure why bother? Also, this recipe is intended for beginners.
I was just curious, it’s kind of a newbie question… But, when the Mead is done after the 6 weeks, do you take out the fruit? Like, do you strain it before you drink it? Or do you leave the fruit in?
Great question, especially since I sort of glossed over that part :) You will definitely want to remove the fruit before drinking. If you follow the link at the bottom of the page about bottling the mead (or cider, it’s the same process) you will see that an auto siphon is used, which will keep the fruit out of the bottles. You can just strain it out if you don’t want to bother with the auto siphon, just be sure to sanitize your strainer and whatever vessel you strain it into!
I have to ask, because after I got my orange sliced and into the jug (which is kind of narrow-necked), it dawned on me that I might need to know how you got the fruit OUT of the jug when all was said and done. ;) LOL.
I’m assuming it’s going to break down over the six weeks of fermentation?
Yes, they will soften up a bit, but not totally break down. After I bottle the mead usually a few shakes of the jug upside down does the trick. Sometimes I do have to stick my finger in there to fish them out, but it’s usually not a problem!
Please don’t use chlorinated water, it can cause problems. Also, I would add only the rind and the meat of the orange, not the pith or the white part, The pit is bitter and can add a aftertaste to the mead. Use a potato peeler to get the rind off the orange. You can also use lemons, limes any citrus fruit, as long as it has an reason acid level. I’ve made mead with just lemons, honey (raw), nutmeg and water…..no yeast, but you have to really be careful to clean everything and no soap.
Yep, non-chlorinated water is what I said in the post ;) I’ve never had a problem with using whole citrus, in fact that’s what I use every time and my mead always turns out great! This recipe is intentionally simple for home brewers.
I have had very good results using lemon rather than orange and raisins and also a cup of cold black tea to add a little tannin. The ageing process I have found is best at about 6 months or so, ie, make in summer to drink at new year.
Hello! Thank you for posting this – has been something I’ve always wanted to try making. I had two newbie questions though:
1. Is there anything special you need to do with the bottling? I know you need to sterilize the bottles, but do you need to strain it through a sieve or cheese cloth or add a yeast inhibitor to the mead before bottling?
2. If I wanted to upsize to a 3 gallon carboy, is it just a one-to-one increase or does the recipe require modifications?
Thank you again!
John
The best way to bottle is by using an auto siphon with a bottling wand, a cheap and wonderful tool! I did a whole post on bottling gallon jugs of hard cider and it’s essentially the same process, so check that out. Yes, it would be just a one to one increase, that’s how I do it when I make a 5 gallon batch. Enjoy!
I love this! One container and GO! I’m about to bottle my first batch of dry mead, and have a batch of sweet mead in the primary fermenter. I have pinned this so I can find it again, because I am absolutely going to do this next time. I also love TJ’s Mesquite honey! I love that this recipe is simple. The one I’ve been using has many more steps, and I am personally of the opinion that simple is better! :)
So glad that you like it! It really is super easy… I’m always amazed by how quickly I can have it done and bubbling nicely in the fermenter!
I am, in fact, going to pick up some more honey and oranges and start a batch this afternoon. One can never have too much mead on hand! :)
Also, I am going to link this to my blog. I took some pictures of my process, as well. :) It smells AMAZING!!!! And it was SO easy, even a *ahem* caveman could do it! ;)
P.S. My husband saw the picture of your ingredients and thought I’d taken it because your tools and equipment look like mine. ;) “Hey, I didn’t know we had oranges in the fridge!” Uh….we didn’t…it isn’t my picture, LOL…
I linked back to you (and didn’t share the recipe, because if they want it, they have to come see your blog to get it, lol) this afternoon. I also posted pictures of ours as it was coming along. Next on my list? Your sourdough starter! <3
Great, thank you! It looks great. It is such a simple and fun recipe!
Maybe a stupid question, but after fermentation will thus be alcoholic?
Yep, just like wine :)
To the tune of about .55 multiplied by the amount of sugar. So if you start at 30% sugar, you will probably wind up with about 16.5% alcohol.
So you sanitize everything and then put dirty water in it? I am not knocking as I do the same for my beer but most of my water is boiled. I do however put in at least a gallon of tap water to bring my wort to 5 gallon after boil. Have you ever had a bad batch From doing that? I have not.
My water is from a well and is very clean, but if you have highly chlorinated tap water it’s probably best to filter it somehow, or boil it like you said. I’m just too impatient for that, haha! I’ve never had a bad batch, thankfully.
Does it taste like honey and also what fruits or combinations of fruits do you prefer?
It does have a slight honey flavor, it all depends on how much honey you use to begin with and how much residual sweetness there is left at the end. I prefer to make my meads dry, so they’re not overly honey tasting. I like to experiment and use all different types of fruits, but I seem to prefer berries of any type, blueberries, blackberries, raspberries and strawberries are all delicious!
How do you make the mead “dry” or “sweet”?
I usually make it on the drier side… make it however you like it, though!
she asked HOW you make them different like that, .. Dry or Sweet? I would like to know this since i do not like Dry wine.
More honey will create a sweeter end product. I would also suggest not using champagne yeast and choosing a sweet yeast variety instead.
does the honey need to be unpasteurized/raw ? we don’t have trader joe’s up here! :)
No, the honey does not need to be unpasteurized or raw, it will work fine with any kind of honey. I do, however, recommend that you use local honey if you can get your hands on it!
The mead can end up with a slightly “baked goods” flavor if you use pasteurized store honey.
Often your pasturized/store bought contains little or no honey, but is diluted with corn syrup/white sugar/high fructose corn syrup. Estimates are that 80% of the honey sold in stores in America are at the very least adulterated in some manner. If you don’t now the beekeeper’s name, you probably aren’t getting honey. That ‘baked goods’ flavor also comes from the non-honey sugars that is used to adulterate real honey.
Is there any way to substitute for the yeast ? …a natural ferment of some kind?
There is a way to do it as a natural ferment, you would do it in an open crock covered with a cloth, and you would probably use a little less honey. I’ve never done it before, but there is a recipe for it in Sandor Katz’s book “Wild Fermentation” (which is a great book to own!)
Question… I accidentally put the whole yeast packet into my gallon, what do you think will happen?
It should ferment just like usual! I’ve done that before, too. It’s just more economical to split a yeast package between two bottles :)
That’s how Belgian ‘Lambic’ beers are fermented. You won’t get a very strong yeast because airborne yeasts do not have a high tolerance for alcohol.
Which one of his books includes this no yeast recipe? He seems to have a few books on fermentation.
In response to a “more natural ferment” – well, yes. You can let atmospheric yeast land in the mix and take off. You never know what you are going to get. Might smell good, might smell bad.
Yeast, fungus, bacteria, and all is ALL around us and is component of nature.
I would STRONGLY suggest sticking with commercial winemaking yeast. EC-1118 can tolerate almost 18% alcohol and will finish cleanly.
The yeasts you purchase ARE natural. They are all natural. However, the yeast you purchase has evolved to the fermentation process and provides a purer, more flavorful result. Using wild yeasts is taking a ride on a very random bottlerocket that most likely will not produce clean flavors. Once your first batch has finished fermenting and has settled out, feel free to reserve some of that yeast from the bottom of the fermenter. Just like a sourdough starter, you can use that for your next batch. Mind you, yeast has very “plastic” genetics and it will continue to evolve based on your local conditions in your kitchen. Any of the decent books on home brewing and wine making should have a section on how to collect and wash yeast from your operation! Good luck!
Because mead is a honey wine, the unfermented mixture is a “must” not a wort. Wort is unfermented beer.
You’re totally right, thank you! I edited the post to reflect that.
Can i use a glass jug with a screw on cap ??
No, not while it’s actively fermenting, as this could cause the bottle to explode. You need to use some kind of airlock.
You can also use a balloon over the opening.
Only if you want glass and mead everywhere. If you don’t have an airlock, use a ballon. place it over the top securly, pinching the side, withoit removing it, to gently let out air as need but always leave it on till done.
Wouldnt putting a small hole in the top be better
Probably a nonsequitor comment here, but is it true that one pound of honey is equal to approximately 10.7 ounces? Here is a link to the conversion I’m referencing –
http://simplyrawhoney.com/what-is-a-lb-of-honey-anyway-convert-lbs-to-cups-or-fluid-oz-or-ml/
Does it need to be racked or can it just be left as is?
It does not need to be racked, but it can be if you would like to :)
I’m am told it should be clear? My batch is on week 6 and “cloudy”. Airlock goes more than 2 minutes without bubbling.
Do I wait for it to clear, or do I just go with the slotted time to bottle?
Colleen, I’ve been a Mazer(Mead maker) for over 25 years. One thing that I’ve discovered about using champagne yeast is that, compared to other brewing yeasts, it uses twice the honey, takes twice the time to ferment to finish, and the end product has twice the alcohol content. For a 1 gal. batch, per your recipe, you need to double the honey used to get a “semi-sweet” mead. If you don’t you will very likely end up with a “dry” mead. I have also discovered through trial and error, that it is best to rack every 30-40 days with champagne yeast or the lees(dead yeast on the bottom) begin to taint the batch with a back-taste like biting tinfoil.
I’ve been using champagne yeast for simple mead making for years and it always performs well for me. It is a great yeast strain for beginners because it is very reliable and rarely causes a stuck fermentation. I prefer my mead to be dry, but increasing the amount of honey will make the end result sweeter. I think doubling it would be way too much though, even with champagne yeast. I don’t find the flavor to taste of tinfoil without racking either. The main point is that this is supposed to be a very simple mead recipe made for beginners :)
What is the alcohol level I can expect from this recipe?
Oh yum. That looks wonderful and it is such an intriguing process. :).