


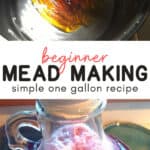
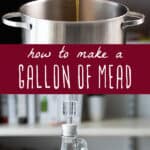
You may have heard of mead before or maybe you haven’t, but one image that always seems to come to mind when mead is mentioned is Vikings drinking their grog. I don’t know a whole lot about Vikings, but I do know a bit about mead! Mead is a fermented honey and water mixture, some call it honey wine, and it is quite possibly the first fermented drink that humans purposefully made. Luckily for us, it’s quite easy to make your own mead! I’m going to show you how to make one gallon of mead with this simple blueberry orange mead recipe.

Want to save this post for later?
Simple Mead Making eBook
Want to learn more about making mead? I have a Simple Mead Making for Beginners eBook just for you!
It has ingredient and equipment checklists, detailed instructions for brewing and bottling your mead, and simple mead recipe ideas! Be sure to check it out if you’re new to the mead making process and want a step by step guide.

One Gallon Mead Recipe
Here is my simple method for making one gallon of mead!
What is Mead?
Mead is a fermented alcoholic beverage that is traditionally made with just honey and water, and maybe some yeast (wild yeast is often used).
Whenever you add fruit to mead it’s technically called a melomel rather than mead. I still usually default to calling it mead, though.
You could also use apple cider instead of water and then you’d have what’s called a cyser. If you add herbs and spices or other flavorings it’s called a metheglin.

Mead Equipment and Ingredients
There is some special equipment and ingredients that you will need to make this mead.
Rather than list it all here, I’ve created a page that has links to all of my favorite mead ingredients and equipment: Mead Equipment & Ingredients: Everything You Need to Get Started.
There you will find links to the sanitizer, brewing jugs and buckets, airlocks, yeast, tubing, bottles, and honey and I recommend!

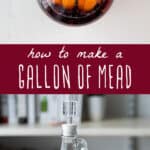
How to Make Mead: One Gallon Mead Recipe
Alright, let’s get started on making this mead!
This is a recipe for one gallon of mead, but I’m always of the mind that if you’re making one you might as well make two.
You can split a package of brewing yeast up between two jugs (one package can make up to 5 gallons of mead).
Sanitize Everything
The first thing to do is sanitize everything that will be used in the brewing process: the jug, airlock, big pot, spoon and funnel.
Simply follow the directions on the sanitizer and don’t throw it out until you’re totally done (just in case your dog licks the funnel or you drop your spoon).
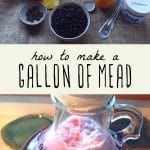
Make the Mead Must
Once everything is sanitized, put about 1/2 gallon of non-chlorinated (filtered) water in a large pot on medium heat. When it’s warm, but not boiling, add the honey and stir until it dissolves.
Using two pounds of honey will make a very “dry” mead (not sweet), while three pounds will create a sweeter mead.
The type of yeast you use will also affect how dry or sweet the mead is.

Turn the heat off. It may be a little foamy, but that’s ok.
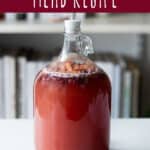
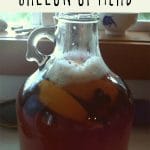
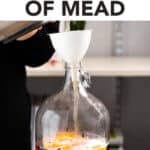
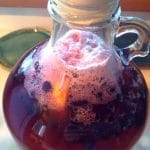
In the meantime, put the berries (or any fruit of your liking), orange slices (skin and all), and raisins into the one gallon jug.
Raisins are added as a natural nutrient for the yeast. You will not notice any flavor from them in the finished mead.

Then, using the funnel, carefully pour the honey water mixture (technically called “must”) into the jug.

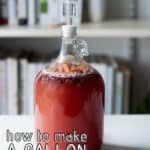
Top off the jug with cool non-chlorinated (filtered) water, leaving at least 2 inches of head space on top.
Then put the lid on the jug and gently mix everything around a bit. If you bought a jug that came with an airlock it may not come with a lid, so you’ll have to find a lid that fits or improvise a bit here. A solid cork (without a hole for the airlock) would work.
Pitch the Yeast
The next step is to add the yeast, but you need to make sure that it isn’t too hot, which will make your yeast inactive. It should feel lukewarm, no more than 90° F (32° C). I recommend using a thermometer before adding the yeast to be sure.

Once it is less then 90° F you can pitch the yeast into the jug.
You don’t need to use the whole package of yeast for one gallon, 1/2 package is enough (it doesn’t have to be an exact measurement). Store the opened yeast package with the remaining yeast in an airtight zip top bag in the refrigerator for later use.

Now the fermentation fun can begin!

Once you’ve pitched the yeast, put the lid back on tightly and this time you’re really going to shake it up for several minutes.
It’s a good workout for your arm muscles, so you can skip the gym on days when you make mead!

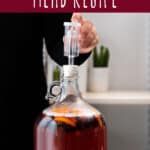
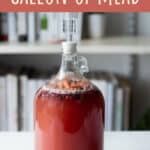
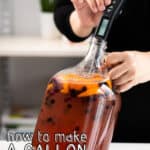
Add the Airlock
Put a little water in the airlock to the line, then put the rubber stopper into the jug.

In a few hours you should start to see bubbles forming in the jug and in the airlock.

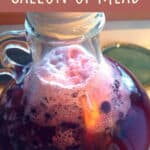
After several hours or overnight, you may see a lot of bubbles rising up the neck of the bottle! The whole top might get a little foamy at first, but things will settle down.
Don’t worry if the bubbles rise up into the airlock for the first couple of days, that just means that you have a very active (and happy) batch of mead! You can periodically remove the airlock to rinse it out, then replace it back into the jug.
I love watching all the little bubbles! Fermentation is so cool.

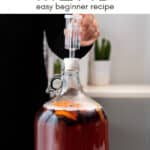
Set Aside to Ferment
Keep the jug in a cool (not cold) dark place out of direct sunlight to ferment.
Mead can take longer to ferment than hard cider or beer, depending on the ambient temperature it will take anywhere from 3-6 weeks.
I usually give it 5-6 weeks before bottling to be on the safe side, as you don’t want any broken bottle explosions! I’ve definitely had some very champagne like mead before.
You want to wait until you don’t see any bubbles in the jug and your airlock is still before bottling.
Bottle the Mead
Bottling one or two gallons of mead is the same process as bottling hard cider. Follow my tutorial there to get a detailed process.
You may want to wait a while to drink your mead as it definitely gets better with age.
I often drink it “green” (young) as I enjoy it either way. It is fun to save a couple of bottles for several months, or even a year, just to see how the taste changes with age.
More Mead Recipes
Now that I’ve shown you how to make this simple one gallon of mead recipe, chances are you will want to make more soon!
I have written posts on How to Make 5 Gallons of Mead and How to Bottle 5 Gallons of Mead if you want to try making a larger batch.
I have one gallon mead recipes for Wildflower Mead, Dandelion Mead, Blackberry Mead, Elderberry Mead, Elderflower Sparkling Mead, and Maple Orange Mead that are all delicious and follow this same basic mead recipe.
See my post on 15 Easy Mead Recipes for Beginners for even more!
If hard cider is your thing, see my posts on brewing hard cider and making hard cider with wild yeast.
Be sure to check out my Simple Mead Making: A Beginner’s Guide to One Gallon Batches eBook for more detailed information on brewing, bottling, and recipe ideas!
Cheers and happy mead making!
Simple One Gallon Mead Recipe
Equipment
Ingredients
- water non-chlorinated or filtered
- 2-3 pounds honey depending on how sweet you want to end product to be.
- berries or fruit of any kind fresh or frozen, about a cup
- 1 orange
- 10 raisins
- 1/2 package champagne yeast or other wine yeast
Instructions
- Sanitize everything that will be used in the brewing process.
- Heat about 1/2 gallon of non chlorinated water in the pot on medium heat. Once it's warm, but not boiling, add the honey and stir it so it all dissolves. Turn off the heat.
- Put the berries or other fruit, orange slices (skin and all), and raisins into the one gallon jug.
- Use the funnel and carefully pour the honey water mixture into the jug.
- Top off the jug with cold (preferably filtered) water, leaving at least 2 inches of head space on top. Put the lid on the jug and gently mix everything around a bit.
- Make sure that the temperature of the must is below 90°F, then add 1/2 packet of champagne yeast. Put the lid back on tightly and this time shake the jug for a minute or two to distribute the yeast.
- Put a little water in the airlock to the line, then put the rubber stopper end into the jug. Put the jug in a dark place. It should start bubbling within 12-24 hours.
- After about 4-6 weeks of fermenting, once all bubbles have stopped rising in the jug and airlock, the mead can be bottled and aged.
Notes
- Please see my Mead Equipment and Ingredients page for a detailed list of what you need to get started.
- Use my tutorial on Bottling Hard Cider to bottle the mead - the process is the same. The flavor of homemade mead will improve after bottling and aging.
- My Simple Mead Making eBook is a helpful resource if you are just getting started with making your own mead.

Can I use a pot with a nonstick lining to heat the honey water or do I need a metal pot?
I would stick to using stainless steel.
OK, I have a question for the author – you state “do not let it boil”. Well, i have used commercial honey AND raw honey. The raw sometimes has bee parts in it. So, I have always boiled it quite well and used a fine-mesh flat strainer (like the japanese restaurants use for frying tempura) to scrape off the foam and bug parts.
Is there a reason that you state “do not boil”?
I don’t recommend to boil the raw honey because there are many benefits and compounds in it that will be diminished by boiling, so I feel that it is an unnecessary step in most cases. You certainly can do so if you like, however.
Do you strain it before you bottle it? If so how.
Thank you.
I love your guides and recipes colleen! I’ve brewed beer before but this is definitely making me consider doing another brew and picking up mead. When I hear ‘mead’ I think of the old lord of the rings type medieval drinks that warriors would drink. This is so interesting though and I really want to try this at home. Thank you for sharing this guide! Very informative with great pictures to boot!
Is there any need to transfer the mead to a secondary bottle? I home brew beer and I’m used to transfering it to a secondary after 7-10 days or once the most active part of the initial fermentation slows down is why I’m asking. What’s the original and final gravity of this recipe? Would I measure the alcohol content the same way as I do my beer using a hydrometer?
This is designed to be a simple mead recipe for beginners, so that’s why there is no transfer into a secondary bottle. You could definitely do that if you’d like, but I’d wait longer than 7-10 days, as the initial fermentation can take several weeks for mead. I don’t know the original and final gravity of this mead (beginners recipe again), but yes, you could measure it just as you would beer using a hydrometer :)
So I found an ageing oak barrel on amazon described as a battle to age alcohol. Would that work or even be perfered over a sort of wine bottle? Let me know (this is my first time ever doing this so I litteraly hate no clue what I’m doing lol) thanks!
-Josh
I’m not sure, as I’ve never used an oak barrel for aging. It would probably impart a very oaky flavor, so if that’s what you’re going for then I don’t see any harm in it.
Hi! Do you not use a hydrometer? Wondering what your SG be at for the maple mead?
I don’t use a hydrometer as I like to keep it as simple as possible :)
I have had my mead from your recipe going for about a week. The air lock is no longer bubbling. Is this ok? Do I let it keep going for the 6 weeks? Also there is some light brown stuff in the bottom of the jug is this ok?
Oh and I love your blog and have made several other recipes already!!
The airlock my have stopped bubbling, but after a week you should still see some bubbles in the jug… unless it’s in a really warm place, then it could be close to done fermenting. But, I would still wait at least 4-6 weeks before bottling. And the brown stuff on the bottom is totally normal!
OK! Thank you for getting back to me :) I will let it wait it out. we can’t wait to try.
Is there a specific purpose for the raisins and the oranges? Or can those be skipped for other fruits? I’ve made plain mead before and didn’t need those so trying to figure out their purpose.
They help to feed the yeast. They are not absolutely necessary, but I feel like they produce a better end product.
Wonderful. Just found your site. I made a gallon of Mead way over a year ago, was in process of packing, moving and just general living, kept forgetting about it. Had to have been sitting a year. I did keep the airlock clean and filled with water.
Just here recently, I was going to toss, thought it was probably bad, but a sniff said GOOD. I then tested it. Such an Incredible taste. I was shocked. Unfortunately I found I can have only a sip of it at a time so my grown son is consumer. We both love Mead. Rationing is now a part of life.
Thanks for sharing. I’m going to make your recipe pretty soon.
Thanks for the recipe. First gallon of plain mead on the go! You really should try beekeeping- it’s great fun and a good supply of honey is easily available. I’m using honey from my first summer harvest.
I’ve brewed beer before- would you prime beer bottles to make a sparkling mead in small quantities?
No, it’s not necessary. Mead will continue to ferment once in the bottles and will almost always produce a sparkling mead – especially if you use the champagne yeast.
Hi Colleen; set up my first batch of mead yesterday, but I’m concerned. Left 2 inches in the bottle, but the airlock looks wrong. There is some fruit in it, blocking the left hand bubble. Might this explode? Is there a way to clear it?
Hi Kate, no need to worry. It probably just bubbled up into the airlock overnight, which is common right after brewing. It won’t explode with an airlock on it. I would take the airlock off, give it a good rinse to clean and dislodge any fruit, then put it back on. Should be good to go after that!
Hahaha! I was afraid it would explode if I took the airlock off! I will do that.
Thank you so much!
Hi, we made the mead and it stopped working last week. We racked it into a new 1 gal. bottle and tasted it. It is very plain in taste. Hint of the berries, good alcohol level but we are thinking we might like it more flavorful and sweeter. Can you advise please? Thanks. Nancy
Hi Nancy! The champagne yeast results in a dry mead, so maybe next time you might want to try a sweet mead yeast. For now, though, I would just let the bottles age a bit, as the mead should become more flavorful with time. I would hesitantly tell you to add a bit of honey and rebottle to increase the sweetness, but that always makes me worried of getting bottle explosions! But you could try it with just a very small amount. Let me know if you have any more questions!
The alternative is to backsweeten. Simply put, backsweetening requires two steps: halting fermentation and adding sugar.
1.Add 1/2 teaspoon of potassium sorbate per gallon of mead/cider and and stir to halt fermentation. Potassium sorbate does not kill yeast, but prevents them from converting anymore sugars into carbon dioxide and alcohol.
2.After at least 24 hours, additional sugar (typically honey) can be added to the mead without the risk of fermentation.
3.The desired sweetness will depend on your personal preference. Add the sugar* of your choosing in small increments, thoroughly stirring, and then testing until the desired sweetness is obtained.
I tried your recipe for my first time making mead. It was so easy! I am 5 days in…and it’s a trip watching that little airlock go. I’m anxious, nervous and excited. I wish the time would go by faster!!!
Very first time making mead. I followed your directions but I missed the part that said to ‘top off the jug with water leaving the 2″ head space’. Will it matter that I didn’t add the extra water? Can I add it now? I saw a picture someone posted on your FB page under the mead conversation and hers looked similar to mine……not filled all the way up. I started it on Sunday. Thanks!!!
Hi Terri! How much air space do you have in the jug? If it were me, I would add the water now to get a better honey to water ratio. It won’t hurt it any to do so, plus it will give you more mead in the end! I saw that photo on FB, too, but it’s hard to say what exactly they were making, they could have been experimenting! Let me know if you have any more questions :)
OH POOOH!!! I just saw this!! LOL!!! I didn’t think my message posted! I didn’t add the extra water. Would you add it now? I’m sure I’ll be making more so lesson learned. It’s been about 18 days…..I have a lot of what I will call residue forming on the bottom, is this right? and the stuff on the top (fruit) is kinda brown and mucky LOL!! I still see an occasional white bubble up from it and my airlock is still bubbling. Just want to make sure this is what it should look like? I have to ask where you are from? I saw you say you were heading out to look for mushrooms in Oregon? I am in Washington.
I think adding the water now will still be just fine. The residue at the bottom is normal, and so is the browning fruit. I’m in southern Oregon :)
Would I stir it all at or just pour it in and re-cork?? Thanks for the info :)
You could give it a bit of a stir to combine, but don’t shake it or go too crazy with it as it will likely bubble up quite a bit!
Hi, I’m starting my very first batch today with your recipe. Thanks you!
I’m following it exactly as I am completely new to brewing but was wondering if the fruits are mandatory and why. Is it “only” for taste? Would I get mead as easily by using only honey, water and yeast?
No, the fruit is not mandatory at all, it’s just for flavor. You can certainly make it with only honey, water, and yeast!
My first batch of mead is going well so I made another. 1 gallon of elderberry mead. Followed the same recipe but used elderberries not black berries. I have a few little bubbles around the floating fruit but no foam and no gas going through the air lock. It’s 48 hours. I’m wondering if it’s a loss or is there something I can do. ? Thanks.
Hmm, it’s not likely a total loss, but it’s a possibility that the yeast was no good. I would try adding a little more champagne yeast, from a new packet.
It’s been two weeks and all my fruits are still on top. Do I need to stir it ?
Nope, most of the fruit will likely stay at the top for the entire fermentation :)
can you leave the mead in your fermenter longer than 6 weeks
Yes, and if it’s cold out you might need to. I’ve had mead take closer to 8 weeks to finish fermenting on occasion. If it’s finished fermenting, though, you will want to bottle it as soon as you can, but an extra week or two in the fermenter won’t hurt.
I was wondering if distilling the mead once finished, would not only turn out a much higher alcohol percentage , but would it still taste drier or sweeter to your taste and honey amount used during the process before distilling … and would distilling it change it from mead to another type or style of alcohol ?
I do not know a whole lot about distilling, so I can’t really answer your questions. I’m sure it would result in a much higher alcohol percentage, though!
DO NOT FORGET TO RACK!!!! EVERY WEEK YOU NEED TO RACK!!! Otherwise you end up with lovely dead yeast flavor. Take it from someone who has been brewing for nearly ten years.
I will occasionally rack once, but in general I don’t feel that it’s a necessary step, especially for beginners. My mead always turns out quite tasty!
Two liter pop bottles also work, just use 2, or halve the recipe. No airlock? Put on a big balloon. You can release the air if it gets too full.
Hi Colleen, I posted two weeks ago about a gallon of mead I started. It was bubbling over like crazy. I rinsed the airlock like you said and let it do its thing. Now my question is, is it possible it is ready after just 2 weeks? I started it two weeks ago today and it has no more action in the jar or the airlock. Should I wait another 2 weeks or bottle it?
Hi Lisa, I’m guessing that you’re in a fairly warm climate for it to be done that quickly, or that you used less than 3 pounds of honey (or both). I would give it another week at least before bottling, because mead is tricky and will often still be fermenting very slowly without any outward signs. I’ve had a couple of explosive bottles in the past when I’ve bottled too quickly! There’s no harm in waiting just to be sure :)
Yes, we have been in a heat wave and I used 2 pounds of honey. I was just worried that it may go too long. Since there is no harm in waiting, I think I will go the full 4 weeks. Thank you!
I started a gallon of mead yesterday following your recipe. I left 2 inches head space and it is bubbling out the top. Should I leave it or pour some off?
Sometimes it does bubble out the top, but it usually dies down within a day, so I often just leave it. If it’s really going crazy you can pour a bit off. Also, you may need to rinse out and replace the airlock a couple of times until it dies down. Yay for happy yeast!
Going to start mine tomorrow. I have cinnamon honey, do you think that could hindrance any of the fermenting?
My buddy is super excited as it should be ready by around his sons birthday and its my little gift to him, my buddy not his son LOL
I’ve never tried it with cinnamon honey, but if all that is in it is just honey and cinnamon (no weird ingredients of any kind), I don’t see why it would be an issue.
Question, the jug I got is not a 1 gallon jug, apparently they gave me a 5 gallon jug by mistake (friend borrowed me it) can i make the same recipe or will all that extra room in the jug not be ok? Could I just add more water? I don’t have anymore unpasteurized honey, just 2.5lbs.
I LOVE mead and just found your post yesterday. What is the best yeast to use to make a nice really sweet mead? I have already ordered the supplies from Amazon! This will be my first attempt at anything like this so wish me luck!
Do I need to do anything to it when i bottle it to get carbonation?
Mead will continue to ferment once bottled, so as long as you have it in something that’s airtight (such as one with a swing top lid) it should be carbonated. Just be careful as I’ve had a few batches be rather explosive when opening (like champagne). It all depends on how many sugars are left when bottling.
Does the alcohol increase the longer the initial ferment? I’m aiming for very dry very hard mead :) Our local beer making store told me the more sweeter you add, the dryer and more alcoholic the final result (because the yeast multiply as long as there is food to eat). I’m wondering if beer and mead differ in that way though. I have 5 gallons of the maple mead fermenting right now, we’ll see in 6 weeks!
hi I have fermented this way before and it is a lot of fun. I guess I am wondering what you feel is the best way to get the oranges and pulp out of the jugs. When I ferment all of these items swell and I have a little project on my hands getting everything out and clean. What would you suggest?
Well, I try to cut the orange slices on the thinner side from the get go. Then, when fermentation is done, I turn the jugs upside down over the sink and fish the oranges and any other fruit out with my fingers or a chopstick. They usually come out fairly easily for me. As far as cleaning goes, a bottle brush is a must have!
Hi there! love the simplicity of the recipe!
I have a few questions that i hope can be answered, as i want a great batch done for the battle of hastings this year ( i do viking reenactment), and this is my first time brewing =)
I have provided an image of the fermenting barrel i’m using. the top marking says 23 litres (which is just over 5 gallons right?). The airlock is also (for some reason) stuffed with cling film. It was like this when i got it off a friend, is that needed?
I’m aiming to replicate something really REALLY sweet. Like danish dark honey mead. Minimum throat hit but strong honey taste. so i made a complete utter guess at 20 pounds of honey for 5 gallons. Would you reccomend this for a very sweet brew?.
A friend also recommended i add tea to the mix, as he says it makes it smoother. (don;t know though)
And finally is fruit needed if i just want it honey flavoured and sweet?.
Thanks for taking the time to read this.
Hi Sean, I don’t see the picture of the barrel, but that’s ok. The cling film is not needed in the airlock, not sure why that’s there, but I would take it off. 20 pounds of honey sounds good for a 5 gallon batch of sweeter brew, and I would also use a sweet mead/wine yeast, not the champagne yeast that I recommend in this post. There are many varieties to choose from, but I don’t have any experience with them because I always make my mead dry, so I can’t recommend a particular one. I’ve added tea before with good results, the tannins are supposed to be good for the yeast. Fruit is not needed at all! In fact, mead with fruit is actually called “melomel”, and made with straight honey is true “mead”. Good luck, and please let me know if you have any more questions and how it turns out!
thanks for the information! I’ve obtained some basic off the shelf yeast thats used in bread making. not sure how that will turn out. I will definitely let you know =)
Hello, I read your comment with interest, could you say yet how did it go with the “off the shelf” yeast?
Regards
its week three so far, and my bubbling has slowed to 1 minute and 10 second intervals, i’m considering racking on friday =)
As for the taste, i have no idea so far.
I will post the alcohol percentage and taste informtation once i sample it, for those who aren’t sure what i used, here is a basic list.
23 Litres (5 gallons) of water.
20 Pounds of honey.
1 packet of allisons bread yeast.
5 teaspoons of yeast nutrient.
Patience.
Sitting watching the bubbling like an expectant parent.
Where did you get the honey from if you don’t mind me asking? Just did my 1st 1 gallon batch and cheapest honey I could source was £16 for 1.4kg on ebay(raw wildflower honey)
Plan to scale it up after this batch but want to find the best place to get large quantities of honey without starving the family haha.
I usually get my honey from a local source, so it’s not cheap, but it is high quality!
What should I do if I’m three weeks into fermenting and just realized I used three pounds of honey for two gallons (forgot to double it like a moron) any way to sweeten it up?
Well, you could just leave it, but it will likely be *really* dry, especially if you used champagne yeast. I tend to like my mead on the dry side, so I often only use 2 pounds of honey per gallon. You could just ride it out and see how it turns out. There’s definitely no harm in adding more honey now, but that might be complicated if your jugs are already full. You may need to get a third vessel if that’s what you want to do. It may be worthwhile at this point to just get a larger fermenting bucket, like I use in my How to Make 5 Gallons of Mead post, transfer everything into there with more honey. And if you’re doing that, you might as well make 5 gallons! The only thing I would advise against is adding more honey right before bottling, as that could cause bottle explosions.