
This is an exciting recipe for me to share because it is something that I accidentally stumbled upon two years ago due to a fermenting mishap. I love it when I have the ability to turn mistakes into something useful, and this turned out so good that I actually want to make it every year! Now I want to share it with you, so here is how to make hard apple cider jelly, with a brief tutorial on water bath canning.
 hard cider into jelly! This seasonal fall recipe is a delicious holiday treat or homemade real food gift for friends, neighbors, and loved ones. This apple cider jelly is straightforward and easy to make, but I'll take you through it step by step including a simple tutorial on water bath canning. Let's make some homemade cider jelly! #jelly #applecider #jam #canning #preserving #foodgift #homemadegift #fall #realfood")
Want to save this post for later?
Here’s what happened two years ago: I decided to make a batch of hard cider, like I usually do in the fall, but I made the mistake of buying apple cider that had a preservative in it. This inhibited the fermentation process and I ended up with a bunch of partially fermented, very sugary apple cider. I tried several things to remedy the situation, like adding more yeast which helped a little, but in the end it was still way to sweet to drink. I didn’t want to throw away the cider, so I started doing some research on what I could do with it. I found a recipe for Hard Apple Cider Jelly on the Hitchhiking to Heaven blog, and that sounded very interesting to me. I had a water bath canner, but had never used it, so it was a chance for me to try my luck in more ways than one. Thankfully I had beginners luck because it turned out to be a success!
You will first need to acquire some hard apple cider for this recipe. I like to brew my own, but you can also use store bought if you must.
 hard cider into jelly! This seasonal fall recipe is a delicious holiday treat or homemade real food gift for friends, neighbors, and loved ones. This apple cider jelly is straightforward and easy to make, but I'll take you through it step by step including a simple tutorial on water bath canning. Let's make some homemade cider jelly! #jelly #applecider #jam #canning #preserving #foodgift #homemadegift #fall #realfood")
Hard Cider Jelly Ingredients
Here is what you will need to make 6 half pint jars (recipe adapted from Hitchhiking to Heaven):
- 4 ½ cups hard apple cider
- 3 Tbsp lemon juice (fresh or bottled)
- 3 cups sugar
- 4 ½ Tbsp low sugar pectin (I used Ball brand)
Because I’m sure some of you are new to canning, I will include some details on that process to make it easier for you. You will need a water bath canner for this, and I suggest that you buy a big one that comes with all the handy little canning tools like this one from Granite Ware. It’s cheap enough and most of the tools are actually pretty helpful. I recommend buying a large one because you just might get addicted to water bath canning like I did, and will most likely want to can all the things.
 hard cider into jelly! This seasonal fall recipe is a delicious holiday treat or homemade real food gift for friends, neighbors, and loved ones. This apple cider jelly is straightforward and easy to make, but I'll take you through it step by step including a simple tutorial on water bath canning. Let's make some homemade cider jelly! #jelly #applecider #jam #canning #preserving #foodgift #homemadegift #fall #realfood")
I’m not sure of the technical names for these tools, but here they are from left to right: measuring tool, magnetic lid lifter, wide mouth funnel, and jar lifter. Your canner should also come with a rack that keeps the jars off the bottom of the pot.
The first step in any water bath canning process is to sterilize your jars and heat your lids. You will need half pint (8 ounce) jars for this recipe, you can use either regular or the fancy jelly kind. Put six jars on the rack in your canner and fill with water until the jars are full and just barely covered with water.
 hard cider into jelly! This seasonal fall recipe is a delicious holiday treat or homemade real food gift for friends, neighbors, and loved ones. This apple cider jelly is straightforward and easy to make, but I'll take you through it step by step including a simple tutorial on water bath canning. Let's make some homemade cider jelly! #jelly #applecider #jam #canning #preserving #foodgift #homemadegift #fall #realfood")
Cover and bring to a boil, then you can turn off the heat. Meanwhile, put the lids into a pot, cover them with water, and heat over medium heat. Don’t let the water boil as it can mess up the seals, you just want them to be warmed up. Set the bands (metal rings) aside for now.
 hard cider into jelly! This seasonal fall recipe is a delicious holiday treat or homemade real food gift for friends, neighbors, and loved ones. This apple cider jelly is straightforward and easy to make, but I'll take you through it step by step including a simple tutorial on water bath canning. Let's make some homemade cider jelly! #jelly #applecider #jam #canning #preserving #foodgift #homemadegift #fall #realfood")
Hard Cider Jelly Recipe
Once you have your jars sterilized and lids heating you can go ahead and start your jelly making. First put the hard cider and lemon juice into a pot and bring to a boil over high heat. Measure the 3 cups of sugar into a bowl, then take out ¼ cup and mix it well with the pectin in another small bowl (make sure this mixture stays very dry). When the cider comes to a full rolling boil, stir in the pectin/sugar mixture and bring it back to a full rolling boil while stirring constantly.
 hard cider into jelly! This seasonal fall recipe is a delicious holiday treat or homemade real food gift for friends, neighbors, and loved ones. This apple cider jelly is straightforward and easy to make, but I'll take you through it step by step including a simple tutorial on water bath canning. Let's make some homemade cider jelly! #jelly #applecider #jam #canning #preserving #foodgift #homemadegift #fall #realfood")
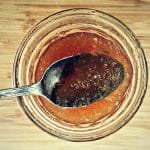
When it gets to the point of boiling hard and you can’t stir it down, then add the rest of the sugar. Stir constantly and bring it back to a full, hard rolling boil. Boil for exactly one minute, then take off the heat. Use your jar lifter to pull the hot, sterilized jars out of the water one at a time, pouring the water from each jar back into the canner. Place the jars onto a towel on the counter, hopefully somewhere close to your canning operation. Use the funnel to fill the jars with the hot jelly mixture.
 hard cider into jelly! This seasonal fall recipe is a delicious holiday treat or homemade real food gift for friends, neighbors, and loved ones. This apple cider jelly is straightforward and easy to make, but I'll take you through it step by step including a simple tutorial on water bath canning. Let's make some homemade cider jelly! #jelly #applecider #jam #canning #preserving #foodgift #homemadegift #fall #realfood")
Leave a ¼ inch of head space, which you can measure with your handy measuring tool. Different types of food require different amounts of head space.
 hard cider into jelly! This seasonal fall recipe is a delicious holiday treat or homemade real food gift for friends, neighbors, and loved ones. This apple cider jelly is straightforward and easy to make, but I'll take you through it step by step including a simple tutorial on water bath canning. Let's make some homemade cider jelly! #jelly #applecider #jam #canning #preserving #foodgift #homemadegift #fall #realfood")
Then use your nifty magnetic stick to pick up each lid and carefully place them on each jar.
 hard cider into jelly! This seasonal fall recipe is a delicious holiday treat or homemade real food gift for friends, neighbors, and loved ones. This apple cider jelly is straightforward and easy to make, but I'll take you through it step by step including a simple tutorial on water bath canning. Let's make some homemade cider jelly! #jelly #applecider #jam #canning #preserving #foodgift #homemadegift #fall #realfood")
Screw the bands on until they are finger-tip tight, meaning tight to your hand, but not overly tight.
 hard cider into jelly! This seasonal fall recipe is a delicious holiday treat or homemade real food gift for friends, neighbors, and loved ones. This apple cider jelly is straightforward and easy to make, but I'll take you through it step by step including a simple tutorial on water bath canning. Let's make some homemade cider jelly! #jelly #applecider #jam #canning #preserving #foodgift #homemadegift #fall #realfood")
Use the jar lifter to put the filled jars back in the canner.
 hard cider into jelly! This seasonal fall recipe is a delicious holiday treat or homemade real food gift for friends, neighbors, and loved ones. This apple cider jelly is straightforward and easy to make, but I'll take you through it step by step including a simple tutorial on water bath canning. Let's make some homemade cider jelly! #jelly #applecider #jam #canning #preserving #foodgift #homemadegift #fall #realfood")
Once they are all in, make sure the water covers the jars by about an inch or so. If not, add more water until it does. Then cover the canner and bring the water back to a boil. Once it’s at a full rolling boil, start a timer for 5 minutes if you’re at 1000 feet or less elevation. Add a minute for every 1000 feet elevation after that. We’re at 2000 feet elevation so I did 6 minutes. Then take the canner off the heat, uncover and just let it sit for a few minutes to cool. Use your jar lifter to pull the the jars out of the canner. Don’t tilt them to drain the water off the top of the lids, just lift them straight out and put them back on the towel to cool.
 hard cider into jelly! This seasonal fall recipe is a delicious holiday treat or homemade real food gift for friends, neighbors, and loved ones. This apple cider jelly is straightforward and easy to make, but I'll take you through it step by step including a simple tutorial on water bath canning. Let's make some homemade cider jelly! #jelly #applecider #jam #canning #preserving #foodgift #homemadegift #fall #realfood")
As the water evaporates from the top of the jars they will seal and you will hear the characteristic “ping” sound. All of mine “pinged” right away as I pulled them out, except for one which waited for a minute or so. Don’t worry if you hear it right away or not, sometimes it takes hours. Just check them the next day to see if any of the lids has any give – if none of them do you can put them all in your pantry. If one didn’t seal for whatever reason it’s no big deal, it just means you need to put that one in your fridge and eat it immediately.
 hard cider into jelly! This seasonal fall recipe is a delicious holiday treat or homemade real food gift for friends, neighbors, and loved ones. This apple cider jelly is straightforward and easy to make, but I'll take you through it step by step including a simple tutorial on water bath canning. Let's make some homemade cider jelly! #jelly #applecider #jam #canning #preserving #foodgift #homemadegift #fall #realfood")
Which shouldn’t be a problem because this jelly is seriously delicious! It’s great on homemade sourdough toast with butter, or on a PB&J.
 hard cider into jelly! This seasonal fall recipe is a delicious holiday treat or homemade real food gift for friends, neighbors, and loved ones. This apple cider jelly is straightforward and easy to make, but I'll take you through it step by step including a simple tutorial on water bath canning. Let's make some homemade cider jelly! #jelly #applecider #jam #canning #preserving #foodgift #homemadegift #fall #realfood")
But, it’s even better as part of a happy hour appetizer plate. It goes especially well with chevre or other soft cheeses. It has such a unique but tasty flavor, you really have to try it! It’s particularly good for the holiday season, and it also makes a great homemade gift. I think you’ll enjoy it just as much as homemade apple butter!
I hope this recipe inspires you to make your own jelly, or if nothing else to help you get started with water bath canning. It really is quite easy even though there are several important steps to follow. To me it’s so fun and empowering to be putting up food, especially if it’s food that you have grown or made yourself. Now it’s hard apple cider jelly time!
Have more autumn apples to preserve?
- 12 Ways to Preserve Apples
- Grandma’s Apple Cinnamon Cake
- Homemade Spiced Apple Butter with Maple Syrup
- Mulled Wine with Whole Spices
- No Sugar Apple Jelly: Canning Recipe
- Freezer Apple Pie Filling
- Apple Ginger Kombucha
- Chunky Applesauce with Spices
Hard Apple Cider Jelly
Equipment
Ingredients
- 4 ½ cups hard cider
- 3 Tablespoons lemon juice, fresh or bottled
- 3 cups sugar
- 4 ½ Tablespoons low sugar pectin I used Ball brand
Instructions
- First put the hard cider and lemon juice into a pot and bring to a boil over high heat.
- Measure the 3 cups of sugar into a bowl, then take out 1/4 cup and mix it well with the pectin in another small bowl (make sure this mixture stays very dry).
- When the cider comes to a full rolling boil, stir in the pectin/sugar mixture and bring it back to a full rolling boil while stirring constantly.
- When it gets to the point of boiling hard and you can’t stir it down, then add the rest of the sugar. Stir constantly and bring it back to a full, hard rolling boil.
- Boil for exactly one minute, then take off the heat.
- Use the funnel to fill sterilized jelly jars with the hot mixture.
- Leave a ¼ inch of head space. Wipe the rims and lids with a clean cloth and top with a ring and lid.
- Process in a waterbath canner for 5 minutes.
Notes
- After you remove the jars from the canner, allow them to rest, undisturbed for 24 hours.
Nutrition

what i’m really after is a hot pepper jelly. in the past I have made it with crabapples, but my access to that tree is gone. so I will try this it sounds good as my base.
How firm is this jelly?
Semi firm, you could use more pectin if you’d like it to be firmer.
Cool! And how long does it generally take to firm up? I just made mine about an hour ago.
Gaffs that turn into family favorites are my favorite!